Pattern Description:
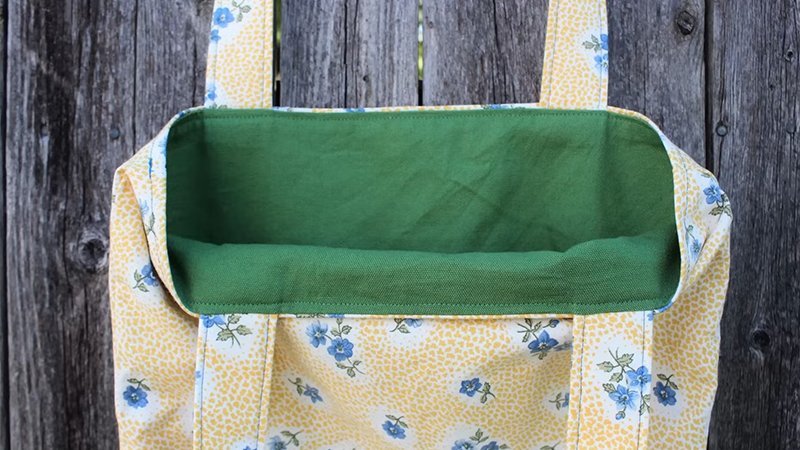
This is an easy, fast, and fun reversible tote bag designed for beginners, perfect for holding Halloween candy.
It requires less than one yard of total fabric, features only straight seams, and results in a finished bag approximately 12” tall by 13” wide (excluding handles). It can also be adapted as a book bag, shopping bag, or craft bag for year-round use.
Materials Needed & Measurements:
The finished Halloween Treat Bag dimensions are approximately 12” tall and 13” wide, not including the handles.
Materials Needed:
- Fabric: The project works best with cotton quilting fabric.
- 1/2 yard of cotton fabric for the bag exterior.
- 1/2 yard of cotton fabric for the bag lining.
- Optional: Two 4” \times 14” pieces of a different fabric for the handles, or scraps from the exterior/lining fabric.
- Thread: Polyester thread is a good choice because it is strong and has a slight stretch.
- Optional Stabilizer: Medium-weight woven interfacing (SF101 from Pellon) can be used if desired, but no stabilizer was used in the original pattern to keep it fast and easy.
- Tools:
- A sewing machine.
- Sewing pins.
- A fabric marking pen or pencil.
- Cutting tools: scissors, rotary cutter, acrylic ruler, and cutting mat.
Cutting Measurements:
No templates are needed; just measuring and cutting tools. From cotton fabric, cut the following pieces:
- Two squares 14” \times 14” for the bag exterior.
- Two squares 14” \times 14” for the bag lining.
- Two rectangles 4” \times 14” for the handles.
Additionally, a 1 2” square must be marked and cut out from the bottom corner of both the exterior and lining pieces (cutting through both layers of each set of squares).
The standard seam allowance used for sewing the bag pieces together is 3/8”, unless otherwise specified.
Instructions for Making the Easy Bag with 1 Yard of Quilting Cotton Pattern:
Constructing the Handles
The handle pieces are the two 4” \times 14” fabric strips.
- Take each strip and fold it in half lengthwise, ensuring wrong sides are together, and press.
- Open the strip and then fold the long raw edges toward the center fold line and press again.
- Fold the strip in half once more and press, creating two finished 1” \times 14” strips.
- Topstitch along both long edges of the resulting strips, sewing about 1/8” from the sides. Set the handles aside temporarily.
Sewing the Exterior and Lining Bag Sections
The standard seam allowance used throughout the construction of the bag pieces is 3/8”, unless specified otherwise. Beginners may find it easy to sew a straight seam by aligning the raw edges of the fabric with the edge of the sewing machine foot, as this distance often equals 3/8”.
- Pin the two exterior pieces together along the side edges and the bottom edge. Sew these pinned edges using a 3/8” seam allowance, and then press the seams open.
- Pin the two lining pieces together in the same manner (side and bottom edges). Sew these edges together, but make sure to leave a 4” opening along the bottom edge for later turning. Press the seams open.
Boxing the Corners
With the exterior bag still inside out, the cut-out corners need to be sewn to create a flat bottom.
- Flatten the corner opening so that the side seam aligns precisely with the bottom seam, forming a straight line. Pin the aligned edges together.
- Sew across this corner seam. Repeat this process to sew the opposite corner of the exterior bag, and then repeat the entire process to sew both corners of the lining bag.
Attaching the Handles and Finishing the Bag
- Turn the exterior bag piece right side out. Use a fabric marking tool to mark two points 4” in from each side seam along the top raw edge of the exterior piece. Repeat this marking process on the reverse side of the bag.
- Pin the ends of one finished handle to the bag exterior, centering the handle over the marks. The raw edges of the handle should line up with the top raw edge of the bag exterior.
- Sew across the ends of the handle, 1/4” from the top edge of the bag. Repeat to sew the second handle to the opposite side.
- The exterior bag should now be right side out, and the lining bag should remain inside out. Place the exterior bag inside the lining bag. Line up and pin all of the raw edges at the top of the bag together, ensuring the side seams match.
- Sew around the entire top edge of the bag using a 3/8” seam allowance.
- Reach into the 4” opening left in the lining bottom and use it to turn the entire bag right side out. Separate the bag exterior and the lining and press the seam that joins them flat to prepare for a neat top edge.
- Tuck the raw edges of the opening inward and sew the opening closed, either by hand or machine, sewing close to the edge.
- Push the lining inside the bag and press carefully, paying attention to the top edge to ensure the seam is pressed right along the edge.
- To finish, topstitch around the top edge of the entire bag, 1/4” from the edge.