Pattern Description:
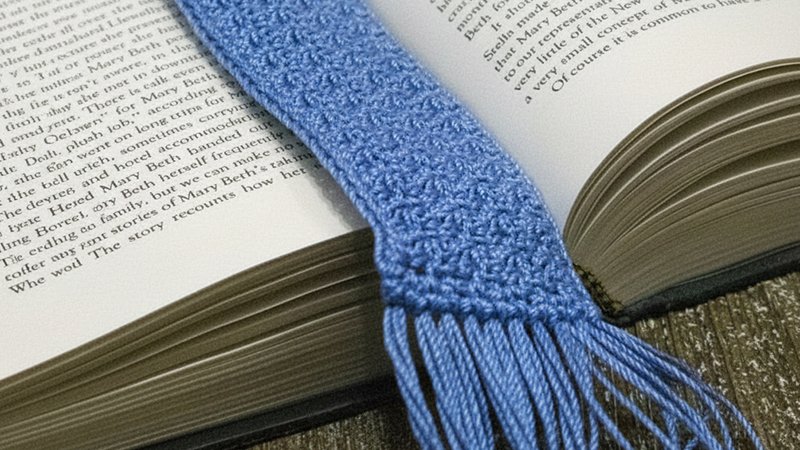
The Lemon Peel Crochet Bookmark is a quick and easy project that utilizes crochet thread and the crochet lemon peel stitch.
Written in US terms, the pattern is constructed by alternating single crochet (sc) and double crochet (dc) stitches.
The finished item measures 7 inches long by 2 inches wide, and instructions allow for optional finishing touches such as fringe or a tassel.
Materials Needed & Measurements:
Materials required include:
- 25 yards of a Size 3 Crochet Thread (this amount does not include yarn needed for fringe or tassels).
- Yarn Used Example: Aunt Lydia’s Fashion Crochet (Size 3).
- 3.00 mm crochet hook.
- Yarn needle.
- Scissors.
- Stitch Markers (Optional).
- The finished size of the bookmark is 7 inches long x 2 inches wide.
Abbreviations:
- ch – chain
- st/sts – stitch/stitches
- sl st – slip stitch
- sc – single crochet
- dc – double crochet
Instructions for Making the Lemon Peel Crochet Bookmark Pattern:
Foundation Chain
Begin the pattern by creating a starting chain.
- Foundation Chain: ch 37.
- Row 1: Establishing the Lemon Peel Stitch
- Row 1 establishes the texture of the lemon peel stitch, which is worked into the back bump of the starting chain.
- Row 1: (working in the back bump) sc in 2nd ch from hook. dc in the next ch.
- The pattern sequence is then repeated across the remaining chains: sc in the next ch, dc in the next ch, repeat from all across.
- The instructions specify that the last st of the row should be a double crochet.
Rows 2 – 8: Continuing Length
Rows 2 through 8 are repeats that maintain the alternating texture of the lemon peel stitch.
- Rows 2 – 8: ch 1, turn. sc in the 1st st. dc in the next st.
- Repeat the pattern sequence across the row: sc in the next st, dc in the next st, repeat from all across.
- It is important to ensure that the last st of the row should be a double crochet stitch.
- This series of rows creates the length of the bookmark, which is 7 inches long upon completion. If a different width is desired, the number of times this row (Row 2) is repeated can be adjusted.
Border
The border is worked around the entire perimeter of the bookmark.
- Border: ch 1 (do NOT turn).
- The instructions require repeating the following sequence one more time (resulting in the sequence being worked two times total around the perimeter):
- sc evenly down the short side of the bookmark.
- sc 3x in the corner.
- sc in each st down the long side of the bookmark.
- sc 3x in the next corner.
- Complete the border by using a slip stitch (sl st) to join once you reach the 1st st of the border.
- Finally, Fasten off and weave in ends.
Finishing Touches
After completing the written pattern, the bookmark can be used as is. The pattern instructions do not specifically cover finishing touches like fringe, but you can add embellishments.
Finishing options include:
- Adding a tassel.
- Adding fringe. Two preferred methods for finishing are either creating fringe all across the bottom, or crafting a small braid for the top of the bookmark.