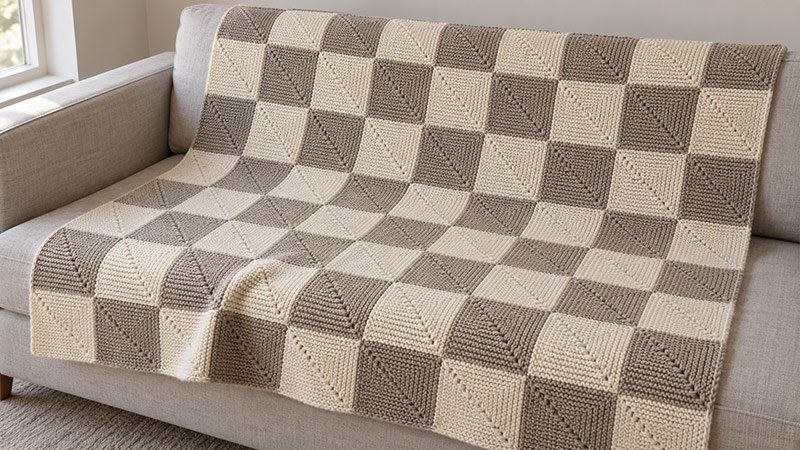
This knit blanket is made from small squares with a neat line through the centre. Each square starts with two edges on the needle.
A decrease draws those edges in until one stitch is left. Knit each square on its own, then sew the squares into rows.
Use one shade, a few soft tones, or scraps of the same yarn weight. The garter stitch gives both sides a firm feel. Make a test square first to check the size and fit.
Materials
- Use about 2,800–3,200 yards of worsted-weight yarn for the size below. Your gauge and yarn choice may change how much you need.
- Choose one colour or a few shades. Keep all yarn the same weight.
- One stitch marker you can remove.
- A blunt yarn needle to sew seams and weave in ends.
- Scissors.
- A tape measure.
- Blocking mats and pins, if needed.
For a closer yarn estimate, weigh your finished test square. Multiply that weight by 80. Then add about 10% for seams and spare yarn.
Size of My Mitred Square Blanket
The planned blanket measures approximately 48 × 60 inches, without a border.
- Each square: approximately 6 × 6 inches.
- Layout: 8 squares across × 10 squares down.
- Total: 80 squares.
- Gauge: 20 sts and 40 rows = 4 inches in garter stitch, measured after washing and drying flat.
Check both stitch and row gauge. If your square has unequal sides, adjust your tension or needle size before making the rest.
Needles
Use US 8 / 5 mm knitting needles, or the size needed to match the gauge.
Straight needles or a circular needle worked back and forth will both work.
Abbreviations
- CO: Cast on.
- k: Knit.
- st / sts: Stitch / stitches.
- RS: Right side.
- WS: Wrong side.
- CDD: Centred double decrease.
- rep: Repeat.
CDD: Slip the next 2 sts together knitwise, as though you were about to knit them together. Knit the next st. Pass both slipped sts over the knit st and off the needle. This turns 3 sts into 1 and removes 2 sts.
How I Knit My Mitred Square Blanket:
1. Make a Test Square
CO 61 sts using a relaxed long-tail cast-on. Do not pull the edge tight.
Row 1 — WS: K all 61 sts. Turn.
Row 2 — RS: K30, CDD, k28. Turn. 59 sts remain.
The decrease uses stitches 31–33 of the original row. This places the shaping just beyond the midpoint of the cast-on edge and helps the two cast-on sides form the square.
Mark the RS with a removable marker.
2. Shape the Square
Row 3 — WS: K all sts. Turn.
Row 4 — RS: K29, CDD, k27. Turn. 57 sts remain.
Continue as follows:
- On each WS row, k all sts.
- On each RS row, knit 1 fewer st before and after the CDD than on the previous RS row.
- Work every CDD into the same central group of 3 sts.
- Each decrease row removes 2 sts.
The next RS rows are:
- Row 6: K28, CDD, k26. 55 sts.
- Row 8: K27, CDD, k25. 53 sts.
- Row 10: K26, CDD, k24. 51 sts.
Continue until 5 sts remain.
3. Finish the Square
With 5 sts on the needle:
- Knit the WS row. Turn.
- Next RS row: K2, CDD. 3 sts remain. Turn.
- Knit the WS row. Turn.
- Final RS row: CDD. 1 st remains.
- Cut the yarn, leaving an 8-inch tail.
- Pull the tail through the last st and draw it snug.
The square has 30 decrease rows and 60 rows in total.
4. Check the Size
Wash the test square as directed on the yarn label. Lay it flat and gently shape it into a square.
Let it dry, then measure it. Aim for 6 inches along each side.
- If it is too large, try smaller needles.
- If it is too small, try larger needles.
- If the sides differ, check your gauge and keep each CDD loose enough to sit flat.
5. Knit the Remaining Squares
Make 79 more squares in the same way.
For a simple two-colour layout:
- Make 40 squares in Colour A.
- Make 40 squares in Colour B.
- Alternate the colours across each row.
- Start the next row with the other colour.
For stripes across a square, change yarn at the start of an RS row. Leave tails long enough to weave in. Avoid knots within the fabric.
6. Block the Squares
- Weave in the colour-change tails.
- Wash or dampen the squares as the yarn label allows.
- Shape each one to 6 × 6 inches.
- Let all squares dry fully before joining.
Do not stretch the squares hard to reach the planned size.
7. Plan the Layout
Lay out 10 rows of 8 squares.
Keep the decrease lines facing the same way for a uniform layout. You can also rotate groups of four squares to form larger shapes.
Take a photo of the layout to help keep the order as you sew.
8. Join the Squares into Rows
Use matching yarn and a blunt yarn needle.
- Place two squares side by side with the RS facing up.
- Pass the needle under an edge loop on the first square.
- Pass it under the matching edge loop on the second square.
- Rep along the edge, matching garter ridges as you work.
- Draw the yarn gently so the edges meet.
- Keep the seam loose enough to lie flat.
Join all 8 squares in each row.
9. Join the Rows
Sew the 10 rows together using the same seam.
Match each square corner to the corner beside it. Secure the yarn at each junction without pulling the fabric tight.
10. Finish the Blanket
Weave in all loose ends. Wash the blanket as directed on the yarn label, then lay it flat to dry.
Smooth the seams and corners by hand. The garter stitch edges can be left plain, so no border is needed.