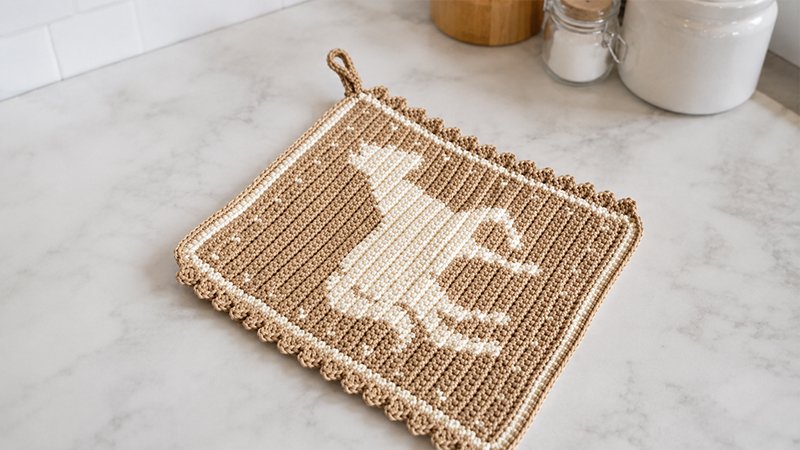
This hot pad features an elegant horse silhouette created using flat tapestry crochet. By carrying two contrasting yarn colors at the same time, you create a thick, dense fabric that protects hands and countertops from heat. The design is finished with a textured, decorative border and an integrated hanging loop.
Project Specs
-
Hook Size: 3.0 mm (UK size 11)
-
Yarn: DK weight (Category 3, light) 100% cotton yarn.
-
Color A (Main): ~62 yards (56 meters)
-
Color B (Contrast): ~39 yards (35 meters)
-
-
Finished Size: 6.7” x 7.3” (17 cm x 18.5 cm)
-
Gauge: 28 single crochets and 26 rows = 4” (10 cm) square in tapestry stitch.
Abbreviations (US Terms)
-
ch: Chain
-
sc: Single crochet
-
hdc: Half double crochet
-
sl st: Slip stitch
-
st(s): Stitch(es)
-
RS / WS: Right side / Wrong side
Technique Notes
-
Tapestry Crochet: Carry the yarn color you aren’t using along the top of the row, working your current stitches right over it to trap it inside.
-
Color Changes: To change colors cleanly, drop your current color just before the final pull-through of the stitch. Pick up the new color and complete the stitch with it.
-
Row Structure: Turn your work at the end of every row. The turning chain-1 counts as your first stitch and always uses Color A. The main body maintains a consistent 45-stitch count per row.
Main Body Pattern
With Color A, ch 46.
-
Row 1 [RS]: Sc into the second ch from your hook and into each remaining ch across. (45 sts)
-
Row 2 [WS]: With A, sc 45.
-
Row 3 [RS]: With A: 2, With B: 1, (With A: 4, With B: 1) 8 times, With A: 2.
-
Row 4 [WS] to Row 5 [RS]: With A, sc 45.
-
Row 6 [WS]: A: 12, B: 2, A: 31.
-
Row 7 [RS]: A: 15, B: 2, A: 9, B: 2, A: 3, B: 2, A: 12.
-
Row 8 [WS]: A: 2, B: 1, A: 8, B: 2, A: 4, B: 2, A: 9, B: 2, A: 12, B: 1, A: 2.
-
Row 9 [RS]: A: 16, B: 2, A: 9, B: 2, A: 4, B: 1, A: 11.
-
Row 10 [WS]: A: 10, B: 2, A: 4, B: 1, A: 10, B: 2, A: 16.
-
Row 11 [RS]: A: 12, B: 2, A: 3, B: 1, A: 10, B: 2, A: 3, B: 2, A: 10.
-
Row 12 [WS]: A: 9, B: 3, A: 2, B: 2, A: 11, B: 1, A: 3, B: 3, A: 11.
-
Row 13 [RS]: A: 2, B: 1, A: 7, B: 2, A: 5, B: 2, A: 10, B: 2, A: 2, B: 3, A: 6, B: 1, A: 2.
-
Row 14 [WS]: A: 10, B: 3, A: 1, B: 2, A: 10, B: 2, A: 6, B: 2, A: 9.
-
Row 15 [RS]: A: 8, B: 2, A: 7, B: 2, A: 9, B: 6, A: 2, B: 4, A: 5.
-
Row 16 [WS]: A: 7, B: 3, A: 1, B: 6, A: 8, B: 3, A: 6, B: 3, A: 8.
-
Row 17 [RS]: A: 9, B: 3, A: 4, B: 5, A: 6, B: 6, A: 1, B: 3, A: 8.
-
Row 18 [WS]: A: 2, B: 1, A: 5, B: 3, A: 1, B: 6, A: 1, B: 17, A: 6, B: 1, A: 2.
-
Row 19 [RS]: A: 10, B: 23, A: 1, B: 3, A: 8.
-
Row 20 [WS]: A: 7, B: 26, A: 12.
-
Row 21 [RS]: A: 13, B: 21, A: 1, B: 3, A: 7.
-
Row 22 [WS]: A: 6, B: 3, A: 1, B: 22, A: 13.
-
Row 23 [RS]: A: 2, B: 1, A: 9, B: 23, A: 1, B: 3, A: 3, B: 1, A: 2.
-
Row 24 [WS]: A: 6, B: 3, A: 1, B: 23, A: 12.
-
Row 25 [RS]: A: 12, B: 22, A: 1, B: 4, A: 6.
-
Row 26 [WS]: A: 6, B: 27, A: 12.
-
Row 27 [RS]: A: 12, B: 26, A: 7.
-
Row 28 [WS]: A: 2, B: 1, A: 5, B: 3, A: 1, B: 22, A: 8, B: 1, A: 2.
-
Row 29 [RS]: A: 11, B: 10, A: 6, B: 5, A: 13.
-
Row 30 [WS]: A: 25, B: 9, A: 11.
-
Row 31 [RS]: A: 5, B: 3, A: 3, B: 8, A: 26.
-
Row 32 [WS]: A: 27, B: 13, A: 5.
-
Row 33 [RS]: A: 2, B: 1, A: 2, B: 12, A: 25, B: 1, A: 2.
-
Row 34 [WS]: A: 28, B: 11, A: 6.
-
Row 35 [RS]: A: 7, B: 9, A: 29.
-
Row 36 [WS]: A: 30, B: 9, A: 6.
-
Row 37 [RS]: A: 8, B: 7, A: 30.
-
Row 38 [WS]: A: 2, B: 1, A: 28, B: 6, A: 5, B: 1, A: 2.
-
Row 39 [RS]: A: 9, B: 2, A: 1, B: 2, A: 31.
-
Row 40 [WS]: A: 32, B: 1, A: 2, B: 1, A: 9.
-
Row 41 [RS] to Row 42 [WS]: With A, sc 45.
-
Row 43 [RS]: With A: 2, With B: 1, (With A: 4, With B: 1) 8 times, With A: 2.
-
Row 44 [WS] to Row 45 [RS]: With A, sc 45.
Border Pattern
Both yarn strands will rest at the top left corner (for right-handed crocheters) after finishing Row 45.
-
Round 1: Use Color B. Work 45 sc evenly down each of the four sides of the hot pad, starting with the left edge. For every corner, work an sc into the last stitch of that side, ch 1, then work an sc into the first stitch of the next side. Slip stitch to the first sc to close the round.
-
Round 2 [RS]: Switch to Color A.
-
Left Side: Sc in the first st. Repeat this sequence 14 times: [sk 1 st, hdc into the next st. Ch 2, then work 3 hdc directly into the space between the first sc and the body of the hdc you just made. Sc into the following st].
-
Bottom Corner: Work [1 sc, ch 1, 1 sc] inside the corner ch-1 space.
-
Bottom Side: Sc in each of the 45 sts across.
-
Right Side: Sc in the first st, then repeat the same 14-step textured pattern used on the left edge.
-
Top Right Corner & Loop: Sl st into the corner ch-1 space. Ch 20, then sl st directly back into that same corner space. Turn your work and make 25 sc into the loop you just created. Sl st back into the corner space one final time, then turn your work back to the front.
-
Top Side: Work 45 sc across the top edge. Join with a sl st to the first stitch.
-
Fasten off, secure your work, and weave in all loose yarn ends.