Pattern Description:
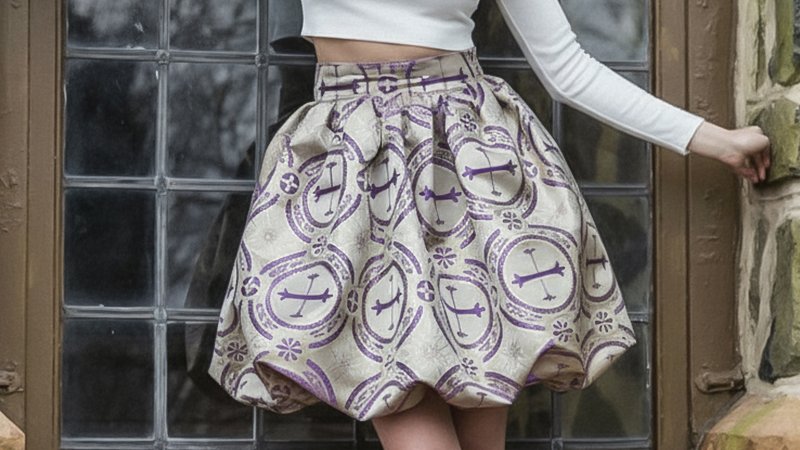
The Erica Skirt is a free, simple sewing pattern designed to create a cute bubble skirt or mini skirt.
The characteristic bubble shape is achieved because the outer layer sweep is about double the size of the lining, and this outer layer is gathered into the smaller lining. It is suitable for fabrics with a nice stiff drape, such as jacquard.
Materials Needed & Measurements:
- Fabric: 2.5 yards of Metallic Gold and Purple Ecclesiastical Medallion Jacquard
- Lining: 2 yards of Lucidum Patrician Purple Bemberg Lining
- Thread: 1 spool of 928 Hydrangea 100m Gutermann Sew All Thread
- Zipper: A 9-inch invisible zipper.
- Seam Allowance: A 1/2 inch seam allowance is accounted for in the pattern.
Instructions for Making the Erica Skirt Sewing Pattern:
Constructing the Main Skirt and Lining
The initial step involves sewing the main skirt and lining pieces together at the side seams.
- Pin and Sew Skirt Sides: With the right sides of the fabric together, the front piece of the outer skirt should be pinned to the back piece at the side seams, and then stitched.
- Pin and Sew Lining Sides: The same process should be repeated for the lining pieces.
- Leave Opening for Zipper: It is crucial to keep the left side seam open for both the outer skirt and the lining, as this is where the zipper will be installed. When sewing the left side seam, stitch only up to the zipper notch and then back stitch to secure the stitching.
- Once the side seams of the lining are complete, the lining should be set aside temporarily.
Assembling the Waistband
The waistband construction involves two pieces: the waistband and the waistband facing.
- Attach Waistband Pieces: The waistband piece should first be pinned at the side seams and stitched.
- Attach Facing Pieces: Next, the waistband facing pieces should be pinned at the side seams and stitched.
- Join Waistband and Facing: After the side seams of both pieces are stitched, the facing is attached to the waistband by matching up the side seams and stitching them in place.
- Press Seam Allowances: All seam allowances on the constructed waistband and facing pieces should then be pressed.
Gathering the Skirt Waist
The next stage involves preparing the outer skirt and the lining to fit the smaller waistband circumference.
- Gather Outer Skirt: To gather the outer skirt waist, a basting stitch is used to sew across the skirt waist. The basting threads should be slowly pulled to gather the fabric until the skirt waist fits the length of the assembled waistband. Care should be taken not to break the basting threads during this process.
- Gather Lining: The lining waist is gathered next, using the same basting stitch method, until it also fits the waistband circumference.
- Baste Lining to Skirt: Once the lining is gathered, it should be pinned to the inside of the outer skirt. This step requires matching the wrong sides of the fabric together. The gathered lining is then secured to the gathered skirt waist using a basting stitch.
Attaching the Waistband and Installing the Zipper
With both the skirt and lining gathered and attached at the waist, the waistband can now be added.
- Pin and Stitch Waistband: The constructed waistband is pinned to the skirt opening, ensuring that the side seams of the waistband align with the side seams of the skirt. The waistband is then stitched in place, but the zipper end must be left open.
- Install Zipper: After the waistband is attached, the zipper (a 9-inch invisible zipper is recommended) must be installed into the opening left on the left side seam.
- Finish Waistband: Once the zipper is installed, the waistband facing is pressed down. The waistband facing is then closed by using a slip stitch.
Creating the Bubble Hem
The final step is to create the signature bubble shape at the bottom of the skirt.
- Gather Skirt Bottom: The bottom of the outer skirt must be gathered so that it fits the length of the hem of the smaller skirt lining. This is achieved using a basting stitch, similar to how the waist was gathered.
- Pin Skirt to Lining Hem: After the skirt bottom is gathered, the skirt should be flipped inside out. The gathered skirt bottom is then pinned to the lining hem.
- Stitch Hem: Stitch along the entire length of the lining hem, but intentionally leave a small 4-5 inch opening.
- Finishing: The skirt is then turned right side out through the small opening left in the hem. This opening is finished by slip stitching it closed. Once this final step is complete, the hem should be cleanly finished along the bottom, and the skirt will have its characteristic cute bubble shape.
Download Free PDF: