Pattern Description:
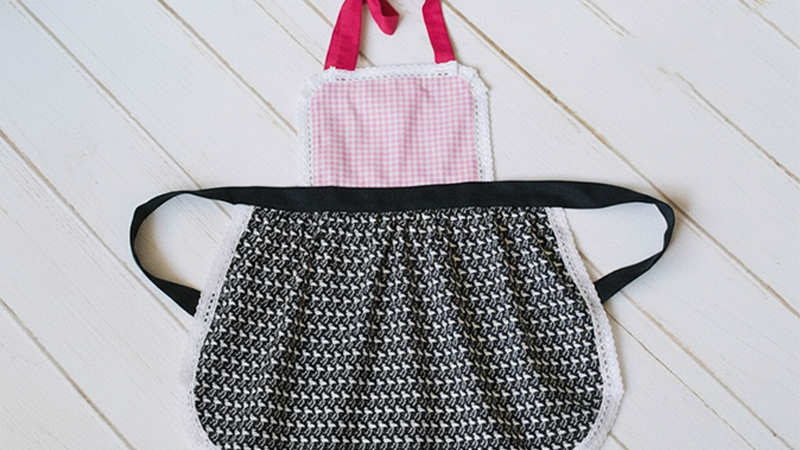
This tutorial provides instructions for making a cute, simple, and inexpensive Kids’ BBQ Apron, which is perfect for summer. The pattern involves upcycling a standard dish towel to create the main apron body.
Construction steps include shaping the neckline using specific measurements, folding the bottom to create a large pocket, stitching vertical lines to divide it into three individual pockets, and finishing the edges with 2 yards of double-fold bias tape, which also forms the neck loop and back ties.
Materials Needed & Measurements:
| Category | Item | Quantity/Specification | |
| Supplies | Dish Towel | 1 | |
| Double-fold bias tape | 2 yards | ||
| Pins | |||
| Equipment | Basic Sewing Tools | ||
| Scissors | |||
| Sewing Machine | (BERNINA or Bernette recommended) | ||
| Marking tool | (A pencil or Sharpie will do) | ||
| Key Measurements | Initial Neckline Shaping | Measure out 4″ from the center of the top short edge on both sides | |
| Initial Neckline Shaping | Measure 7″ from the top corner down each side | ||
| Bottom Pocket Creation | Fold the bottom of the apron up 6″ | ||
| Individual Pocket Divisions | Measure 5″ from each side of the apron for vertical dividing lines | ||
| Bias Tape Placement | Measure 8″ on each side from the middle mark of the bias tape to pin to the top of the apron |
Instructions for Making the Cute Kids Apron Pattern:
Preparing the Apron Body and Shaping the Neckline
The first steps involve laying out the dish towel and cutting the shape for the neck and shoulders.
- Layout and Centering: Lay the dish towel out vertically on a cutting surface (such as a cutting mat or countertop). The short sides of the towel should be positioned along the top and bottom edges. Next, locate and find the exact center point of the top short edge.
- Marking the Neckline Width: Once the center is established, measure outward 4 inches (4″) from the center mark on both the left and right sides. Mark these two points using your marking tool.
- Marking the Shoulder Depth: From the top corner of the dish towel down each side edge, measure 7 inches (7″) and make a mark.
- Cutting the Shape: Connect the marks made in the previous steps on each side using a curving line. This line should be shaped like a “J”. After marking the curves, cut along these lines to finalize the apron’s neckline shape.
Creating the Three Individual Pockets
The next stage involves folding and stitching the bottom edge of the apron to create functional pockets.
- Folding the Pocket Base: Take the bottom edge of the apron and fold it up on top of itself by 6 inches (6″). Pin this fold in place.
- Stitching the Side Edges: Stitch along the edges of each side of the folded section. This stitching secures the fold and creates one continuous, long pocket along the bottom of the apron.
- Dividing the Pockets: To transform the single long pocket into three separate compartments, you need to mark and sew vertical dividing lines. Measure inward 5 inches (5″) from each side edge of the apron.
- Sewing the Vertical Divisions: Mark a vertical line at both of the 5″ measurement points. These lines should run from the top edge of the fold down to the bottom of the apron. Sew along these two vertical lines. This action successfully divides the bottom section, creating three individual pockets for the child’s use.
Attaching and Finishing with Bias Tape
The final step uses the double-fold bias tape to finish all the raw edges and create the neck loop and back ties.
- Preparing the Bias Tape: Fold the 2 yards of bias tape in half to find its center point and mark the center with a pin.
- Pinning the Neckline Section: Starting from the middle mark of the bias tape, measure 8 inches (8″) outward on each side. Pin these two 8″ marks to the top curved edge of the apron. It is important to remember to tuck the raw edge of the dish towel (the apron body) between the folds of the bias tape. This technique ensures a neat, finished edge.
- Pinning the Side Edges: Continue pinning the bias tape down the entire length of both curved sides of the apron.
- Creating the Ties: A significant amount of bias tape will be left hanging off the edge on both sides of the apron; this excess length is intentional, as it forms the back ties for the apron.
- Final Stitching: Begin stitching at one end of the bias tape (the end of one tie). Start by stitching the bias tape fold closed.
Continue stitching along the length of this tie, guiding the stitch up the first curved side of the apron, across the neck loop area, down the second curved side, and finally along the entire length of the other tie.
Stitch together the entire 2-yard length of the bias tape until the fold is completely closed. Once this continuous stitching is finished, the cute Kids’ BBQ Apron is complete.
Download Free PDF: