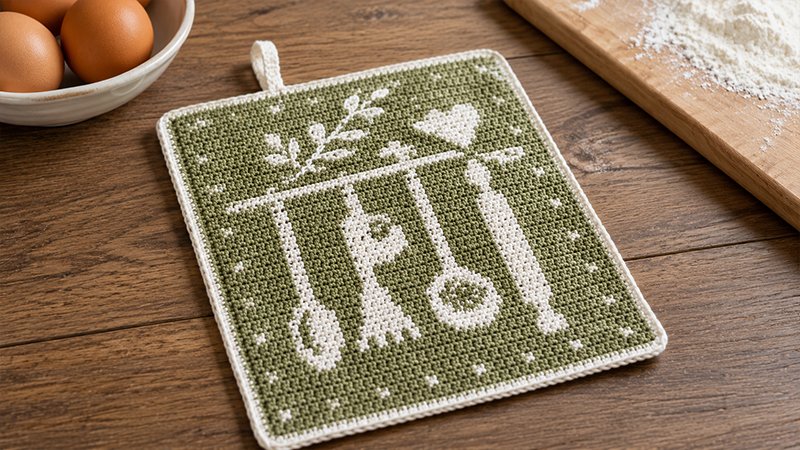
The Nana’s Kitchen Potholder is a beautiful, dense hot pad worked entirely in single crochet. Using tapestry crochet techniques, you carry two contrasting yarn colors throughout the project to create a geometric and heart-motif design.
The body is framed with a clean, two-toned border that includes an integrated hanging loop. To finish, delicate floral branches are embroidered on either side of the central heart using simple hand-sewing stitches, giving it a classic, heirloom quality.
Materials Needed
-
Hook: 3.0 mm (US C/2 or UK 11)
-
Yarn: DK weight (Group 3, Light) 100% cotton yarn in two contrasting shades.
-
Color A (Main Color): ~62 yards / 56 meters (e.g., Wine Red)
-
Color B (Contrasting Color): ~39 yards / 35 meters (e.g., Cream/Champagne)
-
-
Tools: Tapestry needle for weaving in ends and embroidery, scissors.
Sizing & Tension
-
Finished Dimensions: Approximately 6.7 inches (17 cm) wide by 7.3 inches (18.5 cm) tall.
-
Gauge: 28 single crochets and 26 rows = 4 inches (10 cm) square using the tapestry crochet technique.
Pattern Notes & Abbreviations
-
Ch: Chain
-
Sc: Single crochet
-
Sl St: Slip stitch
-
St(s): Stitch(es)
-
RS / WS: Right Side / Wrong Side
-
Color Changes: When switching colors, do so on the final yarn-over (Yo) of the previous stitch. Carry the unused color flat along the top of your previous row, crocheting over it as you go.
-
Row Basics: Every row consists of 45 stitches. At the end of each row, chain 1 and turn your work. The turning chain 1 is always made with Color A and counts as the very first stitch of the next row.
-
Reading the Colorwork: Instructions like (A) 5, (B) 2 mean you work 1 single crochet into each of the next 5 stitches using Color A, then switch to Color B for the next 2 stitches.
Step-by-Step Crochet Instructions
The Main Body
Using Color A, chain 46.
-
Row 1 [RS]: Sc in the second chain from your hook and in each chain across. (45 sts)
-
Row 2 [WS]: Work 45 sc using Color A.
-
Row 3 [RS]: (A) 2, (B) 1. Repeat the sequence of [(A) 4, (B) 1] a total of 8 times. Finish with (A) 2.
-
Rows 4–7: Alternating WS and RS rows, work all 45 stitches in Color A for each row.
-
Row 8 [WS]: (A) 2, (B) 1, (A) 31, (B) 3, (A) 5, (B) 1, (A) 2.
-
Row 9 [RS]: (A) 8, (B) 3, (A) 4, (B) 5, (A) 8, [(B) 1, (A) 1] twice, (B) 1, (A) 2, (B) 3, (A) 7.
-
Row 10 [WS]: (A) 6, (B) 5, [(A) 1, (B) 1] 3 times, (A) 7, (B) 7, (A) 4, (B) 1, (A) 9.
-
Row 11 [RS]: (A) 8, (B) 3, (A) 2, (B) 3, (A) 1, (B) 1, (A) 1, (B) 3, (A) 6, [(B) 1, (A) 1] 3 times, (B) 3, (A) 1, (B) 1, (A) 6.
-
Row 12 [WS]: (A) 6, (B) 1, (A) 1, (B) 3, (A) 1, (B) 5, (A) 6, (B) 2, [(A) 1, (B) 1] twice, (A) 1, (B) 2, (A) 2, (B) 3, (A) 8.
-
Row 13 [RS]: (A) 2, (B) 1, (A) 5, (B) 3, (A) 2, (B) 3, (A) 1, (B) 1, (A) 1, (B) 3, (A) 6, (B) 5, (A) 1, (B) 3, (A) 1, (B) 1, (A) 3, (B) 1, (A) 2.
-
Row 14 [WS]: Repeat Row 12.
-
Row 15 [RS]: (A) 8, (B) 3, (A) 3, (B) 7, (A) 7, (B) 5, (A) 1, (B) 2, (A) 1, (B) 2, (A) 6.
-
Row 16 [WS]: (A) 7, (B) 3, (A) 3, (B) 3, (A) 9, (B) 5, (A) 4, (B) 3, (A) 8.
-
Row 17 [RS]: (A) 8, (B) 3, (A) 6, (B) 1, (A) 12, (B) 1, (A) 5, (B) 1, (A) 8.
-
Row 18 [WS]: (A) 2, (B) 1, [(A) 5, (B) 1] twice, (A) 12, (B) 1, (A) 6, (B) 3, (A) 5, (B) 1, (A) 2.
-
Row 19 [RS]: Repeat Row 17.
-
Row 20 [WS]: (A) 8, (B) 1, (A) 5, (B) 1, (A) 12, (B) 1, (A) 6, (B) 3, (A) 8.
-
Row 21 [RS]: (A) 8, (B) 3, (A) 6, (B) 1, (A) 4, (B) 4, (A) 4, (B) 1, (A) 5, (B) 1, (A) 8.
-
Row 22 [WS]: (A) 8, (B) 1, (A) 5, (B) 1, (A) 3, (B) 6, (A) 3, (B) 1, (A) 6, (B) 3, (A) 8.
-
Row 23 [RS]: (A) 2, (B) 1, (A) 5, (B) 3, (A) 6, (B) 1, (A) 3, (B) 7, (A) 2, [(B) 1, (A) 5] twice, (B) 1, (A) 2.
-
Row 24 [WS]: (A) 8, (B) 1, (A) 5, (B) 1, (A) 1, (B) 8, (A) 3, (B) 1, (A) 6, (B) 3, (A) 8.
-
Row 25 [RS]: (A) 8, (B) 3, (A) 6, (B) 1, (A) 3, (B) 5, (A) 2, (B) 1, (A) 1, (B) 1, (A) 5, (B) 1, (A) 8.
-
Row 26 [WS]: (A) 8, (B) 1, (A) 5, (B) 1, (A) 2, (B) 1, (A) 2, (B) 4, (A) 3, (B) 1, (A) 7, (B) 1, (A) 9.
-
Row 27 [RS]: (A) 8, (B) 3, (A) 6, (B) 1, (A) 3, (B) 1, (A) 1, (B) 2, (A) 1, (B) 1, (A) 3, (B) 1, (A) 5, (B) 1, (A) 8.
-
Row 28 [WS]: (A) 2, (B) 1, [(A) 5, (B) 1] twice, (A) 4, (B) 2, (A) 2, (B) 1, (A) 3, (B) 1, (A) 6, (B) 3, (A) 5, (B) 1, (A) 2.
-
Row 29 [RS]: (A) 9, (B) 1, (A) 7, (B) 1, (A) 4, (B) 3, [(A) 5, (B) 1] twice, (A) 8.
-
Row 30 [WS]: (A) 6, (B) 1, (A) 1, (B) 1, (A) 5, (B) 1, (A) 6, (B) 1, (A) 5, (B) 1, (A) 7, (B) 1, (A) 2, (B) 1, (A) 6.
-
Row 31 [RS]: (A) 5, (B) 1, (A) 1, (B) 31, (A) 1, (B) 1, (A) 5.
-
Row 32 [WS]: (A) 6, (B) 1, (A) 1, (B) 2, [(A) 4, (B) 2, (A) 5, (B) 2] twice, (A) 2, (B) 1, (A) 6.
-
Row 33 [RS]: (A) 2, (B) 1, (A) 39, (B) 1, (A) 2.
-
Row 34 [WS]: (A) 22, (B) 1, (A) 22.
-
Row 35 [RS]: (A) 21, (B) 3, (A) 21.
-
Row 36 [WS]: (A) 20, (B) 5, (A) 20.
-
Row 37 [RS]: (A) 19, (B) 7, (A) 19.
-
Row 38 [WS]: (A) 2, (B) 1, (A) 16, (B) 7, (A) 16, (B) 1, (A) 2.
-
Row 39 [RS]: (A) 19, (B) 3, (A) 1, (B) 3, (A) 19.
-
Row 40 [WS]: (A) 20, (B) 1, (A) 3, (B) 1, (A) 20.
-
Row 41 [RS]: Work 45 sc using Color A.
-
Row 42 [WS]: Work 45 sc using Color A.
-
Row 43 [RS]: (A) 2, (B) 1, [(A) 4, (B) 1] 8 times, (A) 2.
-
Rows 44–45: Work 45 sc using Color A for each row. Do not fasten off.
The Edging & Hanging Loop
Both yarn strands should now sit at the top-left corner (for right-handed crocheters).
-
Round 1 [RS]: Drop Color A and pick up Color B. Work 45 sc evenly down each of the four sides of the square. At each corner point, work 1 sc into the final stitch of the current side, chain 1, then work 1 sc into the first stitch of the next side. Slip stitch into your very first border stitch to close the round.
-
Round 2 [RS]: Switch back to Color A. Work 1 sc in every stitch along the left side, bottom, and right side. At the corner intersections, work
[1 sc, ch 1, 1 sc]directly into the chain-1 space. -
Hanging Loop Integration: Once you reach the top right corner, sc 22 stitches along the top edge. Slip stitch into the next stitch. Chain 20, then slip stitch back into that very same base stitch to form a raw loop. Now, turn your focus to the loop: work 25 single crochets directly over and around the chain loop to reinforce it, then slip stitch once more into the base stitch. Single crochet in the remaining 22 stitches to finish the top edge.
Fasten off and neatly weave in all yarn tails.
Finishing Touches: Embroidery
Bring your potholder to life by adding embroidered foliage using a tapestry needle and yarn. You will focus your stitches around the central heart shape on the lower half of the project (specifically between rows 34 and 41).
-
The Stems: On both sides of the heart (within stitches 6–20 on the right, and stitches 26–40 on the left), use a Backstitch to map out a curving branch. Bring your needle up through the fabric, make a straight stitch forward, and drop back down. For the next stitch, bring the needle up one stitch-length ahead from the back side, then insert it backward into the end of your prior stitch.
-
The Leaves: Accent the stems with small leaves using the Lazy Daisy Stitch. Pull your needle up at the stem line and reinsert it immediately next to that same point, leaving a loose loop of yarn on the front side. Bring your needle up through the center of that loop from the back, pulling gently to form a teardrop petal shape. Secure the loop by making a tiny anchoring stitch right over the top curve before pulling the needle back down to the wrong side.
Once your branches are complete, knot your embroidery strands securely on the back, snip the excess, and your handmade potholder is complete!