Pattern Description:
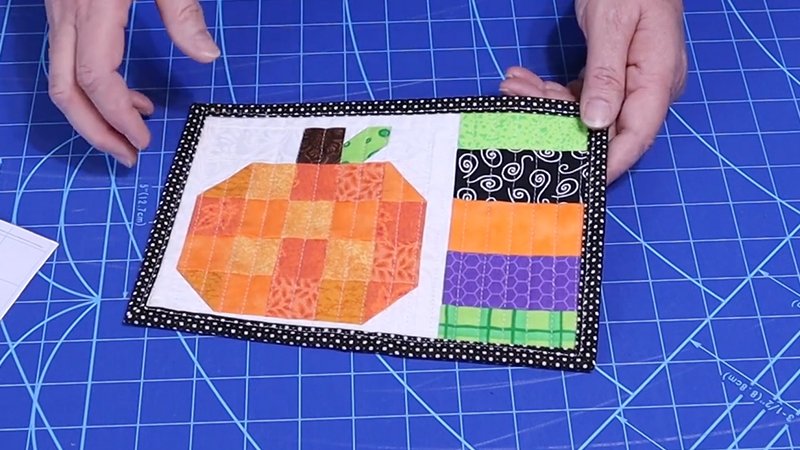
This is the October Mug Rug of the Month appliqué pattern from Sher’s Creative Space. The finished size is 6 1/2 x 10 inches.
This beginner to intermediate pattern details methods for both machine and hand appliqué, utilizing fusible fleece as the inner layer. Mug rugs can be used with a snack, hung on a wall, or given as gifts.
Materials Needed & Measurements:
Required Fabrics and Interfacing:
- Small scraps of fabric for appliques.
- 1/8 yard of light weight paper backed fusible webbing.
- 6 1/2 x 10 inch piece of fabric for background (it is best to start with a bigger top piece if using the hand applique method).
- 6 1/2 x 10 inch piece of fusible fleece.
- 7 1/2 x 11 inch piece of fabric for back.
- 2 3/4” x 44” strip of fabric for binding.
- Notions and Thread:
- Thread to match fabrics (plus thread to match applique fabrics if using machine applique method).
- Embroidery floss to match or contrast with applique fabrics (if using hand applique method).
- Fray-check (optional: to seal the stitches on the back if using machine applique).
- Embellishment supplies of your choice (examples include floss, buttons, beads, ribbon, fabric paint, etc.).
- Good quality and washable fabric glue (recommended brand: Fabri-tac by Beacon), if attaching embellishments such as wiggle eyes, pom-poms, or bows.
- General Supplies:
- Scissors.
- Pins.
- Sewing and embroidery needles.
- Embroidery hoop (if using hand applique method).
- Paper & pencil.
- Fabric marking pen or pencil.
- Paper or cardstock (for printing pattern pieces).
- Iron & ironing board.
- Sewing machine.
- Pressing cloth or piece of light colored, 100% cotton fabric (may be needed for fusing fleece depending on the brand used).
- Cutting mat with ruler & rotary cutter (optional).
Finished Size & Key Measurements:
- Finished Size: 6 1/2 x 10 inches.
- Appliqué Area (Hand Applique Method): Appliques should be placed within a 5 by 8 1/2 inch area.
Instructions for Making the Pumpkin Patch Halloween Mug Rug Pattern:
Preparation and Pattern Transfer
Before starting, read all tips and instructions thoroughly. Iron your fabrics; if pre-washing, avoid fabric softener as it can prevent the adhesive from sticking when fusing. Use 100% cotton fabrics for best results.
- Print Pattern Pieces: Print the pattern at the actual size, choosing “ACTUAL SIZE” or “NONE” for page scaling in your print settings to ensure the pieces fit the project. Use the one-inch square guide provided on the pattern page to verify the size. Cut out the pattern pieces; using cardstock makes tracing easier.
- Trace and Fuse Appliqués: Turn pattern pieces upside down (unless otherwise indicated) and trace them onto the paper side of the light weight paper backed fusible webbing. Do a rough cut just outside the traced line.
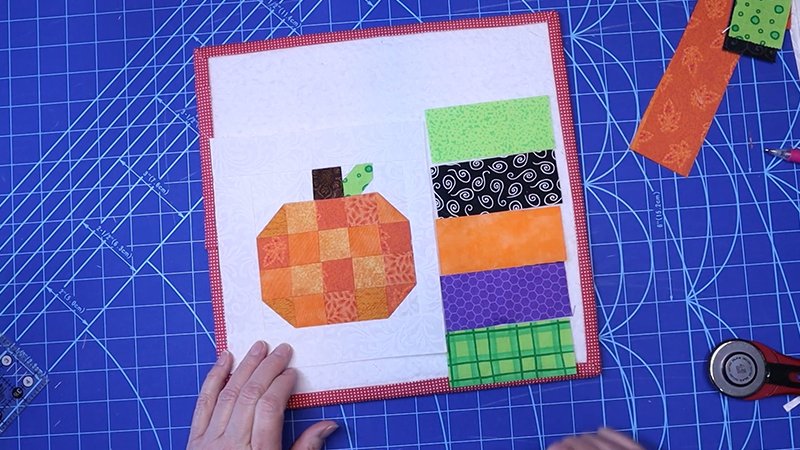
- Cut Appliqués: Fuse these rough-cut pieces to the wrong side of the chosen fabric scraps, following the manufacturer’s instructions for the fusible webbing. Cut the applique pieces out precisely on the traced lines, remove the paper backing, and set the pieces aside. Some pieces may overlap others, so refer to the photo or illustrations for correct placement.
Machine Appliqué Method
- Fuse Fleece: Fuse the 6 1/2 x 10 inch piece of fusible fleece to the backside of the background fabric (6 1/2 x 10 inches). Follow the fleece manufacturer’s directions; some brands may require a damp pressing cloth.
- Arrange Appliqués: Flip the background fabric right side up. Arrange the appliques (glue side down) on the fabric, ensuring they are at least 3/4 inch away from each edge. This clearance is necessary because the binding will take up about 3/8 inch of the edges. Fuse the appliqués in place following the manufacturer’s instructions for your fusible webbing. Refer to the provided photo or illustration for correct placement.
- Stitch and Embellish: Transfer any markings for embellishments or additional stitching (a water soluble marker is helpful). Machine baste around the entire piece 1/4 inch away from each edge. Embroider around the applique pieces as desired, using any preferred stitch. Now, stitch on any embellishments that require sewing, such as buttons or beads. Glued or painted embellishments are applied later.
Hand Appliqué Method
- Start with Larger Fabric: When using the hand appliqué method, it is easiest to start with a background fabric piece larger than the finished 6 1/2 x 10 inch size because using an embroidery hoop makes stitching close to the edges difficult.
- Placement Guide: It is very important to place appliques within a 5 by 8 1/2 inch area to leave room for the binding. A helpful method is to create a cardstock template cut to the finished size (6 1/2 x 10 inches), measure in 3/4 inch from all edges, and cut out the center area. Use this template to arrange appliques. Once satisfied, fuse them in place.
- Hand Stitch: Transfer any placement markings. Using 3 strands of embroidery floss (which must be separated), go around each applique piece with a blanket stitch. Helpful stitch illustrations (like backstitch, running stitch, and blanket stitch) are available in the pattern.
- Finish Top Piece: Iron the piece when stitching is complete. If you started with a larger fabric piece, cut it down to the final 6 1/2 by 10 inches now. Iron the fusible fleece (6 1/2 x 10 inch piece) to the backside of the fabric, following the fleece instructions. Stitch on any buttons or beads; glued embellishments wait until the end.
Pre-binding Preparation
- Layer and Baste: Place the ironed 7 1/2 x 11 inch backing fabric piece wrong side up. Center the applique and fleece piece on top. Secure the layers by hand basting, pinning, or spray basting.
- Trim and Baste: Use a rotary cutter or scissors to cut the backing piece down to the exact size of the top/fleece combination (6 1/2 x 10 inches). Machine baste all the way around this secured piece, 1/4 inch from each edge.
- Quilting (Optional): You may machine quilt the layers together if desired, though quilting is often skipped due to the small size and the use of fusible fleece.
Applying the Binding
- Prepare Binding Strip: Take the 2 3/4” x 44” strip of binding fabric. Fold one of the short ends 1/4 inch to the wrong side and iron. Fold the entire length of fabric in half lengthwise, with wrong sides together, and iron.
- Attach First Edge: Starting at the center front along the bottom edge, pin the binding to the mug rug, aligning the raw edges. Use the edge that was ironed in at 1/4 inch to begin.
- Stitch and Miter Corners: Stitch this section using a 3/8 inch seam allowance. Begin stitching at the folded end and stop stitching 3/8 inch from the corner. Run a couple of back stitches at the beginning and end.
- Form the Miter: Remove the project from the machine. Flip the binding piece down to form a fold at a 45-degree angle. Bring the binding back down so that the new fold is even with the raw edge of the mug rug. Secure with pins.
- Complete Binding: Start stitching the next edge 3/8 inch from the fold and stop 3/8 inch from the next corner. Repeat these steps for the remaining corners. When reaching the end, leave at least an inch overlap, trim the excess binding, and stitch that final section down.
- Finishing Binding: Trim excess threads and remove any exposed basting stitches. Flip the folded edges of the binding to the back, pin them in place, and hand stitch the binding to the backing.
Finishing
If you are using embellishments that require glue (like wiggle eyes, pom-poms, or bows), apply a good quality, washable fabric glue (such as Fabri-tac by Beacon) now and let the piece dry completely.
Download Free PDF: