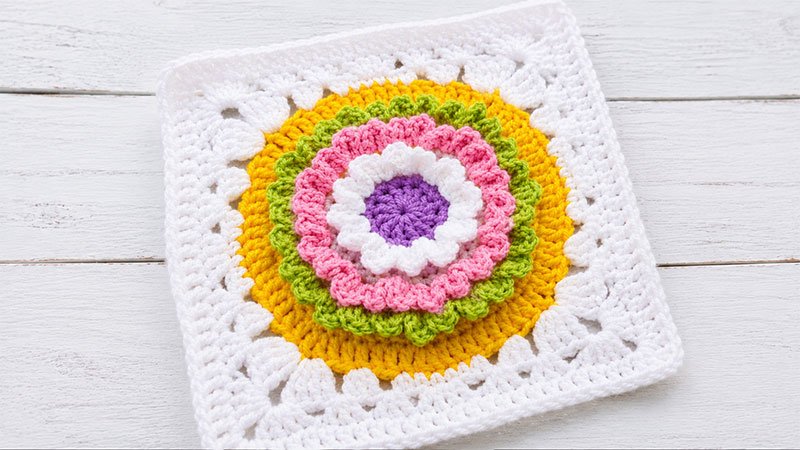
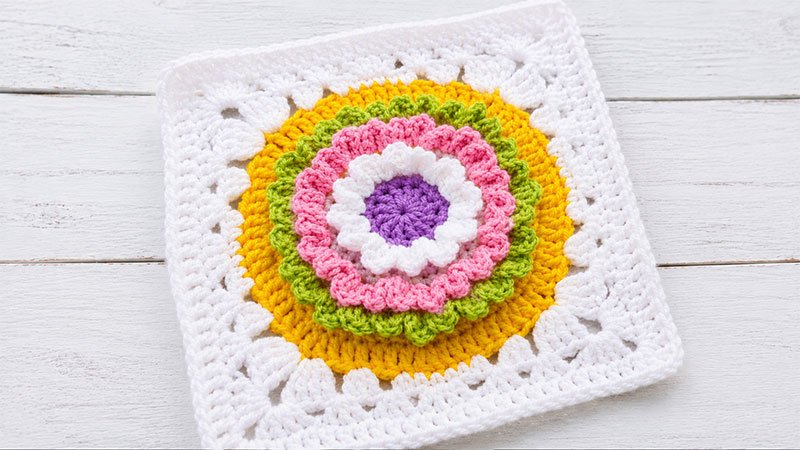
The Crochet Ruffle Flower Square is a gorgeous, textured granny square that transitions a circular floral center into a neat, 8-inch square border.
It features a flat, solid base stitched in the back loops, which leaves front loops open on the surface.
These open loops are later used to anchor cascading, multi-colored ruffles that burst with dimensional, petal-like texture. It’s the perfect building block for vibrant blankets, tote bags, or decorative pillows.
Materials & Quick Specs
Tools & Yarn
-
Hook Size: 4.0 mm (US G/6)
-
Yarn Type: DK weight / Light Worsted (Category 3)
-
Finishing: Tapestry needle for weaving in ends
Color Palette (Suggested)
-
Color A: Sunny Yellow (Base Flower Center)
-
Color B: Crisp White (Square Border & Ruffle 1)
-
Color C: Vivid Pink (Ruffle 2)
-
Color D: Fresh Green (Ruffle 3)
Dimensions & Gauge
-
Finished Size: 8″ x 8″ (20 cm x 20 cm)
-
Gauge: 16 double crochets across by 9 rows high = 4″ (10 cm) square.
Abbreviations (US Terms)
-
Ch: Chain
-
Sl St: Slip Stitch
-
Sc: Single Crochet
-
Hdc: Half Double Crochet
-
Dc: Double Crochet
-
Tr: Treble Crochet
-
BLO: Back Loop Only (insert hook only into the loop furthest from you)
-
Inc: Increase (work 2 stitches into the exact same space)
-
Sk: Skip
-
Sp: Space
-
St(s): Stitch(es)
-
RS: Right Side
Step-by-Step Pattern Instructions
Part 1: The Circular Flower Base
Note: Chains at the start of rounds do not count as active stitches.
Round 1: Using Color A, start by making a ch 3. Work 12 dc directly into the very first chain made. Join with a sl st to the top of your first dc. (12 sts)
Round 2: Ch 1. Work a sc inc (2 sc) into every stitch around. Join with a sl st to the first sc. (24 sts)
Round 3: Ch 2. Working in BLO only for this entire round: (dc 1 in the next st, then dc inc in the following st). Repeat this sequence 12 times total. Join with a sl st to the first dc. (36 sts)
Round 4: Ch 1. Working through both loops normally: (sc 1 in each of the next 3 sts, then sc inc in the next st). Repeat this sequence 9 times total. Join with a sl st to the first sc. (45 sts)
Round 5: Ch 2. Working in BLO only: (dc 1 in each of the next 4 sts, then dc inc in the next st). Repeat this sequence 9 times total. Join with a sl st to the first dc. (54 sts)
Round 6: Ch 2. Working in BLO only: (dc 1 in each of the next 5 sts, then dc inc in the next st). Repeat this sequence 9 times total. Join with a sl st to the first dc. (63 sts)
Round 7: Ch 2. Working through both loops normally: (dc 1 in each of the next 6 sts, then dc inc in the next st). Repeat this sequence 9 times total. Join with a sl st to the first dc. Fasten off Color A. (72 sts)
Part 2: Squaring the Circle
In this section, we transition the round flower into a distinct four-cornered square using Color B.
Round 8: Attach Color B to any stitch from Round 7. Ch 3.
-
Create the Pattern Side: *Work 4 tr into the same starting stitch. Sk 2 sts, work 3 dc into the next st. Sk 2 sts, work 2 hdc into the next st. Sc into each of the next 4 sts. Work 2 hdc into the next st. Sk 2 sts, work 3 dc into the next st. Sk 2 sts.
-
Create the Corner: Into the next stitch, work 4 tr, then ch 2.
-
Repeat from * 3 more times to complete all four sides. Join with a sl st to the top of the initial tr. (22 stitches per side, 4 corner spaces)
Round 9: Ch 2. Work 4 dc into the first corner ch-2 space.
-
*Work 3 dc into the gap between the tr-block and dc-block. Work 3 dc into the gap between the dc-block and hdc-block. Sk 3 sts, work a dc inc in each of the next 2 sts. Work 3 dc into the gap between the hdc-block and dc-block. Work 3 dc into the gap between the dc-block and tr-block.
-
Corner: Into the next corner ch-2 space, work [4 dc, ch 2, 4 dc].
-
Repeat from * around, ending the final repeat with [4 dc, ch 2] in the very first corner space to complete it. Join with a sl st to the first dc. (24 stitches per side)
Round 10: Ch 2. Work 2 dc into the first corner space.
-
*Dc in each of the next 24 sts across the side.
-
Corner: In the corner space, work [2 dc, ch 2, 2 dc].
-
Repeat from * around. On the final side, dc in the last 24 sts, then work 2 dc and ch 2 in the starting corner space. Join with a sl st to the first dc. (28 stitches per side)
Round 11: Ch 1. Work 1 sc into the first corner space.
-
*Sc in each of the next 28 sts across the side.
-
Corner: In the corner space, work [1 sc, ch 1, 1 sc].
-
Repeat from * around. Finish the final side with 28 sc, then work 1 sc and ch 1 into the starting corner space. Join with a sl st to the first sc. Fasten off and weave in all outer border yarn tails. (28 stitches per side)
Part 3: Adding the Dimensional Ruffles
To create the 3D flower effect, you will work into the unworked front loops left behind from the BLO rounds. Always hold the square with the right side (RS) facing you.
Ruffle Layer 1 (Inner Ring)
Attach Color B to any exposed front loop remaining from Round 2. Ch 2.
-
Work 1 dc in that same loop. In the very next loop, work [1 dc, ch 2, sl st].
-
*In the next loop, work [sl st, ch 2, 1 dc]. In the following loop, work [1 dc, ch 2, sl st].
-
Repeat from * all the way around the circular ring. Fasten off and cleanly weave in the ends.
Ruffle Layer 2 (Middle Ring)
Attach Color C to any exposed front loop remaining from Round 4. Ch 2.
-
Repeat the exact same stitch sequence used for Ruffle Layer 1 all the way around this larger ring.
-
Fasten off and weave in your ends.
Ruffle Layer 3 (Outer Ring)
Attach Color D to any exposed front loop remaining from Round 5. Ch 2.
-
Repeat the exact same stitch sequence used for Ruffle Layer 1 all the way around this final ring.
-
Fasten off and securely weave in all remaining yarn tails.
Your stunning Crochet Ruffle Flower Square is officially complete! Feel free to block it gently to achieve perfectly straight edges.