Pattern Description:
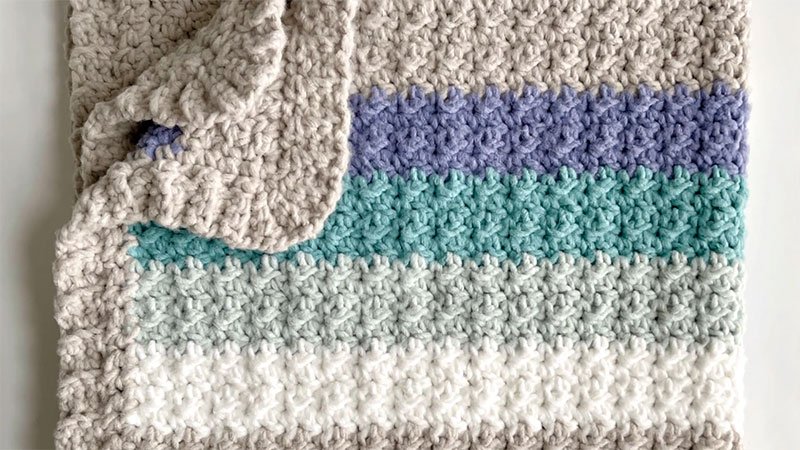
The Crochet Sea Stripes Baby Blanket is a beginner-friendly pattern using the crumpled griddle stitch, alternating single and double crochet.
Made with soft, chunky Bernat Forever Fleece yarn, it works up quickly into an even, cozy blanket. The striped design, an ideal baby shower gift, also features a border.
Materials Needed & Measurements:
- Yarn:Bernat Forever Fleece yarn (100% polyester, 280 g/9.9 oz, 177 m/194 yds). This yarn is described as a chunky yarn.
- Colors: 2 skeins Balsam, 1 skein each of Juniper, Dark Eucalyptus, Sage, and White Noise. The color changes are worked in repeats of 4 rows of each color: Balsam, Juniper, Dark Eucalyptus, Sage, White Noise, repeated three times total.
- Hook: Size M/N/9.00mm crochet hook.
- Notions: Tapestry needle, scissors.
- Measurements:
- Finished size: 34 in x 38 in.
- Gauge: 4 in = 9 st and 8 rows of pattern.
Stitches & Abbreviations Used:
- SC: Single Crochet
- DC: Double Crochet
- Slip Stitch:
- CH: Chain
- YO: Yarn Over
- st: stitch
Step by step instructions for making the Sea Stripes Baby Blanket pattern:
The Main Blanket Pattern: Crumpled Griddle Stitch
The body of the blanket is created using the crumpled griddle stitch, which involves alternating single and double crochet stitches.
Starting the Blanket
- Chain: Begin by chaining 66 with Balsam yarn. It is important to note that you can chain any even number to adjust the blanket’s width.
Working the Rows
- ROW 1: Start in the second chain from the hook and work a SC. Then, “Work a DC into the next stitch, then a SC into the next stitch”. Repeat this sequence from * to the end of the row. At the end of the row, CH 1 and turn your work.
- ROW 2 and Subsequent Rows: For Row 2 and all subsequent rows for the main blanket, you will “Work a SC into the last SC from previous row”. Continue by alternating stitches: “Work a DC into next DC, then work a SC into next SC”. The pattern emphasizes that you “should always work a DC into the top of a DC and SC into the top of a SC from the row below”. Remember to CH 1 and turn at the end of each row.
Color Changes
The pattern incorporates a specific color change sequence to create the stripes:
- Work 4 rows of Balsam.
- Follow with 4 rows of Juniper.
- Then, 4 rows of Dark Eucalyptus.
- Next, 4 rows of Sage.
- Conclude with 4 rows of White Noise. This entire sequence of five colors is repeated two more times, resulting in a total of three full repetitions of the color pattern.
When changing colors at the end of a row, ensure a seamless transition:
- On your last SC of the row, stop when you still have two loops on your hook.
- Pull through with the new color to complete the stitch.
- Cut the old color, leaving a long tail that can be woven into the blanket later using a tapestry needle.
- Finally, CH 1 with the new color and turn. Once you have completed all your rows and the main blanket body is finished, tie off your yarn and weave in all loose ends before starting the border.
The Blanket Border
The blanket is finished with a two-round border.
Round 1 of the Border
- Start: Pull up a loop in any corner of the blanket and CH 1.
- SC Around: Work one round of SC around the entire blanket.
- Sides: On the sides of the blanket (the raw edges where rows end), work 1 SC per row.
- Corners: When you reach each corner of the blanket, work 3 SCs into the corner space.
- Finish Round 1: When you return to the corner where you started, work your last SC, then slip stitch into the starting stitch to join the round.
Round 2 of the Border
This round creates a more textured edge:
- Initial Chain: Continuing in the same direction, CH 4. (You can adjust this chain number if you prefer a wider border).
- Working Back: Starting in the second chain from the hook, work a SC in each of the 3 chains back toward the edge of the blanket.
- Attaching to Blanket: Slip stitch into the next space, and then into the next space on the blanket edge.
- Turning and Working in Back Loops: Turn your work and work in the back loops of each of the 3 SC you just made.
- CH 1 and Turn: After working back across the 3 SCs, CH 1 and turn.
- Working Down: Work back down the row, completing SC in the back loops only. Be careful not to miss the 3rd stitch, as it sometimes pulls tight and can be difficult to see.
- Corners in Round 2: The corners require specific handling:
- In the first of the three stitches that form a corner, only slip stitch once.
- Then, turn and work the SC back up to the edge.
- Return and slip stitch into the corner space.
- Turn and work the SC back up to the edge.
- Upon returning to the corner space, slip stitch one more time into the same corner space for a total of three slip stitches into that corner before moving on with the regular border pattern.
Finishing the Border:
When you reach the corner where you began Round 2, slip stitch into the corner and tie off, leaving a long tail. Use this tail and your tapestry needle to sew the sides of the corners together, creating a neat finish.
After all the crocheting is complete, ensure all remaining yarn ends are neatly woven in using your tapestry needle.
Download PDF