Pattern Description:
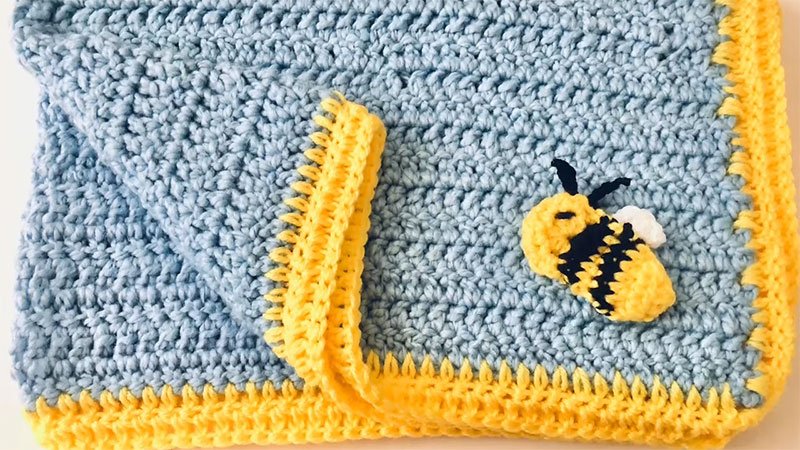
The Crochet Bumble Bee Stripes Baby Blanket is a stroller-sized blanket, perfect for taking on the go. This “bumble bee themed blanket” is designed to pair well with the illustrated children’s book,
Materials Needed & Measurements:
- Yarn:
- Bernat Softee Cotton (60% cotton, 40% acrylic)
- Colors and quantities: 3 skeins Clear White, 1 skein Black, 1 skein Golden
- Yarn Weight: Each skein is 120 g/4.2 oz, 232 m/254 yds.
- Hook: Size H/5.00mm hook
- Notions: Tapestry needle, scissors
- Measurements:
- Finished size: 25 in x 30 in
- Gauge: 4 in = 10 stitches and 17 rows of pattern
Stitches & Abbreviations Used:
- Single Crochet (SC): Insert hook, yarn over (YO) and pull up a loop, YO and pull through two loops on hook.
- Puff Stitch: YO, insert hook, YO and pull up a loop. Repeat from 3 more times, inserting hook into the same space. YO and pull through all loops.
- Half Double Crochet (HDC): YO, insert hook, YO and pull up a loop, YO and pull through three loops on hook.
- Slip Stitch (SL ST): Insert hook, YO, pull up a loop and pull directly through loop on hook.
- Chain (CH): Used for initial chain (e.g., “Chain 100”) and within rows (e.g., “CH 1,” “CH 2”).
- Yarn Over (YO): An instruction used within stitch definitions.
Instructions for Making the Bumble Bee Stripes Baby Blanket Pattern:
Main Blanket Pattern Instructions
The core of the blanket is created by repeating sections of moss stitch and puff stitch rows.
- Starting Chain: Begin by chaining 100 stitches with the Clear White yarn. Alternatively, you can chain any even number if you wish to adjust the blanket’s width.
- Row 1 (Moss Stitch Foundation): In the 4th chain from your hook, work a SC, then CH 1. Skip the next chain, then work another SC, CH 1. Continue this pattern of working SC, CH 1 into every other chain. You should conclude this row with a single SC in the very last chain. After completing the row, CH 2 and turn your work.
- Row 2 (Moss Stitch): Work a SC, CH 1 into the chain-one space of the row directly below. Skip the next stitch, then work SC, CH 1 into the subsequent chain-one space. Continue this sequence of SC, CH 1 into all the chain-one spaces from the row below. End this row with a SC that is positioned between the last stitch and the turning chain of the row below. Conclude by CH 2 and turning.
- Rows 3 – 7 (Moss Stitch): For these rows, simply repeat the instructions given for Row 2 (which is the moss stitch pattern).
- Row 8 (Puff Stitch Row): This row is worked similarly to the previous rows, but you will replace each SC with a puff stitch. When working the puff stitches, you should alternate between Golden and Black yarn for each puff row. Specifically, work a puff stitch into the chain-one space of the row below, where you would normally place an SC, then CH 1. Continue working puff stitch, CH 1 into all the chain-one spaces from the row below. The only exception is the very last space, where you should end with a SC that is between the last stitch and the turning chain of the row below. Finish the row by CH 2 and turning.
- Repeating Rows: You will repeat Rows 1 through 8 until you have a total of 13 puff rows, or until your blanket reaches your desired length. It is important to always maintain 7 rows of moss stitch in between each puff row. Always CH 2 and turn at the end of each row. Conclude the main body of the blanket with 7 rows of moss stitch to create a symmetrical look with the starting end.
Creating the Border
Once the main blanket body is complete, you will add a decorative border.
- Weave in Ends: Before starting the border, ensure all loose yarn ends are woven in using your tapestry needle.
- Round 1 (Moss Stitch Border): Work one round of moss stitch (SC, CH 1) into every other space around the entire edge of the blanket. When you reach the corners, work 2 SC in each corner, or 3 SC if you find the corner is pulling too tightly.
- Round 2 (Ribbing): Continue working in the same direction. CH 5, then work 1 HDC into each of the next 4 chains.
- Ribbing Repeat: Now, SL ST into the next 2 stitches on the edge of the blanket. Turn the blanket edge away from you, then work 1 back loop HDC into each of the 4 HDC. CH 1 and turn. Work 1 HDC into each back loop of the next 4 HDC. Repeat this sequence until you reach a corner.
Rounding Corners:
To properly navigate the corners with the ribbing:
- First, SL ST into the next stitch only once.
- Then, work the ribbing as described.
- Next, SL ST once into the middle stitch, work the ribbing again, and then SL ST into the same middle stitch once more.
- Work the ribbing, and then SL ST a final time into the middle stitch.
- Work the ribbing again, then SL ST 1 time into the next stitch, work the ribbing, and then you can resume SL ST into each of the next 2 stitches.
Finishing the Border:
Continue the ribbing around the entire edge of the blanket. Once you return to your starting corner and finish working around it, tie off your yarn. Finally, sew the bottom edge of the starting chain to the last row of ribbing, then tie off and weave in all remaining ends.
Download PDF