
Pattern Description:
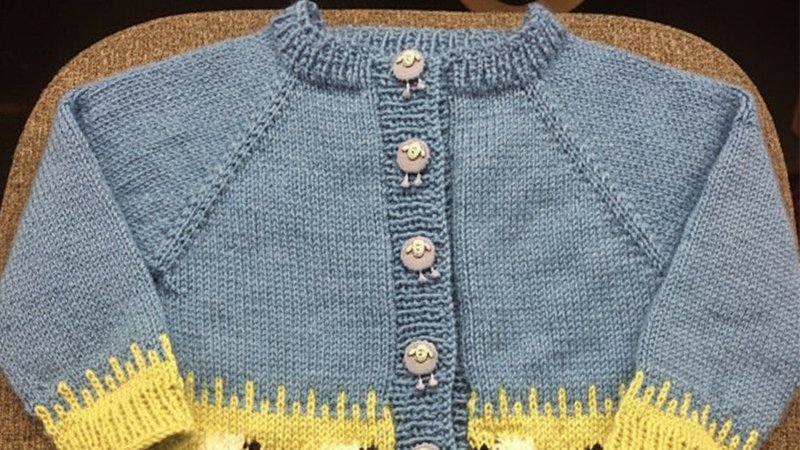
This pattern details the creation of a Sheep Yoke Baby Cardigan, a knitting project inspired by “Knitting in the Old Way” but with a simplified yoke design for babies.
It features a charming sheep yoke pattern, with options for either a boy’s or girl’s version through color variations.
The pattern provides directions for two sizes, 6-9 months or 9-12 months, by utilizing different needle sizes.
Materials Needed & Measurements:
- Yarn: DK weight superwash wool.
- Tan: 220-250 yards (Main Color).
- Blue, Green, Cream: 60-90 yards each.
- Black: Less than 20 yards.
- Pink: Less than 60 yards (for girl’s version).
- Yarn Weight: DK weight.
- Needles: Size 5 (smaller size) and Size 6 (larger size) straight or circular needles.
- Notions:
- Stitch holder or piece of scrap yarn (for holding sleeve stitches).
- Buttons (number to be decided by knitter for button band).
- Measurements:
- Size: 6-9 months or 9-12 months (shown in size 9-12 months).
- Gauge:
- 6 stitches and 9 rows = 1 inch (with smaller needles).
- 5.5 stitches and 8 rows = 1 inch (with larger needles).
- Finished Piece Length (before ribbing): 10.5″ [12.5″].
Stitches & Abbreviations Used:
- BO: Bind Off
- CO: Cast On
- Duplicate-stitch: A technique for adding details, used for sheep heads and legs.
- French-knot eyes: Used for forward-facing sheep in the center back.
- k2, p2 rib: Knit two, purl two ribbing.
- k2tog: Knit two together.
- MC: Main Color (tan yarn).
- purl: Purl stitch.
- rib: Ribbing.
- st: Stitch(es).
- stockinette: Stockinette stitch.
- YO: Yarn Over.
Instructions for Making the Sheep Yoke Baby Cardigan Pattern:
Initial Body Construction
- Using MC (tan yarn), CO 70 st.
- Work 7 rows of k2, p2 rib.
- Work 1 row of purl. This purl row is referred to as the “setup row” on the Sheep Yoke Chart.
- Break MC yarn and join blue yarn.
Working the Sheep Yoke Chart
- Begin working the Sheep Yoke Chart.
- Repeat each bracketed section four times across the rows.
- Space increases across each section, avoiding lining them up vertically to prevent obvious “seams”.
- The black wedges on the chart indicate “no stitches”; simply skip over these areas to the next st in the row.
- If making the girl’s version, work the pink flowers as charted. For the boy’s version, work these two rows in blue.
- For the flower pattern ONLY, do not repeat each bracketed section exactly as pictured; instead, keep the eight-stitch repeat of the flowers continuous across these two rows, incorporating the required increases carefully.
- For the remainder of the chart, you can work the repeats exactly as pictured.
- If making the boy’s version, use blue yarn for the checkerboard pattern. If making the girl’s version, use pink yarn.
- After completing row 34 of the chart (206 st), proceed to divide for sleeves.
Dividing for Sleeves and Main Body
- Divide for sleeves as follows: k29, place 44 st on a holder or scrap yarn, k60, place 44 st on a holder or scrap yarn, k29.
- Work straight in stockinette with MC until the piece measures 10.5″ [12.5″] (the example uses the larger size, 12.5″).
- Then, work 2 rows with blue yarn (boy’s version) or pink yarn (girl’s version).
- Work one more row with MC.
- Work 7 rows of k2, p2 rib and BO.
Adding Sheep Details
- With black yarn, duplicate-stitch the heads and legs onto the sheep as charted in the Duplicate Stitch Chart. Ensure the sheep face toward the button band on each side.
- Use blue yarn to make French-knot eyes for the forward-facing sheep in the center back.
Working Sleeves
- Return the st from one arm to needles and join MC.
- Work 9 rows of stockinette.
- In the next row, decrease by one stitch at each edge.
- Repeat these ten rows two more times (you should have 38 st).
- Work 7 more rows.
- Join pink or blue yarn and work two rows with this color.
- Work 1 more row with MC.
- Work 7 rows of k2, p2 rib and BO.
- Repeat all sleeve steps for the other arm.
Working Button Bands
- With MC, pick up 3 st for every 4 rows along the right front edge.
- Work 8 rows of k2, p2 rib and BO.
- Decide on the number and placement of buttons.
- Pick up the same number of st along the left front edge.
- Work 3 rows of k2, p2 rib.
- Work a row of buttonholes as follows: Work 4 st in rib, then YO, k2tog, work in rib to the desired position for the next buttonhole, repeat from until 6 st remain, k2tog, YO, work 4 st in rib.
- Work 4 more rows of k2, p2 rib and BO.
Finishing
- Seam the arms.
- Weave in all loose ends.
- Block the garment.
- Sew buttons to the button band, matching them to the buttonholes.
Download Free PDF:


