Pattern Description:
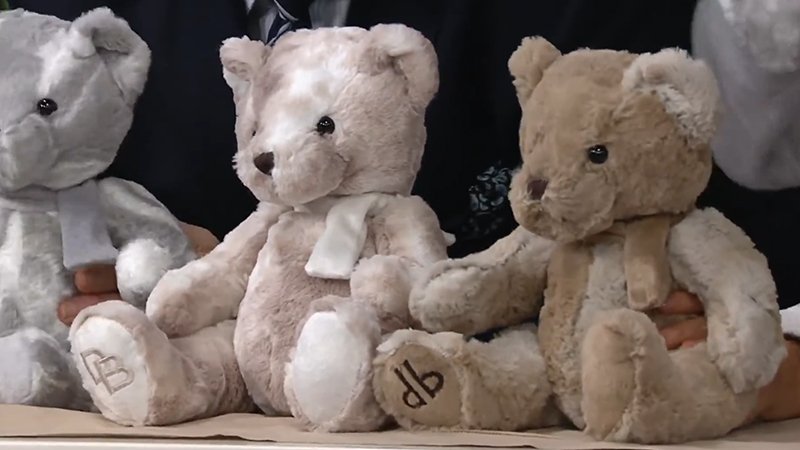
This free faux fur teddy bear pattern guides you to create a soft, 22 cm (8¾ in) tall bear with movable limbs, safety eyes, and embroidered features.
Using plush fabrics, contrasting paw pads, and optional decorative accents, it’s suitable for beginners and advanced sewers.
Detailed step-by-step instructions cover cutting, sewing, stuffing, and finishing for a professional-looking, cuddly toy.
Materials Needed & Measurements:
Fabrics:
- Main Fabric (Fabric A): For the teddy bear’s body, head, arms, legs, and ears. Choose a soft, cuddly fabric like plush, minky, or fleece.
- Contrasting Fabric (Fabric B): For paw pads and foot pads. Felt or short-pile plush works well.
- Optional Fabric (Fabric C): For decorative accents or inner ear details.
Notions:
- Safety eyes (child-safe recommended)
- Ribbon or small scarf for decoration
- Embroidery thread (black or brown) for nose and mouth
- Stuffing (polyester fiberfill or similar)
- Iron-on interfacing (optional, for extra stability in small areas)
Tools:
- Sewing machine
- Needles for hand stitching
- Strong thread
- Scissors or rotary cutter
- Pins or clips
- Bodkin or blunt tool for turning limbs and ears
Measurements
- The finished teddy bear is approximately: Height: 22 cm (8¾ inches) from top of head to bottom of feet
- Fabric Pieces (Cutting Instructions):
- From Fabric A (Main Body):
- Head: 2 pieces
- Head gusset: 1 piece
- Body: 2 pieces
- Arms: 2 pairs (4 pieces)
- Legs: 2 pairs (4 pieces)
- Ears: 2 pairs (4 pieces)
- From Fabric B (Contrasting Pads):
- Paw pads: 2 pieces
- Foot pads: 2 pieces
- Optional: Fabric C can be used for inner ears or other small accents.
- Seam allowance: 6 mm (¼ inch)
Abbreviations Used
- RS – Right Side
- WS – Wrong Side
- SL – Seam Line
- SA – Seam Allowance (6 mm / ¼ inch)
- FAB – Fabric
Instructions for Making the Faux Fur Teddy Bear Pattern:

Step 1: Cutting Fabric Pieces
- Print pattern templates.
- FAB A: Cut head (2), head gusset (1), body (2), arms (2 pairs), legs (2 pairs), ears (2 pairs).
- FAB B: Cut paw pads (2) and foot pads (2).
- FAB C (Optional): Cut any accent pieces.
- Align the fur nap downward and fabric stretch horizontally.
Step 2: Head Assembly
- Place head pieces RS together and pin.
- Insert head gusset between head pieces, matching points A & B.
- Sew along SL using SA of 6 mm.
- Turn head RS out carefully; use a bodkin to push out corners.
- Stuff firmly with fiberfill, shaping a round head.
- Leave neck area open for attaching to body.
Step 3: Ear Construction
- Sew ear pairs RS together, leaving the bottom open.
- Turn RS out, press lightly if needed.
- Hand-stitch the open edge closed.
- Position symmetrically on the head and baste or pin in place.
Step 4: Body Assembly
- Place body pieces RS together and sew along SL, leaving top open for head insertion.
- Turn body RS out, ensuring fur lies in the same direction.
- Stuff body firmly with fiberfill.
- Gather top opening slightly to attach head.
Step 5: Limb Construction
- Assemble arms and legs RS together, leaving openings for turning and stuffing.
- Sew paw and foot pads from FAB B onto corresponding limb pieces using small, tight stitches.
- Turn limbs RS out and stuff lightly to maintain flexibility.
Step 6: Attaching Limbs and Head
- Attach head to body with ladder stitch, ensuring it is centered and secure.
- Position arms and legs at desired locations. Check symmetry and pin in place.
- Hand-stitch limbs to body with strong thread using tight, small stitches.
Step 7: Face and Details
- Position safety eyes evenly; secure according to manufacturer instructions.
- Embroider nose and mouth using black embroidery thread with small, neat stitches.
- Add optional ribbon or scarf around the neck for a finished look.
Step 8: Finishing Touches
- Fluff fur with a soft brush or fingers to give the bear a plush, even appearance.
- Check all seams and reinforcements; ensure limbs and head are firmly attached.
- Adjust stuffing if needed for balance and shape.
Tips for Working with Faux Fur
- Cut fabric with fur nap in one direction to prevent mismatched fur lines.
- Use a blunt tool for turning small parts to avoid pulling or tearing fur.
- Keep SA consistent for professional-looking seams.
- Hand-stitch small areas (ears, paws, neck) for a neater finish.
Download Free PDF: