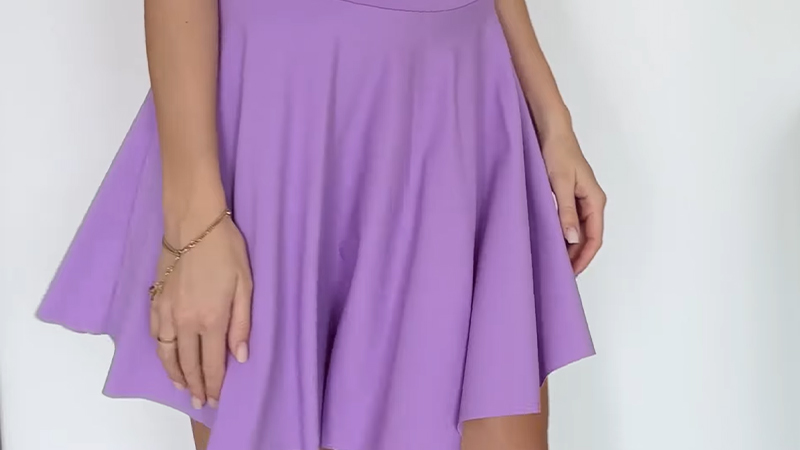
Pattern Description:
The Arbor Skort is a versatile, free athleisure sewing pattern that features integrated shorts and a practical pocket designed for a phone.
Known for its functionality, it is suitable for various activities including hiking, yoga, tennis, jogging, walking, and can even double as swimwear. It is considered the “unsung hero of athleisure”.
Materials Needed & Measurements:
Materials Used:
- Fabric: 2 yards of Santorini Plus Lavanda UV Protective Stretch Recycled Swimwear Tricot.
- Thread: 1 spool of 930 Bright Lavender 250m Gutermann Sew All Thread.
- Adhesive: 1 package of Heat & Bond Lite Soft Stretch Web Adhesive – 5/8″ x 10 yards. (The use of stabilizing tape or soft stretch adhesive is highly recommended when sewing with stretch fabric).
- Pattern: MDF323 – The Arbor Skort Free Sewing Pattern (free download).
Alternative Recommended Fabrics:
- Spandex.
- Polyester Jersey.
- Compression Fabrics.
- A cotton jersey.
- Merino with 2-way stretch.
- Note that the pattern used a fabric that had all-way stretch measuring 45-50%.
Measurements and Allowances:
- Seam Allowances: All seam allowances are ⅜”.
- Hem Allowances: Hem allowances are ⅝”.
- Pocket Sewing: The pocket top edge is pressed down using adhesive and then sewn ⅝”.
Instructions for Making the Arbor Skort Pattern:

Sew the Shorts
The instructions for constructing the integrated shorts are as follows:
- Outer Leg Seam: Place the front short piece onto the back short piece, ensuring the notches are aligned. Sew the outer leg seam. A straight stretch stitch should be used because the fabric has stretch. For added durability, topstitch this seam. Repeat this process for the remaining leg.
- Pocket Preparation: Press the edges of the pocket down according to the guidelines provided on the pattern. Utilize the soft stretch adhesive during this pressing stage. Next, press the top edge of the pocket down with additional adhesive, and then sew it ⅝”.
- Pocket Attachment: Decide which side of the shorts the pocket should be placed on. Align the pocket with the pocket markings that were transferred from the pattern during the cutting phase. If using adhesive, iron the pocket directly onto the shorts. Topstitch the edges of the pocket to secure it.
- Inseam: Sew up the inseam of each leg. Topstitching can be added here if desired.
- Rise Seam: Place one leg inside the other, right sides together, ensuring the notches are aligned. Sew up the rise seam, and then finish by topstitching.
- Hemming: Hem the bottom edges of the shorts. To achieve a neat and clean appearance, use the recommended adhesive before sewing the hem.
Sew the Skirt
The skirt is constructed in two primary steps before being joined to the shorts:
- Side Seams and Hem: With the fabric pieces right sides together, sew up each side of the skirt. Once the side seams are sewn, topstitch them and then hem the bottom edge of the skirt.
- Joining the Shorts and Skirt: Place the shorts, right side out, inside the skirt. It is critical to ensure that the fronts of both pieces are aligned and the side seams match up. Sew along the top edge of the waistline to secure the two layers together, before proceeding to attach the waistband. This initial securing stitch can be made with ¼” seam allowance.
How to Sew the Waistband
The waistband is created in two steps:
- Top Seams: Sew the top edge of the front waistband piece together, right sides facing. Repeat this procedure for the back waistband piece.
- Closing the Band: Unfold the resulting front and back waistband pieces. Place them right sides together and sew each of the short ends. This process results in a single, closed loop for the waistband.
Attaching the Waistband to the Skort
The final stage is attaching the assembled waistband to the joined shorts and skirt:
- Attachment: Unfold the finished waistband. Place the front waistband onto the front of the skort, right sides together. Align the edges and side seams. Use the adhesive tape to help secure the waistband pieces in place. Repeat this alignment and securing process for the back section. Sew all layers together.
- Finishing: Fold the waistband along its top seam. Then, topstitch the outer facing waistband, ensuring that the inner band is caught in the stitching. This completes the final step of sewing the waistband to both layers of the garment.