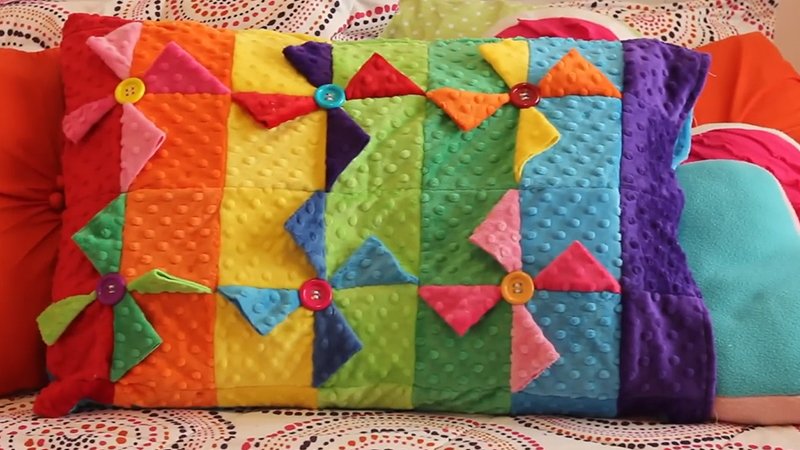
Pattern Description:
The Pinwheel Band Pillowcase features a decorative band of eight colorful Pinwheel blocks attached to a coordinating pillowcase body.
Measuring 30×20″, it fits a standard pillow. The design combines light and dark prints for contrast, using precise piecing with ¼” seams and ½” seams for final assembly, creating a polished, handcrafted finish.
Materials Needed & Measurements:
| Material | Yardage Requirement | Cut Pieces |
| Assorted light prints (band blocks) | ⅝ yard total | 16 – 3⅜” squares (8 sets of two matching squares) |
| Assorted dark prints (band blocks) | ⅝ yard total | 16 – 3⅜” squares (8 sets of two matching squares) |
| Print No. 1 (band) | ⅓ yard | 1 – 5½×40½” strip |
| Print No. 2 (body) | ⅞ yard | 1 – 25¾×41″ rectangle |
Finished Size: 30×20″ (fits a standard pillow).
Instructions for Making the Pinwheel Band Pillowcase Pattern:
Preparation and Cutting
Before starting, ensure all fabrics are prewashed, pressed, and squared for accuracy. The cutting layout and seam allowances are essential for proper alignment later on.
Seam Allowances
Use a ¼” seam allowance when piecing blocks and assembling the band. For the final pillowcase construction, a ½” seam allowance should be used. All sewing steps are completed with right sides together unless otherwise noted.
Cutting Instructions
Using the materials listed in the pattern:
- From assorted light prints, cut 16 squares, each measuring 3⅜”. Group these into eight matching pairs.
- From assorted dark prints, cut another 16 squares, also 3⅜” each, and arrange into eight matching pairs.
- From Print No. 1 (band fabric), cut one strip measuring 5½×40½”.
- From Print No. 2 (body fabric), cut one rectangle measuring 25¾×41″.
After all pieces are cut, organize them into labeled groups to streamline the assembly process.
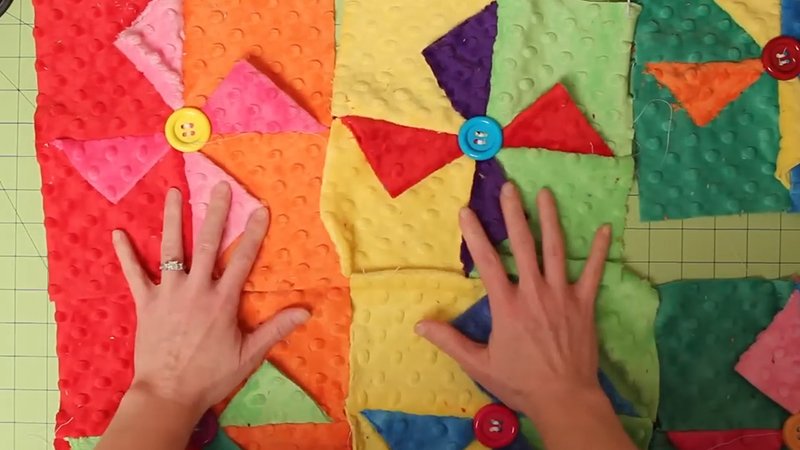
Constructing the Pinwheel Blocks
The Pinwheel blocks form the decorative highlight of this project. Each block is made using four half-square triangle (HST) units created from light and dark fabric pairs.
Step 1: Marking and Pairing
For one Pinwheel block, gather two matching light squares and two matching dark squares. On the wrong side of each light square, draw a diagonal line from corner to corner with a pencil or fabric marker.
Step 2: Stitching the Pairs
Layer each marked light square on top of a dark square, right sides together. Sew a line of stitching ¼” away from both sides of the drawn diagonal line. Repeat for the second pair.
Step 3: Cutting and Pressing
Cut along the drawn diagonal line on each pair to create four triangle units. Open each unit and press the seam allowance toward the darker fabric to reduce bulk. Each finished triangle unit should measure 3″ square, including seam allowances.
Step 4: Assembling the Pinwheel
Arrange the four triangle-squares into a Pinwheel layout, alternating light and dark triangles to form the spinning design. Sew the units together in pairs, pressing seams in opposite directions.
Then, join the two rows to complete the block, pressing the final seam to one side. The completed Pinwheel block should measure 5½” square.
Repeat these steps to make a total of eight matching Pinwheel blocks.
Assembling the Band
Once the Pinwheel blocks are complete, it’s time to join them into a continuous decorative band.
Step 1: Joining Blocks
Align and sew the eight Pinwheel blocks in a single horizontal row using a ¼” seam allowance.
Press all seams in one direction for consistency. The assembled row should measure 5½×40½”, matching the length of the band fabric strip.
Step 2: Adding the Band Fabric
Sew the Print No. 1 (5½×40½”) strip to one long edge of the Pinwheel block row, right sides together. Press the seam toward the solid strip. Join the short edges of the completed unit to form a loop.
Step 3: Folding and Pressing
Fold the loop in half lengthwise, wrong sides together, aligning raw edges and ensuring the Pinwheel blocks are visible on the outside. Press well to create a crisp, folded edge – this forms the finished pillowcase band.
Constructing the Pillowcase Body
With the band ready, you can now build the main body of the pillowcase.
Step 1: Sewing the Body
Take the 25¾×41″ rectangle cut from Print No. 2. Fold it in half with right sides together, matching the short edges to form a 25¾×20½” rectangle. Using a ½” seam allowance, sew along the long edge and one short edge, leaving one short edge open for the pillow opening.
Step 2: Turning and Pressing
Turn the pillowcase body right side out and press the seams flat. Make sure all corners are sharp and edges are even.
Attaching the Band to the Pillowcase
Step 1: Aligning the Band
Slide the prepared band over the open end of the pillowcase body, aligning all raw edges and side seams. Ensure that the pieced side of the band faces the body of the pillowcase. Pin securely around the edge.
Step 2: Stitching the Band
Sew through all layers with a ¼” seam allowance to attach the band. Press the seam allowance toward the pillowcase body.
Step 3: Finishing Touches
To complete the project, topstitch ⅛” from the seam on the pillowcase body side. This secures the seam allowance and gives the pillowcase a clean, professional finish.
Final Pressing and Display
Give the entire pillowcase a final press, paying special attention to the band seam and corners. Slip a standard 30×20″ pillow inside to admire your finished project.
The Pinwheel Band Pillowcase showcases your quilting skill while adding a handmade, decorative charm to any bedding ensemble.