Pattern Description:
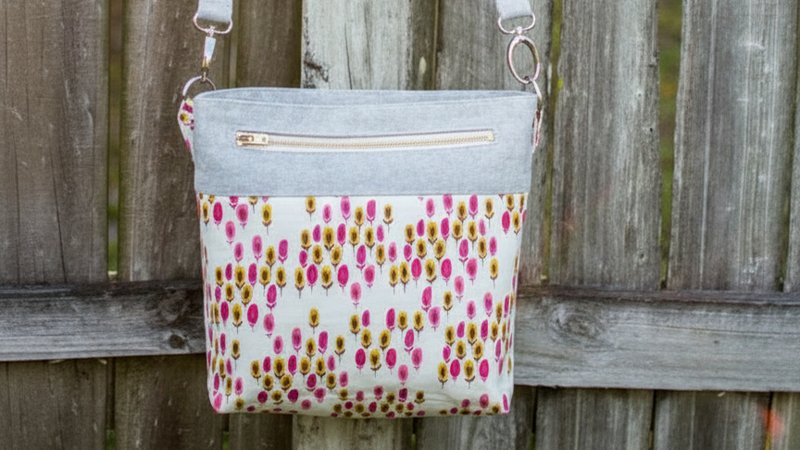
This free, fat-quarter-friendly pattern creates a convertible cross-body tote. It features a double-strap look, an exterior zipper pocket, and interior slip pockets.
The design includes a magnetic snap and an interior d-ring for keys. The instructions explain how to sew the strap as convertible or permanent, allowing for personalization.
Materials Needed & Measurements:
Materials Needed:
- 1 fat quarter (18” \times 20” piece of fabric) for the exterior and tabs.
- 1 fat quarter (18” \times 20” piece of fabric) for the interior lining.
- 1 fat quarter (18” \times 20” piece of fabric) for the pockets.
- 1/4 yard of Essex Linen (or other fabric) for the top panels and straps.
- 1 yard of interfacing or fusible fleece (e.g., Pellon SF101 Shape-flex).
- 1 zipper, 8” or longer.
- 1 magnetic snap.
- 3 D-rings (2 for the shoulder strap, 1 for interior ring to clip things on).
- 1 or 2 swivel snap clips (for a convertible strap).
Cutting Measurements:
| Fabric | Item | Measurement (Height\Width) |
| Exterior | Rectangles | 2 rectangles 9” \times 13” |
| Exterior | Squares (Tabs) | 3 squares 4” \times 4” |
| Lining | Rectangles | 2 rectangles 9” \times 13” |
| Essex Linen/Coordinating | Top panels | 4 rectangles 4” \times 13” |
| Essex Linen/Coordinating | Strap | 1 strip 4” \times fabric width (or 42”) |
| Pocket Fabric | Interior slip pocket | 1 rectangle 11” \times 13” |
| Pocket Fabric | Exterior zipper pocket | 1 rectangle 14” \times 10” |
Instructions for Making the Convertible Cross Body Tote Pattern:
Cutting and Interfacing Preparation
- Cutting Fabric Pieces: Cut the necessary pieces from the specified fabrics. Pieces needing interfacing are marked with an asterisk.
- Exterior fabric: 2 rectangles 9” \times 13” and 3 squares 4” \times 4”.
- Lining fabric: 2 rectangles 9” \times 13”.
- Coordinating fabric (Top panels/Straps): 4 rectangles 4” \times 13” and 1 strip 4” \times fabric width (or 42”).
- Pocket fabric: 1 rectangle 11” \times 13” (interior slip pocket) and 1 rectangle 14” \times 10” (exterior zipper pocket).
- Applying Interfacing: Apply interfacing (such as Pellon SF101 Shape-flex) to all pieces marked with an asterisk, which includes the exterior and lining print fabrics, the slip pocket, all four coordinating top panels, and the strap piece. If using fusible fleece, do not apply it to the slip pocket piece.
Sewing the Bag Sides and Preparing Corners
- Creating Boxed Corners: Measure and cut 1 \frac{1}{2}” squares from the bottom corners of the exterior and interior rectangles to prepare for boxed corners. This step can be skipped if boxed corners are not desired.
- Attaching Top Panels: Sew a top panel piece (4” \times 13”) to each of the four interior and exterior rectangles using a 1/2” seam allowance.
- Pressing and Topstitching: Press the seam allowance toward the top panel. Topstitch 1/8” from the seam onto the top panel.
Making the Zippered Pocket
The zipper pocket rectangle is 14” \times 10”. The zipper should be 8” or longer.
- Drawing the Pocket Slit: On the wrong side of the zipper pocket rectangle, draw a horizontal line approximately 8” long, 1” below the top edge. Draw a second line 1/2” below the first. Connect the long lines with short vertical lines 1” from each edge, creating a rectangle 1/2” tall and 8” long.
- Positioning and Sewing: Pin the pocket piece (right sides together) onto the chosen bag side (interior or exterior). If placing the pocket centered on the upper panel, place the top of the pocket piece 1 \frac{1}{4}” below the top of the bag side piece. Sew all the way around the drawn rectangle, backstitching at the start.
- Cutting the Slit: Cut down the middle of the sewn rectangle using small sharp scissors, stopping about 1/4” from either end, and then clip carefully into the corners, avoiding cutting the stitching.
- Turning and Inserting the Zipper: Turn the pocket piece through to the back of the bag exterior and press gently. Center the zipper underneath the opening, ensuring the slider is visible. Secure the zipper using pins or Wondertape (double-sided tape for sewing).
- Finishing the Pocket: Topstitch around the zipper opening, 1/8” from the edge. Trim any excess zipper tape about 1/4” from the sewing. Fold up the pocket piece, pin around the top and sides, and stitch the pocket top and sides with a 1/4” or 1/2” seam allowance.
Making the Interior Slip Pocket
The slip pocket piece is 11” \times 13”.
- Sewing the Pocket Top: Fold the slip pocket piece with the 13” edges right sides together. Sew along the top edge with a 1/2” seam allowance. Turn the resulting pocket tube right side out and press.
- Securing the Pocket: Place the pocket on top of an interior bag piece, about 1/2” below the upper panel. Stitch close to the bottom edge to secure it. Baste along the sides within the 1/2” seam allowance, if desired.
- Dividing the Pocket: Mark and sew a dividing line to create two slip pockets.
Installing the Magnetic Snap
- Marking Location: On one interior side piece, mark the center of the upper panel, 1 \frac{1}{2}” from the top edge. Use the metal disk that comes with the magnetic snap to mark the slit lines on both sides of the center mark.
- Stabilizing: Cut two stabilizer circles (e.g., quilt batting, felt, or fleece) about the size of a silver dollar. Mark slit lines on the stabilizer circles as well.
- Cutting and Inserting: Use a seam ripper or small scissors to cut small slits on all the marked lines. Insert the snap prongs from the right side through the slits. On the back side, place a stabilizer circle over the prongs, followed by the metal disk. Bend the prongs outward.
- Repeat: Install the other half of the magnetic snap into the second lining piece in the same manner.
Making the D-ring Tabs
- Folding Tabs: Take the 4” \times 4” tab squares. Press them in half, then press the edges to the center. Fold in half again and press.
- Topstitching and D-rings: Topstitch close to the long edges. Wrap each tab through a D-ring and stitch the ends together. Create at least two tabs for the shoulder strap and one additional tab if an interior D-ring is desired.
- Placing Tabs: Center two D-ring tabs on the upper panel of one of the exterior pieces. If using an interior D-ring, center one on the upper panel of a bag interior piece.
Sewing the Tote Together
- Sewing Exterior: Pin the exterior bag pieces along the side and bottom edges and stitch with a 1/2” seam allowance. Press the seams open.
- Boxing Exterior Corners: Flatten each corner, center the side and bottom seams, pin, and stitch both corners using a 1/2” seam allowance.
- Sewing Lining: Sew the lining in the same manner as the exterior, pressing the seams open and boxing the corners. However, leave a 6” opening in the bottom of the lining.
- Joining Exterior and Lining: Turn the bag exterior right side out. Place the bag lining over the exterior, so right sides are together. Pin around the entire top edge and sew with a 1/2” seam allowance.
- Finishing: Turn the bag right side out through the opening left in the lining. Pin and stitch the lining opening closed. Press the bag and topstitch around the top edge.
Sewing the Shoulder Strap
The strap piece is 4” \times fabric width (or 42”).
- Strap Construction: Press and topstitch the strap piece using the same method used for the tab pieces.
- Permanent Strap: For a permanent strap, wrap each strap end through a D-ring already secured on the bag exterior, tucking in the raw edges, and stitch to secure it.
- Convertible Strap: For a removable and convertible strap, sew swivel snap clips onto the strap ends. Wrap each end through a clip, tuck the raw edges under, and sew two rows of stitching to secure the clip.
- To make a cross-body strap, hook one clip onto a D-ring on either side of the bag.
- To make a purse-length strap, hook one clip onto a D-ring, slip the other clip through the D-ring on the opposite side of the bag, and then snap it onto the same side as the first clip.