Pattern Description:
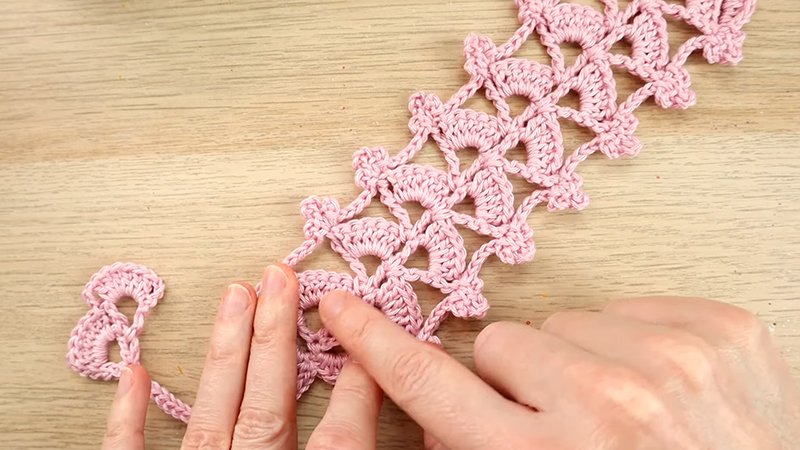
This is an intermediate level vintage-style lace bookmark featuring a beautiful flowery design. It utilizes delicate crochet stitches like shells (made of puff stitches) and V-stitches.
Crocheted with #30 thread, it creates a simple, dainty item. The pattern includes floral details and is a variation of a Bible cover design.
Materials Needed & Measurements
Materials Needed:
- 15-20 yards #30 Extra Fine Aunt Lydia’s Crochet Thread in Natural or a color of your choice.
- (Optional) 3-4 yards of Embroidery floss in a color of your choice for accent trim.
- 1.15mm steel hook.
- Fine embroidery needle.
- Scissors.
- Pins.
- Stitch markers.
- Starching spray of your choice.
- Blocking board.
- Gauge: 18 sc in 1½”. Each row 2-5 repeat adds approximately ¾” of height.
Measurements:
The finished bookmark measures 1¾” wide by 6″ or 7″ tall after blocking.
Abbreviations Used:
- ch/chs: chain/chains
- sc: single crochet
- dc: double crochet
- sl st: slip stitch
- st/sts: stitch/stitches
- sp/sps: space/spaces
- sk: skip
- prev: previous
- Puff (Puff Stitch): yo, pull up a loop 3 times in same st, yo, pull through 6 loops, yo, pull through final 2 loops.
- V-stitch: (dc, ch 1, dc) in same st.
- Picot: ch 3, sl st back into first ch.
Notes:
- Ch 1 at beginning of row does not count as st.
- Turning chs counted as first st of next row will be included in the next row’s st count.
- The pattern is constructed using shells (made of 3 puff sts with chs in between) and V-sts.
Instructions for Making the Vintage Crochet Lace Bookmark Pattern:
Evidence of Hope Bookmark Pattern
Ch 18.
- Row 1: sc in 2nd ch from hook, ch 1, sk 3 sts, ([puff, ch 2] 2 times, puff, ch 1) in next st, sk 3 sts, sc in next st, this will create a “shell”; rep from , ch 3 (counts as first dc of next row), turn. (3 sc, 2 shells).
- Row 2: dc in first st, ch 3, sk to top of first “shell” in prev row (this is the second puff of the “shell”) sc, ch 3, sk to sc between shells, V-stitch, ch 3, sk to top of next “shell” in prev row, sc, ch 3, sk to sc at end of row, 2 dc in final st, ch 3 (counts as first dc of next row), turn. (4 dc, 2 sc, 1 V-stitch, 4 ch-3 sps).
- Row 3: (puff, ch 2, puff) in first st, ch 1, sk 3 chs, sc in top of sc from prev row, ch 1, sk 3 chs to ch-1 sp at center st of V-stitch from prev row, ([puff, ch 2] 2 times, puff, ch 1) in ch-1 sp, sk 3 chs, sc in top of sc from prev row, ch 1, sk 3 chs, (puff, ch 2, puff, dc) in final st (top of ch-3 from prev row), ch 1, turn. (1 shell, 2 half-shells, 2 sc, 2 dc).
- Row 4: sc in first st, ch 3, sk to sc between shells, V-stitch, ch 3, sk to top of next shell in prev row, sc, ch 3, sk to sc between shells, V-stitch, ch 3; sc in final st (top of ch-3 from prev row), ch 1, turn. (4 ch-3 sps, 2 V-stitches, 3 sc).
- Row 5: sc in first st, ch 1, sk to ch-1 sp at center of V-stitch from prev row, ([puff, ch 2] 2 times, puff, ch 1) in ch-1 sp, sk to next sc, sc in top of sc from prev row, ch 1, sk to ch-1 sp at center of V-stitch from prev row, ([puff, ch 2] 2 times, puff, ch 1) in ch-1 sp, sk to final st of row, sc, ch 3 (counts as first dc of next row), turn. (2 shells, 3 sc, 4 ch-2 sps, 4 ch-1 sps).
- Repeat: Rep rows 2–5, 4 times (for approx. 5½” long) or 5 times (for approx. 6½” long). Repeat these rows as many or few times as desired to adjust length. Then, rep Row 2, but omit the ch-3 at the end; instead, ch 1, turn. Continue to Edging rounds once the bookmark is about ½” to 1″ shorter than your desired finished size.
Bookmark Edging
- Round 1: sc in next 2 sts, 3 sc in ch-3 sp, sc in next st, ch 1, sk 3 chs ([puff, ch 1] 4 times) in ch-1 sp, sk 3 chs, sc in next st, 3 sc in ch-3 sp, sc in next 2 sts, ch 1, place stitch marker (first corner), continue working sc evenly down the side of the bookmark, ch 1, place stitch marker. Continue working sc evenly across bottom edge, totaling 17 sts (3 sc in each ch-3 sp, a sc in the bottom of each shell, the 2 sc on each end, and one in the center), ch 1, place stitch marker. Continue working evenly up the other side, ensuring the st count matches the first edge. At end of row, ch 1, place stitch marker, join with sl st to first sc of round. Note: Stitch counts along the sides should ideally be a multiple of 6, minus 2 (e.g., 58 or 76 sc), for the picot edge to match the pattern sample.
- Round 2: ch 1, sc in next 5 sts, sk st, 3 sc in each of next 5 ch-1 sps, sk st, sc in next 5 sts, (sc, ch 1, sc) in corner, sc in next 2 sts, picot, sc in next 6 sts, picot rep to end of side, (sc, ch 1, sc) in corner. sc in next 2 sts, picot, sc in next 7 sts, picot, sc in next 6 sts, picot, sc in next 2 sts, (sc, ch 1, sc) in corner. sc in next 2 sts, picot, sc in next 6 sts, picot rep to end of row, (sc, ch 1, sc) in corner, join with sl st to first sc. Note: This round is not exact and may require “eyeballing” for evenness.
- Round 3 (Optional, contrasting color): working between rounds 1 and 2: sl st across next 5 sts, sl st in sc sts at top of 4-petaled lily at center top of bookmark. Working between rounds 1 and 2: sl st across next 5 sts, continue working sl sts down edge, across bottom, and up the other side.
Fasten off and weave in ends. Block and stiffen using starch, glue, or stiffening spray.
Cord and Tassel Instructions
- Cord Creation:
- Twist six 12″ lengths of thread into a cord. Ensure the threads are laying flat before beginning.
- Tape one end of the threads to a table.
- Twist the threads in one direction until the cord tightens and twists back over on itself.
- Once the desired twist is achieved, thread the cord through the flower at the top of the bookmark, fold the strands in half, and stretch the twists out until they are even.
- Knot the ends together using an overhand knot to prevent the cord from unraveling.
- Tassel Creation:
- Cut an 8″ piece of thread, thread it halfway through an embroidery needle (creating a 4″ double-thickness piece) and set it aside.
- Wrap thread around a 2″ piece of cardboard (like a credit card) until the bundle is 1½” to 2″ wide.
- Thread the reserved 4″ piece of double-thickness thread through the wrapped bundle and tie it tightly around the top, then snip the bottom loops.
- Thread the bundle through the finished cord just above the end knot. Gently untwist the cord slightly if needed to get the bundle through, but do not undo the knot.
- Fold the bundle in half. Ensure the knot used to tie the center is tucked inside the bundle.
- Wrap another piece of thread around the tassel several times about ½” from the top and fasten securely.
- Trim the ends of the tassel with scissors so they are all the same length.