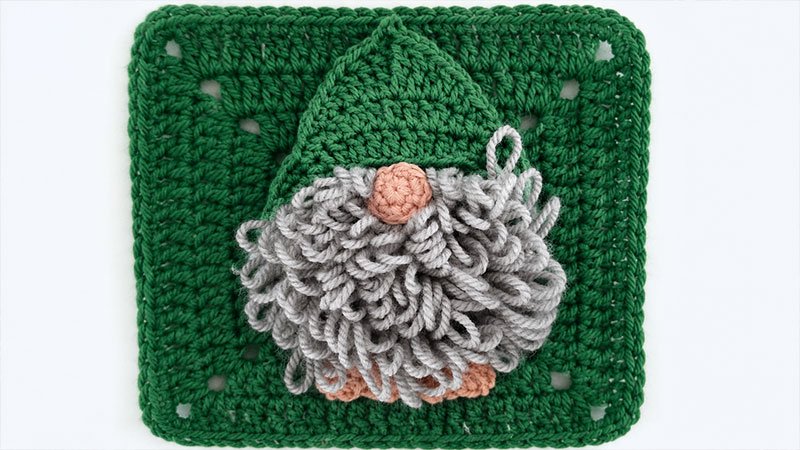
This pattern combines a classic crochet square base with playful, dimensional appliques to bring a Christmas gnome to life.
The center of the square is worked in a dense Loop Stitch using a soft grey yarn, which instantly mimics a plush, fluffy gnome beard.
Once the base square transitions into a vibrant holiday green background, you will crochet separate pieces for the iconic red hat, pink nose, hands, and brown shoes.
Perfect for holiday blankets, festive throw pillows, or Christmas bunting, this square balances beautiful texture with clean geometric framing.
Materials & Tools
Crochet Hooks
-
Main Hook: 4.0 mm (US G/6) – Used for the main background square.
-
Detail Hook: 3.5 mm (US E/4) – Used for the smaller gnome features (hat, nose, hands, shoes).
Yarn Requirements
Weight: DK (Weight 3 / Light)
-
Color A (Background): Grass Green (approx. 15–20 yards)
-
Color B (Hat): Festive Red (approx. 10 yards)
-
Color C (Shoes): Light Brown / Fudge (Small scrap amount)
-
Color D (Beard): Stormy Grey (approx. 12 yards)
-
Color E (Skin): Vintage Soft Pink (Small scrap amount)
Notions
-
Tapestry needle for assembly and weaving ends.
-
Scissors.
Sizing & Gauge Info
-
Finished Size: Approximately 5.5 inches (14 cm) square.
-
Gauge Target: The first 3 rounds of the center circle should measure exactly 2.25 inches (5.5 cm) across when using the 4.0 mm hook.
Key Terms & Special Stitches
-
MC (Magic Circle): An adjustable yarn loop used to start working in the round seamlessly.
-
Loop Hdc (Loop Half Double Crochet): Wrap the yarn over your hook, insert into the stitch, loop the yarn over your finger to create a 1-inch loop on the right side of the fabric, and secure it by completing a normal half double crochet.
-
Picot: Chain 3, then insert your hook into the back ridge of the very first chain made and execute a slip stitch to form a small pointed tip.
-
Inc (Increase): Placing two stitches into the exact same space to expand the round or row.
Step-by-Step Crochet Instructions
1. The Textured Background Square
Using the 4.0 mm hook. Start with Grey yarn [Color D] to create the beard center, then switch to Green [Color A]. Initial chains do not count as stitches; join your rounds directly into the first actual stitch.
-
Round 1 [Grey]: Create a MC. Chain 2, then work 11 Loop Hdc stitches directly into the ring. Pull tight to close. (11 sts)
-
Round 2 [Grey]: Chain 1. Work 2 Loop Hdc stitches into every single stitch around. (22 sts)
-
Round 3 [Grey]: Chain 1. Work 2 Loop Hdc in the first stitch, then 1 Loop Hdc in the next. Repeat this sequence 11 times around. (33 sts)
-
Round 4 [Grey]: Chain 1. Work 1 Loop Hdc, then an increase (2 Loop Hdc in one st). Following this, repeat the pattern of (2 individual Loop Hdc, 1 increase) 10 times. Finish the round with 1 final Loop Hdc. (44 sts)
-
Fasten off the Grey yarn and securely tie on the Green yarn [Color A].
-
-
Round 5 [Green]: This round transforms our circle into a square. Chain 1. Work 2 Sc, 2 Hdc, 1 Dc, then create a corner by working [2 Dc, Ch 2, 2 Dc] all in the next stitch. Repeat this sequence around to build your 4 corners. Finish the final side by mirroring the start: 1 Dc, 2 Hdc, and 1 Sc. (13 stitches per side, plus corner spaces)
-
Round 6 [Green]: Chain 2. Work a Dc into the first 7 stitches. At the corner space, work [1 Dc, Ch 2, 1 Dc]. Work 13 Dc across the straight edge. Repeat this around, finishing the final side with 6 Dc. (15 stitches per side)
-
Round 7 [Green]: Chain 2. Work a Dc into the first 8 stitches. At the corner space, work a sharper point: [2 Dc, Ch 1, 2 Dc]. Work 15 Dc across the flat edge. Repeat around, finishing the last side with 7 Dc. (19 stitches per side)
-
Round 8 [Green]: A clean border round. Chain 1. Sc in the first 10 stitches. In the corner space, work [1 Sc, Ch 1, 1 Sc]. Sc 19 along the edge. Repeat around, completing the final side with 9 Sc. (21 stitches per side).
Fasten off and neatly weave in the background tails.
2. The Pointed Hat Applique
Using the 3.5 mm hook and Red yarn [Color B]. This piece is built in progressive rows, leaving unworked edges to create a curved, slouchy gnome hat.
-
Base Row 1: Chain 24. Starting in the second chain from your hook, slip stitch 2, Sc 3, Hdc 3, Dc 7, Hdc 3, Sc 3, and slip stitch the final 2 chains. Fasten off. (23 sts)
-
Row 2: Turn your work so the right side faces you. Join your Red yarn with a slip stitch into the 4th stitch of Row 1. Starting in the very next stitch, work 3 Sc, 1 Sc-increase, 1 Hdc, 1 Dc-increase, 3 Dc, 1 Dc-increase, 1 Hdc, 1 Sc-increase, 3 Sc, and 1 slip stitch. Leave the remaining 3 stitches of the previous row completely untouched. Fasten off. (20 sts)
-
Row 3: With the right side facing you, join the Red yarn with a slip stitch into the 4th stitch of Row 2. Moving to the next stitch, work 2 Sc, 1 Hdc, 1 Dc-increase, 1 Tr. In the next stitch, create the hat’s decorative tip by working: [1 Tr, 1 Picot stitch, 1 Tr] all in that same space. Continue down with 1 Tr, 1 Dc-increase, 1 Hdc, 2 Sc, and a final slip stitch. Leave the last 4 stitches unworked.
Fasten off, ensuring you leave a long yarn tail (approx. 12 inches) for sewing.
3. Face & Limb Accents
Switching to the 3.5 mm hook for all delicate detail pieces.
The Round Nose
-
Round 1 [Pink Yarn E]: Start a MC. Work 6 Sc into the loop. Do not join with a slip stitch; you will work this piece in a continuous spiral. (6 sts)
-
Round 2: Work an increase (2 Sc in one st), then 1 Sc in the next. Repeat this pattern 3 times around. (9 sts)
-
Fasten off, leaving a long sewing tail.
-
Tiny Hands (Make 2)
-
Row 1 [Pink Yarn E]: Chain 3. Turn, skip the first chain, and work 1 Sc into each of the remaining 2 chains. (2 sts)
-
Fasten off, leaving a tail for assembly.
-
Right Boot
-
Row 1 [Brown Yarn C]: Chain 4. In the second chain from the hook, work 1 Sc. In the next chain, cluster [1 Hdc, 1 Dc]. In the final chain, cluster [1 Dc, 1 Hdc]. Chain 1, then finish with a slip stitch right into the very first chain node. (5 sts)
-
Fasten off, leaving a tail.
-
Left Boot
-
Row 1 [Brown Yarn C]: Chain 4. In the second chain from your hook, cluster [1 Hdc, 1 Dc]. In the next chain space, cluster [1 Dc, 1 Hdc]. Work a single Sc in the very last chain. (5 sts)
-
Fasten off, leaving a tail.
-
Assembly & Finishing
     [ Hat Tip / Picot ]
         _  __  _
        /        \  <- Red Hat (Rows 1-3)
      /____________\
     [  Pink Nose   ] <- Center top of beard
   (H) [Loop Beard] (H) <- Hands on sides
         [B1]  [B2]   <- Boots aligned at bottom edge
-
Prep the Beard: Lay your green square flat. Use your fingers to brush all of the loop stitches downward so they lay flat, creating a clean, layered beard effect.
-
Position the Hat: Place the red hat applique across the top section of the loop circle (overlapping Round 4). The long, flat bottom edge (Row 1) of the hat should cleanly mask the top edge of the grey loops. Whipstitch it in place using your yarn tail.
-
Place the Nose: Tuck the pink nose slightly under the center brim of the red hat, sitting dead-center on top of the grey loops. Sew securely.
-
Attach Hands and Shoes: Pin the two pink hands on either side of the grey circle body. Align the brown boots at the base of the gnome body, angling the initial chains perfectly along the natural seam between rows 5 and 6 of your green square backdrop.
-
Final Clean-up: Thread all remaining yarn tails through to the back of the square, knot them gently to secure your appliques, weave them through the stitches, and snip any excess.