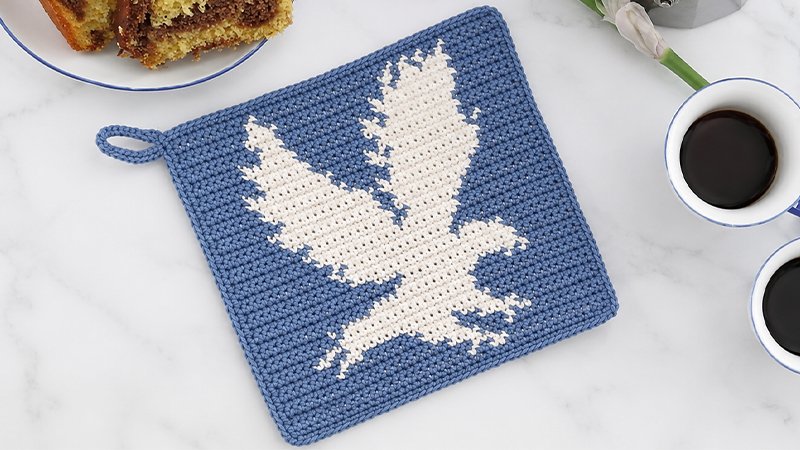
This project guides you through creating a square kitchen hot pad featuring a majestic eagle design using the tapestry crochet technique.
By carrying two contrasting colors of sport-weight cotton yarn simultaneously, you will create a sturdy, thick fabric perfect for heat protection.
The project is worked flat in rows for the main body and finished with a clean border and a functional hanging loop.
-
Final Dimensions: Approximately 6.3 inches by 6.3 inches (16 cm × 16 cm)
-
Tension/Gauge: 27.5 single crochets across and 26 rows high equals a 4-inch (10 cm) square.
Needed Supplies
-
Hook: 2.75 mm (Size C/2 US)
-
Yarn: Fine/Sport weight (Category 2) 100% cotton yarn. The original model uses Schachenmayr Catania.
-
Main Color (A): Dark Coffee Brown — approx. 52 yards (47.5 meters)
-
Contrast Color (B): Off-White/Natural — approx. 30 yards (27.5 meters)
-
-
Notions: Tapestry needle for weaving in yarn ends
Important Pattern Guidelines
-
Method: Work every stitch as a single crochet. Run the unused color along the top of the previous row, catching it inside your stitches as you work over it.
-
Stitch Count: Every single row maintains a strict count of 43 stitches.
-
Row Transitions: Do not count the turning chain as a stitch. Chain 1 and turn your work at the end of every row.
-
Reading Direction: Odd rows represent the front (Right Side) of the potholder. Even rows represent the back (Wrong Side).
Step-by-Step Instructions
Main Body
Using Color A, start by making 44 chain stitches.
-
Row 1 (Right Side): Work 43 stitches with Color A.
-
Row 2 (Wrong Side): Work 24 in A, 1 in B, 2 in A, 2 in B, then finish with 14 in A.
-
Row 3 (Right Side): Work 15 in A, 3 in B, and 25 in A.
-
Row 4 (Wrong Side): Work 22 in A, 4 in B, 4 in A, 1 in B, and 12 in A.
-
Row 5 (Right Side): Work 9 in A, 2 in B, 1 in A, 1 in B, 5 in A, 5 in B, and 20 in A.
-
Row 6 (Wrong Side): Work 8 in A, 1 in B, 10 in A, 5 in B, 3 in A, 5 in B, and 11 in A.
-
Row 7 (Right Side): Work 13 in A, 5 in B, 1 in A, 6 in B, 6 in A, 3 in B, and 9 in A.
-
Row 8 (Wrong Side): Work 6 in A, 2 in B, 2 in A, 19 in B, and 14 in A.
-
Row 9 (Right Side): Work 15 in A, 20 in B, and 8 in A.
-
Row 10 (Wrong Side): Work 10 in A, 18 in B, and 15 in A.
-
Row 11 (Right Side): Work 15 in A, 17 in B, 1 in A, 1 in B, and 9 in A.
-
Row 12 (Wrong Side): Work 15 in A, 14 in B, 4 in A, 1 in B, 1 in A, 1 in B, and 7 in A.
-
Row 13 (Right Side): Work 7 in A, 17 in B, and 19 in A.
-
Row 14 (Wrong Side): Work 20 in A, 15 in B, and 8 in A.
-
Row 15 (Right Side): Work 8 in A, 18 in B, and 17 in A.
-
Row 16 (Wrong Side): Work 14 in A, 20 in B, and 9 in A.
-
Row 17 (Right Side): Work 11 in A, 3 in B, 1 in A, 15 in B, and 13 in A.
-
Row 18 (Wrong Side): Work 12 in A, 1 in B, 1 in A, 14 in B, and 15 in A.
-
Row 19 (Right Side): Work 14 in A, 16 in B, and 13 in A.
-
Row 20 (Wrong Side): Work 11 in A, 19 in B, and 13 in A.
-
Row 21 (Right Side): Work 13 in A, 7 in B, 1 in A, 12 in B, and 10 in A.
-
Row 22 (Wrong Side): Work 11 in A, 11 in B, 2 in A, 7 in B, and 12 in A.
-
Row 23 (Right Side): Work 11 in A, 9 in B, 1 in A, 13 in B, and 9 in A.
-
Row 24 (Wrong Side): Work 8 in A, 13 in B, 2 in A, 10 in B, and 10 in A.
-
Row 25 (Right Side): Work 9 in A, 11 in B, 2 in A, 14 in B, and 7 in A.
-
Row 26 (Wrong Side): Work 9 in A, 12 in B, 1 in A, 13 in B, and 8 in A.
-
Row 27 (Right Side): Work 7 in A, 12 in B, 1 in A, 1 in B, 2 in A, 12 in B, and 8 in A.
-
Row 28 (Wrong Side): Work 7 in A, 11 in B, 6 in A, 12 in B, and 7 in A.
-
Row 29 (Right Side): Work 7 in A, 13 in B, 6 in A, 10 in B, and 7 in A.
-
Row 30 (Wrong Side): Work 6 in A, 11 in B, 5 in A, 2 in B, 1 in A, 10 in B, 1 in A, 1 in B, and 6 in A.
-
Row 31 (Right Side): Work 8 in A, 11 in B, 1 in A, 1 in B, 6 in A, 7 in B, 2 in A, 1 in B, and 6 in A.
-
Row 32 (Wrong Side): Work 8 in A, 7 in B, 9 in A, 11 in B, and 8 in A.
-
Row 33 (Right Side): Work 8 in A, 12 in B, 8 in A, 7 in B, and 8 in A.
-
Row 34 (Wrong Side): Work 7 in A, 7 in B, 9 in A, 2 in B, 1 in A, 9 in B, and 8 in A.
-
Row 35 (Right Side): Work 7 in A, 10 in B, 2 in A, 1 in B, 9 in A, 4 in B, 2 in A, 1 in B, and 7 in A.
-
Row 36 (Wrong Side): Work 10 in A, 3 in B, 12 in A, 11 in B, and 7 in A.
-
Row 37 (Right Side): Work 7 in A, 9 in B, 1 in A, 1 in B, 12 in A, 4 in B, and 9 in A.
-
Row 38 (Wrong Side): Work 9 in A, 4 in B, 14 in A, 1 in B, 1 in A, 7 in B, and 7 in A.
-
Row 39 (Right Side): Work 7 in A, 3 in B, 1 in A, 2 in B, 1 in A, 2 in B, 15 in A, 2 in B, and 10 in A.
-
Row 40 (Wrong Side): Work 10 in A, 1 in B, 17 in A, 1 in B, 1 in A, 1 in B, 1 in A, 1 in B, 2 in A, 1 in B, and 7 in A.
-
Row 41 (Right Side): Work all 43 stitches using Color A.
Cut and secure Color B; you will complete the remainder of the project using only Color A.
Decorative Border
Facing the front side, chain 1 with Color A.
-
Round 1: Navigate down the left vertical edge, placing 41 single crochets evenly along the row ends. Chain 1 to turn the corner. Work 43 single crochets across the foundation chain at the bottom. Chain 1 to turn the next corner. Work 41 single crochets up the right vertical edge. Chain 1 for the corner, then place 43 single crochets across the top edge. Finish the border by chaining 1 and closing the round with a slip stitch into your very first border stitch.
Hanging Element
Chain 15, turn the piece to look at the back, and secure the chain down with a slip stitch into the adjacent border stitch to create a ring. Chain 1, flip back to the front side, and distribute 20 single crochet stitches evenly inside the chain loop you just anchored.
Cut your yarn, pull it through to fasten off completely, and use your tapestry needle to hide all loose yarn ends inside the stitches.