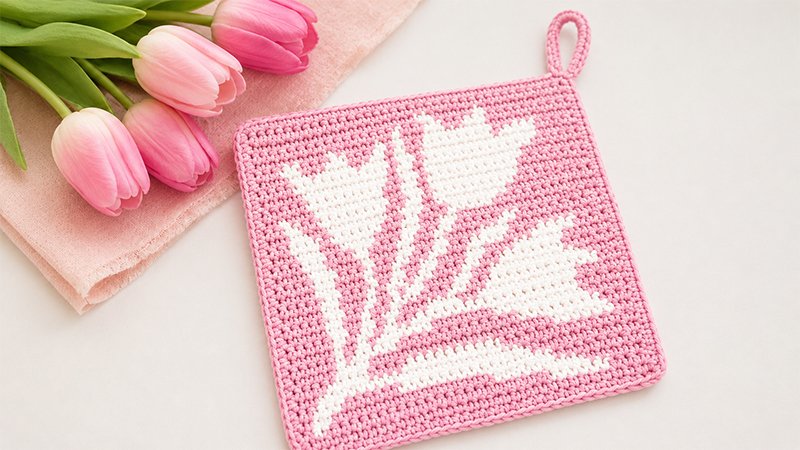
This delightful tapestry crochet hot pad brings the fresh energy of spring right into your kitchen. Decorated with a charming tulip motif, it is a quick and satisfying project that makes an excellent gift for Easter, Mother’s Day, or seasonal baking enthusiasts.
By utilizing two contrasting colors of sturdy cotton yarn, you will create a thick, functional fabric that protects your hands and countertops while looking beautifully festive.
Project Overview
-
Skill Level: Intermediate (requires basic knowledge of tapestry crochet and carrying yarn)
-
Finished Dimensions: Approximately 6.2 inches wide by 6.3 inches tall (15.7 cm × 16 cm)
-
Stitch Gauge: 22.5 single crochet stitches across by 21 rows tall equals a 4-inch (10 cm) square.
Supplies Needed
-
Crochet Hook: Size 3.5 mm (US E/4 or UK 9)
-
Yarn: Medium/Aran weight (Category 4) 100% cotton yarn.
-
Color A (Background/Main Color): Roughly 48 yards (e.g., Red)
-
Color B (Tulip Pattern Color): Roughly 21 yards (e.g., White)
-
-
Notions: A tapestry needle for weaving in the yarn tails.
Essential Pattern Notes
-
Stitch Base: The entire body of the potholder is worked using standard single crochet stitches. The row-by-row instructions always equal a total of 34 stitches per row.
-
Color Changes: Use the tapestry technique, carrying the resting color along the top of your previous stitches and working over it with your active color. To make seamless color transitions, change yarn during the final “yarn over” of the stitch right before the new color starts.
-
Turning: At the end of every row, make a single chain stitch and turn your work. This turning chain does not count as an active stitch.
-
Reading the Rows: Odd-numbered rows represent the Right Side (RS), and even-numbered rows represent the Wrong Side (WS). The shorthand instructions indicate the color letter followed by the number of stitches to work (e.g., “(A) 3, (B) 4” means make 3 single crochets in Color A, then 4 single crochets in Color B).
Step-by-Step Instructions
Section 1: The Main Potholder Body
Using Color A, start by making a foundation chain of 35.
-
Row 1 (RS): Insert hook into the second chain from it. Work 34 single crochets across using Color A.
-
Row 2 (WS): Color A 1, Color B 2, Color A 22, Color B 6, Color A 3.
-
Row 3 (RS): Color A 5, Color B 9, Color A 16, Color B 2, Color A 2.
-
Row 4 (WS): Color A 2, Color B 3, Color A 6, Color B 15, Color A 8.
-
Row 5 (RS): Color A 10, Color B 21, Color A 3.
-
Row 6 (WS): Color A 4, Color B 4, Color A 4, Color B 9, Color A 13.
-
Row 7 (RS): Color A 1, Color B 6, Color A 18, Color B 4, Color A 5.
-
Row 8 (WS): Color A 5, Color B 1, Color A 1, Color B 5, Color A 12, Color B 8, Color A 2.
-
Row 9 (RS): Color A 3, Color B 9, Color A 6, Color B 6, Color A 1, Color B 1, Color A 2, Color B 1, Color A 5.
-
Row 10 (WS): Color A 4, then repeat the sequence [Color B 2, Color A 1] two times, Color B 1, Color A 2, Color B 16, Color A 4.
-
Row 11 (RS): Color A 3, Color B 10, Color A 2, Color B 3, Color A 3, Color B 2, Color A 1, Color B 1, Color A 2, Color B 2, Color A 5.
-
Row 12 (WS): Color A 5, Color B 2, Color A 2, Color B 1, Color A 2, Color B 3, Color A 3, Color B 2, Color A 2, Color B 11, Color A 1.
-
Row 13 (RS): Color A 2, Color B 9, Color A 2, Color B 2, Color A 3, Color B 2, Color A 1, Color B 1, Color A 1, Color B 2, Color A 2, Color B 2, Color A 5.
-
Row 14 (WS): Color A 5, Color B 2, Color A 3, Color B 1, then repeat the sequence [Color A 1, Color B 2] two times, Color A 3, Color B 2, Color A 2, Color B 6, Color A 4.
-
Row 15 (RS): Color A 3, Color B 5, Color A 3, Color B 2, Color A 3, Color B 2, Color A 2, Color B 1, Color A 2, Color B 1, Color A 3, Color B 3, Color A 4.
-
Row 16 (WS): Color A 4, Color B 3, Color A 3, Color B 1, then repeat the sequence [Color A 2, Color B 2] two times, Color A 2, Color B 4, Color A 3, Color B 4, Color A 2.
-
Row 17 (RS): Color A 8, Color B 3, Color A 4, Color B 1, Color A 2, Color B 2, Color A 3, Color B 1, Color A 3, Color B 3, Color A 4.
-
Row 18 (WS): Color A 3, Color B 3, Color A 3, Color B 2, Color A 3, Color B 2, Color A 2, Color B 2, Color A 5, Color B 2, Color A 7.
-
Row 19 (RS): Color A 13, Color B 2, Color A 2, Color B 2, Color A 3, Color B 4, Color A 2, Color B 3, Color A 3.
-
Row 20 (WS): Color A 2, Color B 4, Color A 1, Color B 6, Color A 2, Color B 2, Color A 3, Color B 5, Color A 9.
-
Row 21 (RS): Color A 7, Color B 8, Color A 1, Color B 3, Color A 1, Color B 7, Color A 2, Color B 3, Color A 2.
-
Row 22 (WS): Color A 2, Color B 2, Color A 2, Color B 8, Color A 2, Color B 2, Color A 1, Color B 9, Color A 6.
-
Row 23 (RS): Color A 5, Color B 10, Color A 1, Color B 2, Color A 2, Color B 8, Color A 3, Color B 2, Color A 1.
-
Row 24 (WS): Color A 1, Color B 1, Color A 3, Color B 9, Color A 2, Color B 2, Color A 1, Color B 10, Color A 5.
-
Row 25 (RS): Color A 4, Color B 11, Color A 1, Color B 2, Color A 1, Color B 10, Color A 5.
-
Row 26 (WS): Color A 4, Color B 11, Color A 1, Color B 2, Color A 1, Color B 12, Color A 3.
-
Row 27 (RS): Color A 1, Color B 14, Color A 1, Color B 2, Color A 1, Color B 3, Color A 1, Color B 4, Color A 1, Color B 2, Color A 4.
-
Row 28 (WS): Repeat the sequence [Color A 3, Color B 2] three times, then work Color A 1, Color B 1, Color A 2, Color B 8, Color A 1, Color B 4, Color A 2.
-
Row 29 (RS): Color A 7, Color B 7, Color A 3, Color B 1, Color A 1, Color B 1, Color A 5, Color B 1, Color A 8.
-
Row 30 (WS): Color A 16, Color B 1, Color A 3, Color B 2, Color A 2, Color B 3, Color A 7.
-
Row 31 (RS): Color A 7, Color B 1, Color A 5, Color B 2, Color A 19.
-
Row 32 (WS): Work all 34 stitches using Color A.
Do not flip your work yet. Cut Color B and secure it, leaving just Color A connected at the top corner.
Section 2: Border & Hanging Loop
Turn the potholder so the Right Side is facing you to begin working around the edges.
-
Round 1 (RS): Using Color A, chain 1. Work 34 single crochets evenly across the top edge. Chain 1 to form a corner, then work 32 single crochets down the left edge. Chain 1 for the next corner, work 34 single crochets across the bottom edge, chain 1, and work 32 single crochets up the right edge. Chain 1, then connect to your very first border stitch with a slip stitch.
-
Creating the Loop: Chain 1 and turn your work to the Wrong Side. Chain 14 more stitches (creating a chain of 15 total), and anchor it to the adjacent border stitch with a slip stitch to form a ring. Chain 1 and turn back to the Right Side. Work 18 single crochets directly into the chain loop to reinforce it.
Finishing
Cut your yarn, pull it through the final loop to fasten off, and neatly weave all loose yarn tails into the back of your stitches with your tapestry needle. Your spring potholder is finished and ready for use!