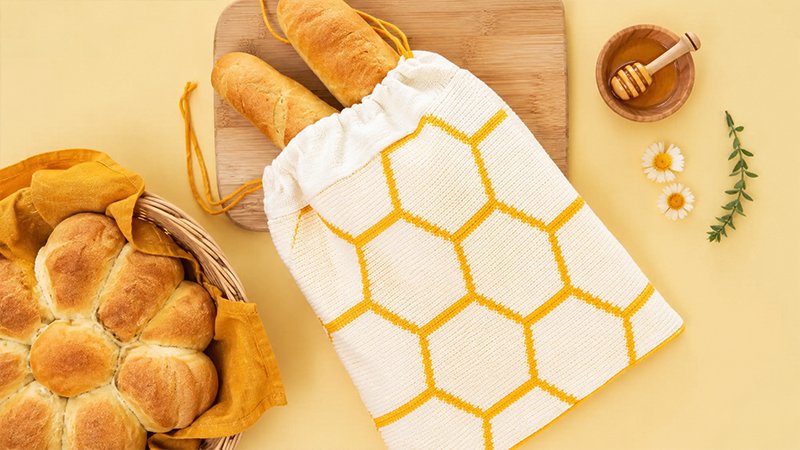
This project is a functional, structured bread bag featuring a geometric honeycomb motif. It is crafted by working tapestry crochet in the round to create a dense, beautiful exterior shell.
To ensure the bag safely holds bread and functions smoothly, a fabric inner lining is sewn directly into the piece, complete with a dual-drawstring closure system at the top.
Project Setup & Materials
-
Hook Size: 3.0 mm
-
Yarn: Sport weight yarn in two high-contrast shades: Main Color (A) and Accent Color (B).
-
Cord: 72 inches of 3mm drawstring cord, divided into two equal lengths.
-
Fabric: A piece of linen or cotton lining fabric measuring roughly 13.8″ × 43.3″.
-
Technique Note: From Round 3 onward, work exclusively in the Back Loop Only (BLO) single crochet. Carry the unused color along inside your stitches as you go. Every round maintains a strict count of 172 stitches.
Crochet Exterior Instructions
The Base
-
Round 1: Using Accent Color B, chain 86. Place 2 single crochets in the second chain from your hook. Work 1 single crochet into each of the next 83 chains. In the final chain stitch, work 3 single crochets to round the corner. Rotate your project to work along the opposite side of your initial chain; single crochet 83 times down the row, then place 1 final single crochet into the very first starting chain space. (172 stitches total)
-
Round 2: Work 1 standard single crochet into every stitch around using Color B.
The Honeycomb Pattern
Introduce Main Color A. For the remaining rounds, work in BLO and change colors seamlessly as indicated below:
-
Round 3: 16 stitches in A, 2 in B, 14 in A, 2 in B, 22 in A, 2 in B, 14 in A, 2 in B, 98 in A.
-
Rounds 4–5: 17 in A, 16 in B, 24 in A, 16 in B, 99 in A.
-
Rounds 6–7: 16 in A, 2 in B, 14 in A, 2 in B, 22 in A, 2 in B, 14 in A, 2 in B, 98 in A.
-
Rounds 8–9: 15 in A, 2 in B, 16 in A, 2 in B, 20 in A, 2 in B, 16 in A, 2 in B, 97 in A.
-
Rounds 10–11: 14 in A, 2 in B, 18 in A, 2 in B, 18 in A, 2 in B, 18 in A, 2 in B, 96 in A.
-
Rounds 12–13: 13 in A, 2 in B, 20 in A, 2 in B, 16 in A, 2 in B, 20 in A, 2 in B, 95 in A.
-
Rounds 14–15: 12 in A, 2 in B, 22 in A, 2 in B, 14 in A, 2 in B, 22 in A, 2 in B, 94 in A.
-
Rounds 16–17: 13 in B, 24 in A, 16 in B, 24 in A, 10 in B, 85 in A.
-
Rounds 18–19: Work the exact same stitch sequence as Round 14.
-
Rounds 20–21: Work the exact same stitch sequence as Round 12.
-
Rounds 22–23: Work the exact same stitch sequence as Round 10.
-
Rounds 24–25: Work the exact same stitch sequence as Round 8.
-
Rounds 26–27: Work the exact same stitch sequence as Round 6.
Finishing the Bag Length
-
Rounds 28–75: Repeat the entire pattern block from Rounds 4 through 27 two more times.
-
Rounds 76–78: Execute the sequence for Rounds 4, 5, and 6 one final time.
-
Tie-off: Fasten off your yarn with a clean, invisible join. Weave in all loose ends and wet-block the finished crochet sleeve.
Sewing the Fabric Lining
-
Fold your fabric rectangle in half, matching up the short edges.
-
Sew down both of the long sides using a 0.5-inch seam allowance. To leave a gap for the drawstrings, stop sewing 4 inches from the top opening, skip half an inch, and then continue sewing to the bottom corner. Make sure to backstitch before and after this gap to reinforce the opening.
-
Press your side seams open. Fold the top raw edge down by 0.5 inches, press it with an iron, and stitch a clean hem all the way around.
-
Fold the upper section down once more to create your final drawstring casing channel.
Assembly & Drawstrings
-
Slide the prepared fabric lining inside your completed crochet bag. Align the top edge of the crochet bag with your fabric liner, pin them together, and sew around the rim to join the two pieces.
-
Take your first 36-inch piece of cord. Thread it into the left-side casing gap, run it completely around the top channel of the bag, and bring it back out through the same left opening. Secure the two ends with a knot.
-
Take your second 36-inch piece of cord. Thread it through the right-side casing gap, loop it entirely around the channel, and bring it back out through the right side opening. Knot these ends together.
Your drawstring bread bag is now assembled and ready for use.