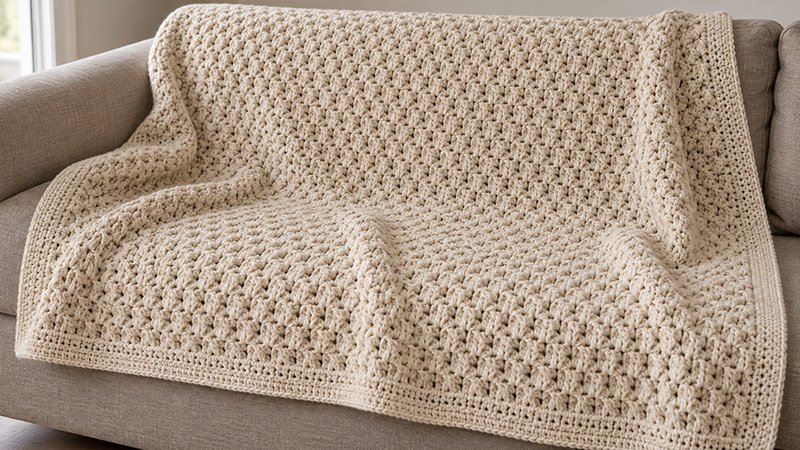
This alpine stitch throw has a raised texture on the front and a flatter back. Rows of sc and dc form the base. FP tr stitches reach down to the row below the sc row to create the raised pattern.
The throw is worked flat in one piece, then edged with a simple sc border. Use one yarn color to make the stitch pattern easy to see.
Materials
- Yarn: About 2,600–3,000 yards of worsted-weight yarn, category 4. Yarn needs will vary with your gauge and choice of yarn.
- Hook: US J/10, 6 mm, or the size needed to meet gauge.
- Stitch markers: Two to mark the first and last sts.
- Yarn needle: For weaving in ends.
- Scissors
- Tape measure
Gauge
14 sts × 16 rows = 4 × 4 inches, measured in the alpine stitch pattern.
Make a swatch before you start:
- Ch 30.
- Follow Row 1 below to make 28 dc.
- Work Rows 2–6, using 13 repeats between the two edge sts on each texture row.
- Keep repeating Rows 3–6 until the swatch is at least 6 inches tall.
- Lay it flat without pulling it. Measure the center.
Use a larger hook if you have too many sts per inch. Use a smaller hook if you have too few.
Finished Measurements:
Approximately 44 × 54 inches, including the border.
The main piece measures about 42 × 52 inches at the stated gauge. The border adds about 1 inch on each side. The final size will depend on your gauge.
Pattern Notes
- Use US crochet terms.
- Work back and forth in rows.
- Turn at the end of each row.
- The ch-1 and ch-2 used to turn do not count as sts.
- Each blanket row has 146 sts.
- Keep one plain dc at each edge of each texture row.
- Row 3 faces the front of the blanket.
- Work each FP tr around the matching st’s post two rows below. This post is beneath the sc row.
- Work a post st around a dc or a prior FP tr.
- After each FP tr, skip the sc right behind it. Do not work into that sc too.
- Keep FP tr sts loose. They should match the height of the dc sts.
- Count your sts after the first few rows.
- To change the width, start with an even number of chains. Each row has two fewer sts than the start chain.
- To change the length, end after a sc row.
Abbreviations
- ch: Chain
- sc: Single crochet
- dc: Double crochet
- FP tr: Front post treble crochet
- sl st: Slip stitch
- st / sts: Stitch / stitches
- rep: Repeat
- RS: Right side, or front
- WS: Wrong side, or back
FP tr: Yarn over twice. Insert the hook from front to back to front around the post of the stated st. Yarn over and pull up a loop. Yarn over and pull through two loops three times.
Pattern Instructions
Step 1: Make the Starting Chain
Ch 148 loosely.
Step 2: Work the Base Rows
Row 1: Dc in the third ch from the hook. Dc in each ch across. The two skipped chains do not count as a st. Turn.
Count: 146 dc.
Row 2: Ch 1. Sc in each st across. Turn.
Count: 146 sc.
Step 3: Work the First Texture Row
Row 3 — RS: Ch 2. Dc in the first sc.
FP tr around the post of the next matching dc in Row 1. Skip the sc directly behind that FP tr. Dc in the next sc.
Rep from * to * 72 times total. Dc in the last sc. Turn.
Count: 146 sts.
There is one plain dc at each edge, with 72 FP tr and 72 dc between them.
Row 4: Ch 1. Sc in each st across, working into the top of both dc and FP tr sts. Turn.
Count: 146 sc.
Step 4: Work the Offset Texture Row
Row 5 — RS: Ch 2. Dc in the first sc.
Dc in the next sc. FP tr around the post of the next matching st two rows below, in Row 3. Skip the sc directly behind that FP tr.
Rep from * to * 72 times total. Dc in the last sc. Turn.
Count: 146 sts.
The raised sts now fall between the raised sts from Row 3.
Row 6: Ch 1. Sc in each st across. Turn.
Count: 146 sc.
Step 5: Repeat the Stitch Pattern
Rep Rows 3–6 throughout the throw.
On each new texture row, work the FP tr around the matching post two rows below. The row numbers in the first repeat show where to place the hook; the target row moves up as you work.
For the stated length:
- Work Rows 1–6 once.
- Rep Rows 3–6 50 more times. You now have 206 rows.
- Work Row 3 once more for Row 207.
- Work Row 4 once more for Row 208.
Finish with 208 rows, or when the main piece measures about 52 inches, ending after a sc row.
Do not fasten off if you will use the same yarn for the border.
Step 6: Add the Border
Keep the RS facing you. If needed, remove the hook and turn the blanket so the front faces you.
Border Round 1:
- Ch 1.
- Sc across the top edge, working 3 sc in the corner st.
- Work down the first side. As a starting guide, work 2 sc around each dc or texture-row end and 1 sc around each sc-row end.
- Work 3 sc at the lower corner.
- Sc across the unused loops of the starting chain.
- Work 3 sc at the next corner.
- Work up the second side in the same way.
- Complete the last corner and join with a sl st to the first sc.
Each corner must have 3 sc total. Adjust the side sts if needed so the edge lies flat.
Border Round 2: Ch 1. Sc in each st around. Work 3 sc in the center st of each corner group. Join with a sl st to the first sc.
Border Rounds 3–4: Rep Border Round 2.
Fasten off.
Step 7: Finish the Throw
- Weave in all yarn ends.
- Lay the throw flat and check the edges.
- Block it using a method suited to the yarn’s care label.
- Shape the corners gently and let the throw dry flat.