Pattern Description:
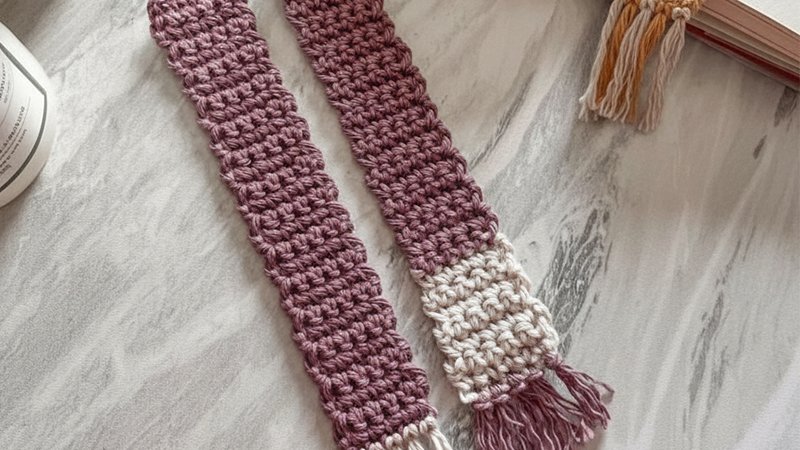
The Beginner Bookmark is described as the perfect very first crochet project, using basic stitches and small rows to allow practice without being intimidated by a large size.
This easy project utilizes chains and single crochets and is ideal for learning how to work in rows.
For those learning new skills, the pattern includes the option to change colors to create a two-toned bookmark.
Materials Needed & Measurements:
- Materials:
- US H/5.00 mm crochet hook
- 16 yards of Pima Cotton, weight 4 yarn (worsted weight). The color specified for 16 yards is “Rose Taupe“. Other colors used in pictures include “Vintage” and “Mineral Yellow”.
- Tapestry Needle
- Scissors
- Measurements:
- Finished Size: 8 x 1.5 inches
- Gauge: 4 sc sts = 1″
- Gauge: 16 rows = 4″
Abbreviations used:
- ch(s) – chain(s)
- sc – single crochet
- st/sts – stitch/Stitches
Instructions for Making the Beginner Bookmark Pattern:
Foundation
Start by creating the initial chain:
- ch 6.
Row 1
This first row establishes the foundation of the single crochet work:
- sc 1 in 2nd ch from hook.
- sc across.
- turn.
- (5 sts).
Rows 2 through 7 (First Section)
These rows continue the single crochet pattern:
- ch 1.
- sc across.
- turn.
- (5 sts).
Note on Color Change: After Row 7, the pattern allows for a color change to create a two-toned look. If implementing the change, instructions are provided in the video tutorial.
Rows 8 through 28 (Second Section)
Continue the established single crochet pattern for these rows:
- ch 1.
- sc across.
- turn.
- (5 sts).
Row 29 (Final Row)
This row is completed without turning to prepare for fastening off:
- ch 1.
- sc across.
- (5 sts).
Fasten Off
- Fasten off the yarn, ensuring a 2.5” tail is left.
Finishing and Fringe Attachment
After the main body of the bookmark is complete, the following steps are necessary for finishing.
- Step 1: Weave in the Beginning Tail
- Using a tapestry needle, weave in the yarn tail remaining from the beginning of the project.
- Step 2: Preparing Fringe Strands
- Cut 5 strands of yarn, each measuring 4” long, to be used for the fringe.
- Step 3: Inserting the Hook
- Insert the crochet hook (US H/5.00 mm) into a st on the last row (Row 29).
- Step 4: Creating and Placing the Loop
- Fold one strand of the 4” fringe yarn in half, forming a loop on one end.
- Place this loop onto the hook.
- Step 5: Drawing Tails Through Loop
- Grab the two tail ends of the fringe strand.
- Draw these tails through the loop.
- Step 6: Securing the Fringe
- Pull the tails tight to secure the fringe knot.
- Step 7: Repetition
- Repeat Steps 3 through 6 across the edge of the last row until a total of 5 fringes are attached.
- Step 8: Separation
- Separate each fringe strand. It may be easier to comb through the strands using a sewing needle.
- Step 9: Trimming
- Cut the fringe so that all 5 strands are the same length.
- Step 10: Blocking
- Block the finished bookmark using a steamer so that it lays flat.