Pattern Description:
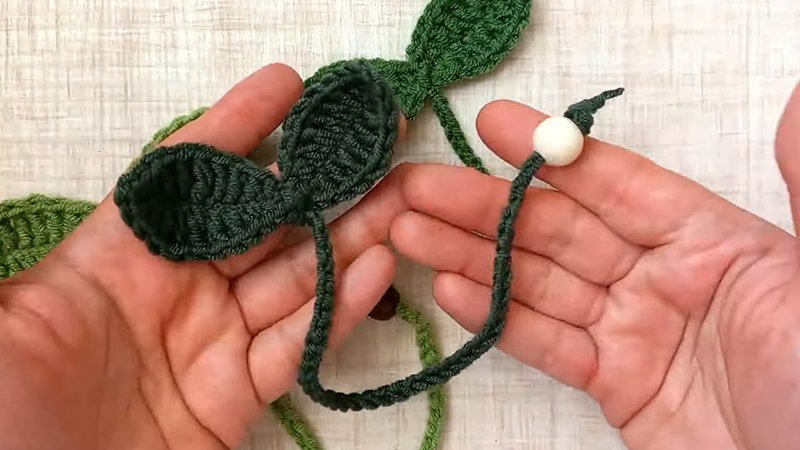
The Budding Leaf Bookmark features cute, self-standing crochet leaves that look like they are sprouting from the book. This project is very simple, quick, and beginner-friendly.
The length is easily adjustable, fitting average novel book sizes comfortably (8” to 10”). This is a perfect gift idea for bookworm friends.
Materials Needed & Measurements:
Materials Needed
- Yarn: Lily Sugar n’ Cream Original (or any Category 4 medium/worsted weight yarn). One ball (120 yd / 109 m, 2.5 oz / 71 g) is more than enough for several bookmarks.
- Crochet Hook: US 7 / 4.5 mm.
- Tapestry Needle: For weaving in ends.
- Tape Measure: To check measurements and length.
- Stitch Marker (optional): Useful for beginners to mark key points.
- Bead (optional): About 10 mm in size; a wooden or colorful bead can be added for extra detail.
Measurements
- Overall Length: Approximately 13” (33 cm).
- Leaf Width: About 3.5” (9 cm).
- Fit: Best suited for books between 8”–10” tall, but the stem length can be easily adjusted to suit your needs.
Abbreviations:
- CH – chain stitch
- SC – single crochet
- HDC – half double crochet
- DC – double crochet
- TR – treble crochet
- SL ST – slip stitch
- YOH – yarn over hook
Instructions for Making the Budding Leaf Bookmark Pattern:
Step 1 – Initial Chain
Begin by making a CH 15. This chain forms the foundation of your bookmark. Fasten off after completing the chain to secure your base.
Step 2 – Starting the First Leaf
Insert your hook into the 7th CH from the hook and make a SL ST to anchor your work. In that same stitch, crochet 1 HDC. Then follow the pattern sequence marked with an asterisk below:
(DC, TR, TR, DC, HDC, [SC, CH 1, SC] in the last CH, HDC, DC, TR, TR, DC, HDC, SL ST in the same stitch where HDC was made).
This creates a symmetrical leaf shape with a neat point at the top. Once finished, make a SL ST in the next (8th) CH to secure the leaf.
Step 3 – Completing the Second Leaf
In the next chain, crochet 1 HDC to begin the second leaf. Repeat the sequence from Step 2 exactly as written to form the second leaf.
Now you should have two identical leaves attached along the base chain, looking like twin buds emerging from the same stem.
Step 4 – Joining the Leaves
To join the two leaves neatly, insert your hook into the next stitch (the 8th CH). YOH and draw up a loop. Then, insert your hook into the starting SL ST made at the beginning of Step 2.
YOH again and pull up another loop. You will now have 3 loops on your hook. YOH once more and draw through all 3 loops together. This creates a clean, joined base for the two leaves.
Step 5 – Creating the Stem Length
Pull up a long loop measuring about 25”. Align the working yarn to the same length and then cut the yarn. This will form the base for your braided stem.
If you’d like a longer or shorter bookmark, simply adjust this length accordingly. Weave in any yarn ends from your initial chain and the beginning of Step 2.
Step 6 – Knotting the Strands
With all three yarn strands together, tie a knot close to the leaves to secure them. Tie another knot directly on top of the first to reinforce it. Make two more large knots, spaced slightly apart, to give a textured start to your stem.
Step 7 – Braiding the Stem
Cut open the loop end to separate the strands. Now braid the three strands evenly until the braided section measures around 11” (28 cm). Once you reach your desired length, tie a tight knot at the end to prevent unraveling.
Step 8 – Optional Bead Addition
If you wish, thread a 10 mm bead onto the three strands near the bottom of the braid. Tie a final knot right after the bead to keep it secure.
Trim any extra yarn from the ends for a neat finish. Adding a bead not only adds a touch of color and texture but also helps weigh the bookmark slightly, so it rests perfectly between pages.
Finishing Touches
Weave in any loose ends and gently shape your leaves using your fingers. No blocking is necessary, but a light steam press can help flatten the leaves if desired. Your Budding Leaf Bookmark is now complete.