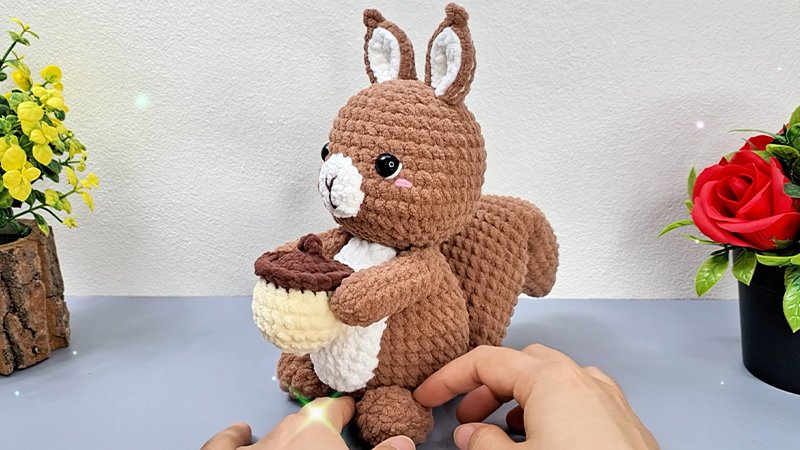
Pattern Description:
This intermediate-level amigurumi squirrel features continuous rounds, color changes, and joined parts. Legs, body, head, arms, ears, tummy patch, and tail are made separately and assembled.
It teaches techniques like forming heels, bending tails, and simple embroidery, making it suitable for ambitious beginners.
Materials Needed & Measurements:
- Yarn: Worsted weight (4) acrylic; colors vary by squirrel type.
- Hook: Size E/4 (3.5 mm)
- Stuffing: Poly-fil
- Tools: Stitch markers, tapestry needle, scissors, safety eyes (9 mm, optional), stuffing tools.
- Finished Size: Approx. 8.25″ (21 cm) tall.
- Gauge: Tail first 8 rounds ≈ 2.5″ (6.4 cm) diameter.
Abbreviations/Stitches:
- ch – chain
- sc – single crochet
- sc2tog – single crochet 2 together
- sl st – slip stitch
- st(s) – stitch(es)
- Rnd(s) – round(s)
- Row(s) – row(s)
- Magic ring – adjustable circle
- [ ] / ( ) – repeat instructions as indicated
Instructions for Making the Squirrel Pattern:
Legs
- Left Leg (Color B & A)
- Foot Base (Rows & Rnds):
- Ch 4; work 10 sc around back bars.
- Increase to 14 sts in Rnd 2, 16 sts by Rnd 3.
- Sc around for Rnds 4-7.
- Rnd 8: decrease to 14 sts; Rnd 9: sc around.
- Bottom of Foot (Rows 10-13): Work in rows, decreasing to 2 sts, then return to continuous rounds.
- Heel & Leg (Rnds 14-23): Join edges, shape heel, increase and decrease as noted, switch to Color A at Rnd 15, ending with 19 sts at Rnd 23. Fasten off, leaving markers for joining.
- Right Leg: Worked identically to left leg in Color B & A, ending with 19 sts. Do not fasten off.
Joining Legs & Body
- Rnd 24: Join legs with a sc join; work across both feet and chain to connect. (44 sts)
- Rnds 25-30: Increase and decrease to shape the lower body. (36-66 sts)
- Rnds 31-48: Continue shaping body with sc and sc2tog. Begin stuffing body at Rnd 34; finish at 14 sts. Fasten off, leaving a long tail for head attachment.
Head (Color C & A)
- Begin with magic ring, 6 sc. Increase rounds to 42 sts by Rnd 14.
- Insert safety eyes between Rnds 10–11, about 8 sts apart.
- Continue sc rounds, increasing to Rnd 14, then decrease to 8 sts by Rnd 27.
- Stuff head firmly and close hole with tapestry needle.
Ears (Make 2, Color A)
- Magic ring, 6 sc; increase to 12 sts by Rnd 6.
- Fasten off, leaving long tail for sewing to head.
Arms (Make 2, Color A)
- Magic ring, 6 sc; increase to 12 sts by Rnd 3.
- Sc rounds 4-5, shaping arm with decreases in Rnds 6-10.
- Stuff firmly, leaving last rounds unstuffed.
- Press top edges together, sc across (4 sts), fasten off for attachment.
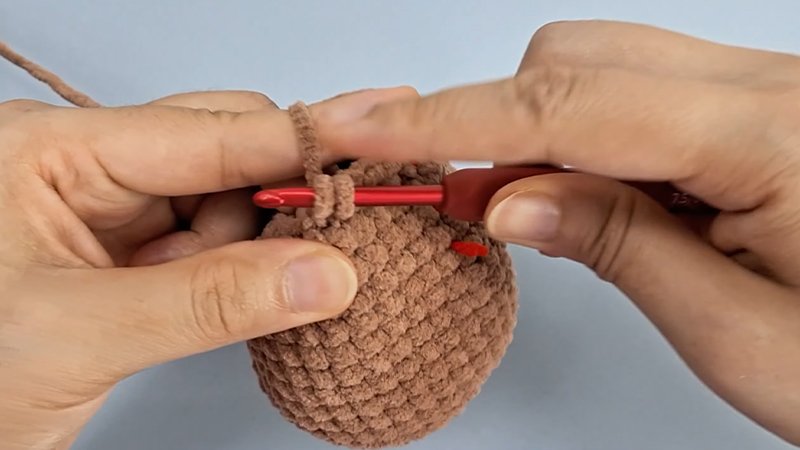
Tail (Color A)
- Tail Base:
- Magic ring, 6 sc; increase to 48 sts by Rnd 8.
- Fold and mark middle st 28.
- Tip of Tail: Work decreases across 11 rounds, reducing to 4 sts, fasten off, and stuff tip.
- Bottom Portion:
- Reattach yarn, increase and shape in rounds 1–6 to 36 sts.
- Continue shaping with decreases and light stuffing through Rnds 7–24.
- Press top edges together and sc across (6 sts). Fasten off.
Tummy Panel (Color C)
- Work in rows, increasing to 10 sts by Row 3.
- Sc in each st for Rows 4-13.
- Decrease to 2 sts by Row 17.
- Fasten off, leaving long tail for attachment.
Assembly
- Pin pieces for placement before sewing.
- Attach Head: Center over body rounds 12-18.
- Ears: Stitch on Rnds 16-19, 3-4 sts apart.
- Arms: Attach 1-2 rounds below head attachment.
- Nose (Color D): Whipstitch triangular nose on top of Color C, stitch line downward.
- Tummy Panel: Center and stitch to front body.
- Tail: Attach to back, base 4-5 rounds above leg join. Secure along sides and underside.
Download Free PDF: