Pattern Description:
The Daylily Skirt is a free sewing pattern for a gorgeous maxi skirt featuring three gathered tiers. It is designed to be a transitional piece, suitable for summer, spring, and fall wardrobes.
This tiered style can be created using bold solids or intricate prints in fabrics like sateen, crepe, or velour.
Materials Needed & Measurements:
- 5 yards Mood Exclusive Paintbrush Lily Stretch Cotton Sateen.
- 9″ Invisible Zipper.
- 1 pkg Skirt Hook & Eyes.
- 2 pkg Wrights White 1/2″ Extra Wide Double Fold Bias Tape.
Alternative Suggested Fabrics:
- Velour.
- Crepe.
- Jacquard.
- 100% cotton fabric.
- Double cotton gauze.
Measurements & Specifications:
- Seam Allowances: All seam allowances are 1/2″ unless otherwise stated.
- Sizing: The specific pattern is available up to a size 30.
- Full Skirt Length: The fully constructed skirt length is about 44″ from the natural waist to the floor. This length is broken down as follows:
- Waistband: 2″
- Top tier: 9″
- Middle tier: 14″
- Lower tier: 19″
Instructions for Making the Daylily Skirt Pattern:
Preparing the Upper Skirt Tier
Sewing Darts and Establishing Structure
The initial step requires sewing the darts into the front and back pieces of the upper skirt tiers. Once these darts are sewn, they should be pressed toward the side seams.
Assembling Side Seams and Inserting the Zipper
The next step involves connecting the front and back panels. Sew the front and back panels together at one side using a French seam. On the opposite side, you will insert the 9″ invisible zipper. After the zipper is inserted, finish the remainder of that side seam using a French seam as well.
Constructing and Attaching the Waistband
- Waistband Preparation and Interfacing: If the fabric being used is lightweight, it is recommended that you interface your waistband panels here. The waistband requires four panels for construction. Sew two of the waistband panels together at one of the short sides; repeat this process with the remaining two waistband panels to create your waistband facing.
- Attaching the Waistband and Facing: Attach one layer of the assembled waistband to the top raw edge of the skirt. Next, attach the facing piece along the top three edges of the waistband, ensuring the fabric faces are together. Clip the seam allowance, then turn the waistband right side out and press it. Fold the raw edges inward and use a slip-stitch to close the bottom edge.
- Completing the Waist Closure: To complete the closure of the waistband, add a skirt hook and eye. Alternatively, the skirt hook and eye may be omitted entirely if the invisible zipper is installed so that it extends all the way up after the waistband is attached.
Assembling the Tiered Skirt Panels
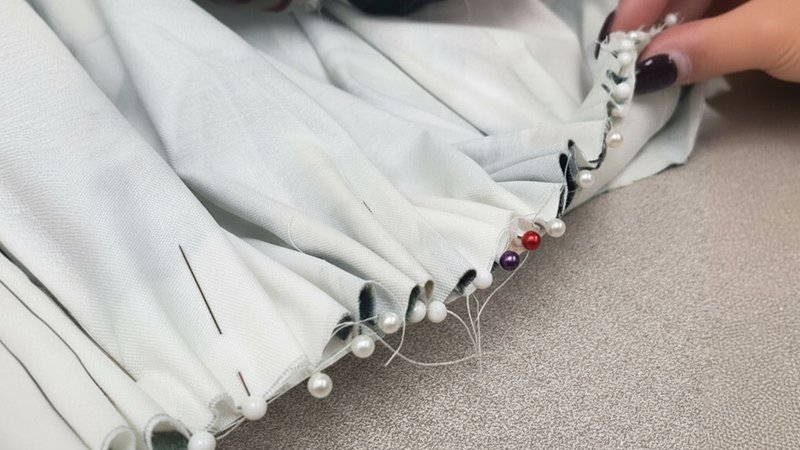
- Connecting the Middle Tier (Tier 2): Sew the middle tier skirt layers together at their shorter side seams. Use a French seam for these side seams. With fabric faces together, evenly gather the top edge of the middle tier onto the bottom edge of the upper tier. Once gathered and aligned, stay-stitch the tiers into place.
- Connecting the Lower Tier (Tier 3) and Finishing Raw Edges: Repeat the steps above (Step 6) to attach the lower skirt tier to the bottom edge of the middle tier. The bottom tier is composed of three panels, which is intentionally designed to save fabric. While it may seem unusual that the seams do not align when attaching the lower tier to the middle tier, the fullness of the gathers helps to effectively hide these seams.
- Once the tiers are assembled, finish the raw edges inside the skirt using a length of 1/2″ Extra Wide Double Fold Bias Tape.
Hemming and Alternative Construction
- Hemming the Skirt: After all tiers are attached, hem the bottom edge of the lower tier. The full length of the constructed skirt is about 44″ from the natural waist to the floor. This length is broken down into: 2″ waistband, 9″ top tier, 14″ middle tier, and 19″ lower tier. If you are shorter, it is suggested that you measure how long you want the finished skirt to be and take off an appropriate amount from each layer, rather than removing the entire excess amount from just the final layer.
- Alternative Elastic Waistband Option: The pattern can be made with an elastic waistband instead of the zipper and fitted waistband. To do this, the waistband pieces should be doubled to create a casing, and the elastic should be cut 1 to 2 inches shorter than the waist measurement. If you choose this elastic waist method, the invisible zipper is not necessary.
Download Free PDF: