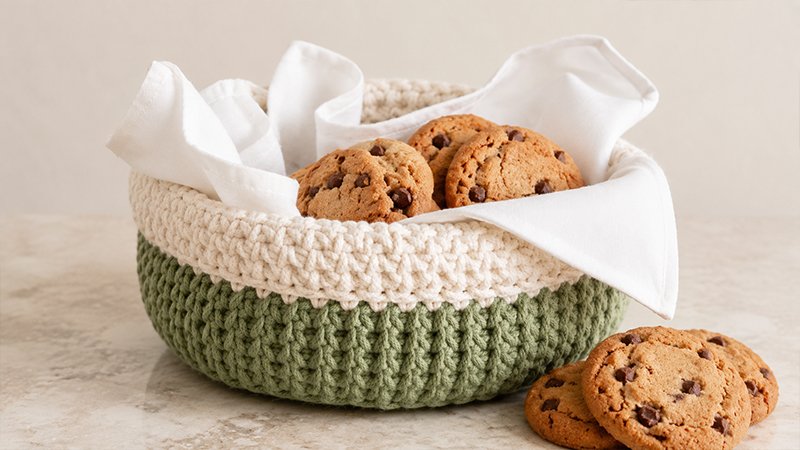
This sturdy, functional bread basket features a structured hexagonal base and thick sides made from cotton rope yarn. By using the knit stitch (also known as the waistcoat stitch), the basket achieves a dense, knit-like texture that holds its shape perfectly. The design uses a two-tone color scheme, with a folded brim at the top for a modern, cozy look.
Supplies Needed
-
Crochet Hook: Size 8-mm (US L/11)
-
Yarn: Bulky weight (Size 5) cotton rope, such as 3mm Bobbiny Cotton Rope Junior.
-
Color A (Main/Base): Approx. 55 yards (50 meters)
-
Color B (Accent/Brim): Approx. 39 yards (36 meters)
-
-
Notions: 1 stitch marker (essential for tracking continuous rounds), tapestry needle for weaving in ends, and scissors.
Finished Dimensions & Gauge
-
Diameter: 8 inches (20.5 cm)
-
Height: 4 inches (10 cm)
-
Gauge: 5 rounds of knit stitch should equal 4 inches (10 cm).
Stitches & Techniques Explained
-
Knit Stitch (Waistcoat Stitch): Instead of inserting your hook under the top two loops of a stitch, insert it directly into the center of the “V” post on the front of the single crochet stitch. Pull up a loop and finish like a normal single crochet. This creates a thick, rigid fabric.
-
Increase (Inc): Work two knit stitches into the exact same stitch from the previous row to expand the round.
Step-by-Step Instructions
Part 1: The Hexagonal Base
You will work this section using Color A in a continuous spiral. Place your stitch marker in the first stitch of each round to keep track of your progress.
-
Round 1: Start by forming a magic circle. Chain 1, then work 6 single crochet stitches into the ring. Pull the tail tight to close the center. (6 stitches)
-
Round 2: Work 2 knit stitches into every stitch around. (12 stitches)
-
Round 3: Work 2 knit stitches in the first stitch, then 1 knit stitch in the next. Repeat this pattern 6 times total. (18 stitches)
-
Round 4: Work 2 knit stitches in the first stitch, then 1 knit stitch in each of the next 2 stitches. Repeat 6 times. (24 stitches)
-
Round 5: Work 2 knit stitches in the first stitch, then 1 knit stitch in each of the next 3 stitches. Repeat 6 times. (30 stitches)
-
Round 6: Work 2 knit stitches in the first stitch, then 1 knit stitch in each of the next 4 stitches. Repeat 6 times. (36 stitches)
-
Round 7: Work 2 knit stitches in the first stitch, then 1 knit stitch in each of the next 5 stitches. Repeat 6 times. (42 stitches)
-
Round 8: Work 2 knit stitches in the first stitch, then 1 knit stitch in each of the next 6 stitches. Repeat 6 times. (48 stitches)
-
Round 9: Work 2 knit stitches in the first stitch, then 1 knit stitch in each of the next 7 stitches. Repeat 6 times. (54 stitches)
-
Round 10: Work 2 knit stitches in the first stitch, then 1 knit stitch in each of the next 8 stitches. Repeat 6 times. (60 stitches)
Do not cut the yarn. Keep your yarn attached to begin the sides.
Part 2: Building the Sides (The Body)
This section transitions the flat base into upright walls.
-
Round 1 (The Transition): Chain 1, then turn your work so the wrong side (inside of the basket) is facing you. You will now work single crochets around the vertical posts of the stitches from Round 10. Insert your hook from the back to the front around the post of the stitch, yarn over, and complete a single crochet. Do this all the way around to create a clean, sharp crease for the basket wall. (60 stitches)
-
Rounds 2–4: Continue working in a continuous spiral. Work 1 knit stitch into every stitch around. On the very last stitch of Round 4, stop before the final yarn over. Drop Color A, pick up Color B, and complete the stitch with the new color. Cut Color A, leaving a tail to weave in. (60 stitches per round)
-
Rounds 5–14: Using Color B, work 1 knit stitch into every stitch around. (60 stitches per round)
Once you finish Round 14, cut the yarn and fasten off using an invisible join for a seamless edge.
Part 3: Assembly & Finishing
-
Fold the Brim: Take the top section of the basket (the last 4 to 5 rounds made in Color B) and fold it downward toward the outside of the basket to create a stylish cuff.
-
Secure the Fold: Thread your tapestry needle with a scrap piece of Color B yarn. Standardize the fold and sew a few hidden stitches through the cuff into the body of the basket to lock the brim in place.
-
Weave in Ends: Use your tapestry needle to securely weave all loose yarn tails into the dense stitches on the inside of the basket, then trim any excess yarn.
Your structured cotton rope bread basket is now finished and ready to use!