Pattern Description:
The Juniper Skirt is an adorable, simple, and sleek A-line skirt. It is a quick and easy pattern, designated as a beginner sewing pattern. The pattern (MDF033) allows sewists to create a cute, wearable garment quickly. It features darts, a waistband, and requires a 9″ invisible zipper closure.
Materials Needed & Measurements:
| Item | Measurement/Quantity | Details |
| Main Fabric | 1.5 yards | Navy Cotton Canvas |
| Lining Fabric | 1.5 yards | Pink/White Striped Floral Dense Combed Cotton Poplin |
| Zipper | 9″ | Navy Invisible Zipper |
| Seam Allowance | 1/2″ | All seam allowances are 1/2″ unless otherwise stated. |
| Lining Length | 1″ shorter | The lining should be cut 1″ shorter than the main skirt fabric. |
Instructions for Making the Juniper Skirt Sewing Pattern:
Preparing Panels and Darts
The first mandatory step in constructing the skirt is to prepare the panels by adding the darts. The pattern should include guides to mark the bottom of the darts.
You will need to incorporate darts into both the main fabric and the lining material:
- Add two darts in the front skirt panels.
- Add two darts in the back skirt panels.
- Add one dart on the front overskirt panel.
Be sure to sew these darts into both your main skirt fabric and your lining.
Constructing the Overskirt Flap
The next set of steps focuses on creating the decorative front overskirt flap:
- Place the overskirt lining and the main fabric with faces together.
- Sew the overskirt lining to the main fabric, focusing on sewing around the curved side.
- Once sewn, clip the seam allowance along the curve.
- After clipping, turn the flap right-side-out and press.
Assembling the Skirt Shell
Once the overskirt flap is complete, it is integrated into the primary skirt body:
- The overskirt must be sandwiched between the front and back panels of your skirt.
- Sew up the side of your skirt.
- When sewing, the overskirt lining should be oriented towards the skirt front.
- The specific side (left or right) that receives this assembly depends on which way you cut out your skirt flap panels.
Waistband and Zipper Installation
With the skirt panels joined, attention turns to the waistline:
- Fold the overskirt flap toward the skirt front. The garment is now ready to have the waistband attached.
- The waistband is made up of two panels. Attach these two panels together along one of the shorter sides.
- Place the resulting center seam of the waistband along the side seam of your skirt.
- Sew the waistband along the top edge of your skirt, ensuring the fabric faces are together.
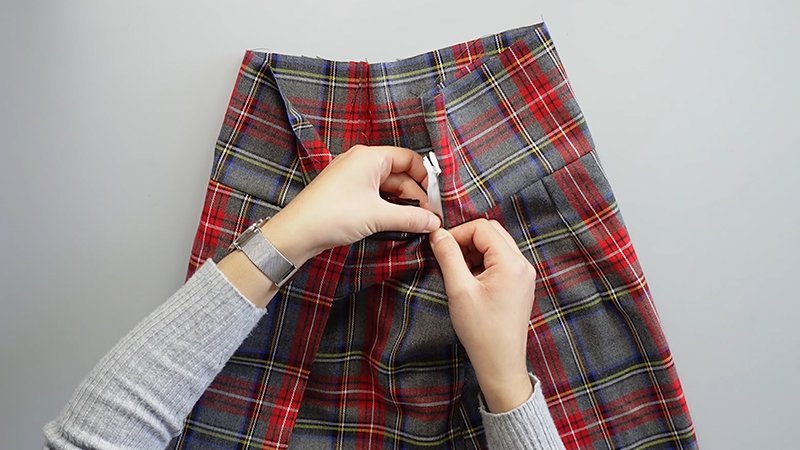
- To install the zipper, start halfway down the waistband.
- Pin and insert the 9″ invisible zipper along the open side of your skirt.
- After the zipper is sewn to both the front and back skirt panels, sew down the remainder of the side.
Attaching the Lining and Finishing
The final steps involve integrating the lining and completing the hems:
- Take the two remaining lining panels and place them with the faces together.
- Sew them together. You must sew halfway up the side where the zipper will lie, and also fully up the opposite side.
- Attach the lining to the hem of your skirt, placing the fabric faces together.
- It is important that the lining is previously cut 1″ shorter than your main skirt fabric.
- When you flip the garment right-side-out, this shorter lining piece will result in a small hem facing.
- To finish, fold the raw edges inward.
- Pin the remaining open side of the skirt lining to the backside of the zipper.
- Similarly, fold the hem in half toward the inside of your garment and tuck the unfinished edges inward.
- Complete the skirt by slip-stitching along the waistband and zipper.
Download Free PDF: