
Pattern Description:
The Kisses Quilt Pattern is a fast and easy strip quilt. It is ideal for beginners or as a break from complicated projects because the piecing is simple and repetitive.
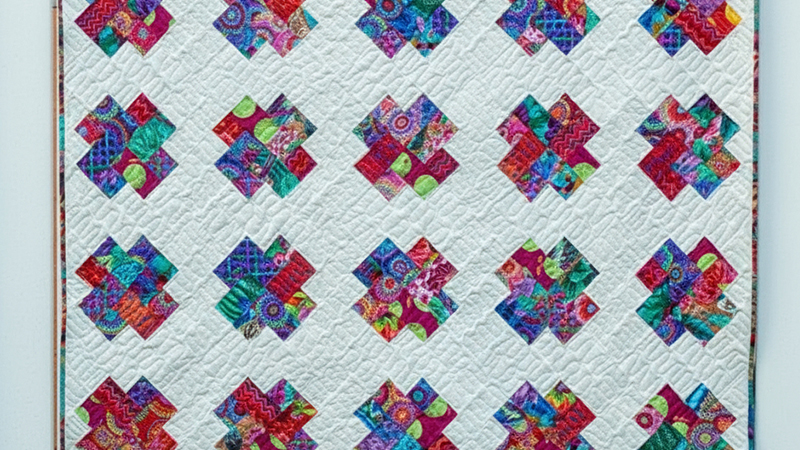
This pattern creates a modern geometric design and can be sewn as a scrappy or two-toned strip quilt using jelly roll strips. The finished size is 56’’ x 68’’.
Materials Needed & Measurements:
Materials Required:
- Background Fabric: 34 strips, each 2 1/2’’ x width of fabric (WOF) (2 1/2 yards total). (This amount is equivalent to a full jelly roll of solid fabric, if using one for the background).
- Sub-cut background strips: 120 pieces measuring 2 1/2’’ x 6 1/2’’ (from 20 strips) and 120 pieces measuring 2 1/2’’ x 4 1/2’’ (from 14 strips).
- Print Fabric: 20 strips, each 2 1/2’’ x WOF (1 1/2 yards total). (This amount is half of a standard jelly roll bundle).
- Sub-cut print strips: From each strip, 6 pieces measuring 2 1/2’’ x 4 1/2’’ and 6 pieces measuring 2 1/2’’ x 2 1/2’’.
- Option for Two-Toned Quilt: You will need 10 print strips in one color family and 10 print strips in a different color family.
- Backing Fabric: 4 yards. (When pieced, the backing should measure at least 64’’ x 76’’).
- Binding Fabric: 1/2 yard of fabric.
- Cut binding strips: 7 strips measuring 2 1/2’’ x 42’’.
- Quilt Batting: 64’’ x 76’’.
- Supplies: Basic sewing, pressing, and rotary cutting supplies.
- The finished size of the Kisses Quilt is 56’’ x 68’’.
Instructions for Making the Kisses Quilt Pattern:
The Kisses Quilt Pattern is described as a fast and easy strip quilt that is ideal for beginners or for those seeking a break from more complicated projects, as the piecing is simple and repetitive.
The finished size of the quilt is 56’’ x 68’’. The pattern uses jelly roll strips and can be constructed as a scrappy quilt, like the example made with a Kaffe Fasset jelly roll, or as a two-toned geometric design.
Cutting the Fabric Pieces
The pattern requires specific sub-cuts from the initial strips of fabric.
- Background Fabric Strips: The total background fabric needed is 34 strips, each 2 1/2’’ x width of fabric (WOF).
- From 20 of these background strips, sub-cut 120 pieces measuring 2 1/2’’ x 6 1/2’’.
- From the remaining 14 background strips, sub-cut 120 pieces measuring 2 1/2’’ x 4 1/2’’.
- Print Fabric Strips: The total print fabric needed is 20 strips, each 2 1/2’’ x WOF.
- From each of the 20 print strips, sub-cut:
- 6 pieces measuring 2 1/2’’ x 4 1/2’’.
- 6 pieces measuring 2 1/2’’ x 2 1/2’’.
- Two-Toned Option: If creating a two-toned quilt, choose fabrics from two different color families for the print strips (10 strips in one color family and 10 strips in a different color family). Cut these strips as directed above, but keep each color family separated.
- From each of the 20 print strips, sub-cut:
- Binding Strips: Cut 7 binding strips measuring 2 1/2’’ x 42’’.
Making 60 Quilt Blocks
Throughout the block construction, a 1/4” seam allowance should be used. Before starting, group all cut pieces by size and whether they are background or print fabric.
If making a two-toned quilt, also group pieces by color family. For scrappy quilts, choose the print fabric pieces at random.
Constructing Unit A
- Select one background strip (2 1/2’’ x 6 1/2’’) and one print square (2 1/2’’ x 2 1/2’’).
- Sew these two pieces together to create Unit A.
- Repeat this process until you have made 120 Unit A pieces.
Constructing Unit B
- Select one background strip (2 1/2’’ x 4 1/2’’) and one print strip (2 1/2’’ x 4 1/2’’).
- Sew these two pieces together to create Unit B.
- Repeat this process until you have made 120 Unit B pieces.
Constructing Unit C
- Select one Unit A and one Unit B and sew them together.
- Repeat this process until you have made 120 Unit C pieces.
- Two-Toned Note: If constructing the two-toned quilt, ensure that the two print pieces within each Unit C belong to the same color family.
Creating the Final Quilt Blocks
- Select two Unit C pieces and sew them together.
- Repeat this step to make a total of 60 finished blocks.
- Two-Toned Note: If making a two-toned quilt, arrange each block consistently so that one color family is positioned in the top right corner and the other color family is in the bottom left corner.
Making 22 Triangle Pieces
The pattern uses triangle pieces along the edges of the quilt.
- Select 11 of the 60 finished square blocks.
- Cut each of the 11 blocks in half diagonally.
- Ensure the cut passes only through the background fabrics.
Assembling the Kisses Quilt
Use a 1/4’’ seam allowance during assembly.
- Arrange the 60 square blocks into diagonal rows, referring to either the Quilt Assembly Diagram or the Two-Toned Quilt Assembly Diagram.
- Place the 22 triangle pieces along the edges of the arrangement.
- Sew the square blocks and triangle pieces together in these diagonal rows.
- When sewing a triangle piece to a square block, align the square corners and begin sewing there. Note that the triangle pieces are slightly smaller than the blocks.
- Sew the finished rows together to complete the quilt top.
- If necessary, trim the edges to square the quilt.
Finishing the Quilt
- Take the 4 yards of backing fabric. Cut the backing fabric in half and piece it together to create a backing piece that measures at least 64’’ x 76’’.
- Layer the backing fabric, the quilt batting (64’’ x 76’’), and the finished quilt top.
- Baste the layers together using pins, basting spray, or fusible batting.
- Quilt the layers as desired.
- Sew the 7 binding strips together.
- Bind the quilt using the prepared binding strips.
Download Free PDF:


