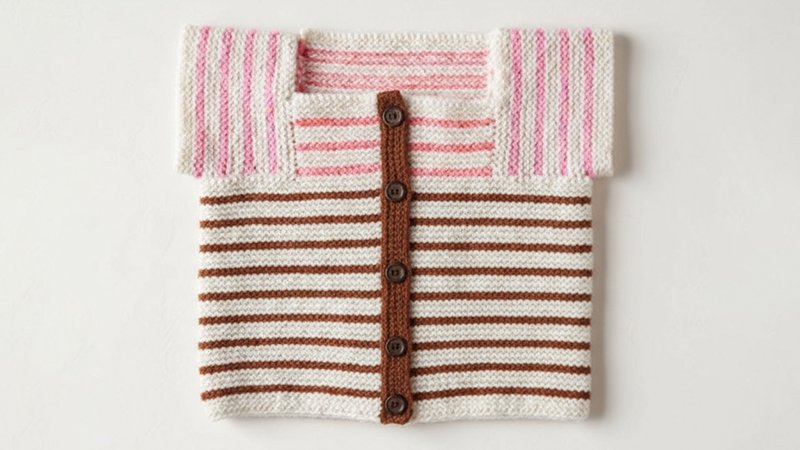
Pattern Description:
This is a free, wonderfully simple striped cardigan for newborns (0-6 months), designed with no fuss and no frills.
Knit from the bottom up in one piece in garter stitch, it features minimal sewing, easy inset sleeves, and clever buttonholes on both sides for perfect button placement.
Materials Needed & Measurements:
- Yarn:
- Purl Soho’s Quartz, a mix of 65% merino wool and 35% suri alpaca.
- Each skein is 420 yards/100 grams.
- Main Color (MC): 1 skein (approximately 215 yards required; Peony Pink was used as an example).
- Contrast Color (CC): 1 skein (approximately 60 yards required; Autumn Oak was used as an example).
- Note: This is enough yarn to make two oppositely colored sweaters.
- Yarn Weight: Fingering-weight yarn.
- Needles: US 3 (3.25 mm), 16- or 24-inch circular knitting needles.
- Notions:
- Four 3/8-inch buttons (Small Corozo Buttons in Kiln Red were used as an example).
- Tapestry needle (implied for seaming and weaving in ends).
- Measurements (Size):Newborn-6 Months.
- Finished Chest Circumference: 18¼ inches, buttoned.
- Finished Length from Bottom Hem to Top Shoulder: 9 inches.
- Finished Length from Bottom Hem to Underarm: 5½ inches.
Stitches & Abbreviations Used:
Stitches/Techniques:
- Garter stitch (used throughout the pattern).
- Long Tail Cast On (used for body cast on).
- Cable Cast On (used for sleeves).
Abbreviations:
- k: knit
- bind off: bind off
- yo: yarn over
- k2tog: knit 2 together
- MC: Main Color
- CC: Contrast Color
- US: United States (for needle sizing)
- mm: millimeter (for needle sizing)
Instructions for Making the Little Baby Sweater In Posy Pattern:
Body
- With Main Color (MC), cast on 124 stitches using a basic Long Tail Cast On.
- Starting with a wrong-side row, knit 5 rows.
- Carrying up yarn between stripes (see Notes) and starting with a right-side row, follow this stripe sequence:
- With Contrast Color (CC), knit 2 rows.
- With MC, knit 6 rows.
- Repeat from the beginning of the CC stripe sequence 7 more times. This will create 9 MC stripes and 8 CC stripes.
- Then, with CC, knit 2 rows.
- With MC, knit 5 rows, ending with a right-side row. This results in 10 MC stripes and 9 CC stripes, and the piece should measure approximately 5.5 inches from the cast-on edge.
- Do not cut yarns.
Divide Fronts + Back
- On the Division Row (wrong side), still using MC:
- Knit 15 stitches.
- Bind off 31 stitches for the Left Underarm.
- Knit 32 stitches (this includes the stitch remaining on the right needle after binding off).
- Bind off 31 stitches for the Right Underarm.
- Knit to the end of the row.
- 62 stitches remain: 15 stitches for the Left Front, 32 stitches for the Back, and 15 stitches for the Right Front.
Right Front
- Working only the 15 Right Front stitches and starting with a right-side row:
- With CC, knit 2 rows.
- With MC, knit 6 rows.
- Repeat from the beginning of the CC stripe sequence 2 more times. This will create 3 MC stripes and 3 CC stripes from the Division Row.
- With the right side facing you, bind off knitwise to the end of the row.
- Cut yarns.
Back
- With the right side facing you, working only the 32 Back stitches and joining yarns as needed:
- With CC, knit 2 rows.
- With MC, knit 6 rows.
- Repeat from the beginning of the CC stripe sequence 5 more times. This will create 6 MC stripes and 6 CC stripes from the Division Row.
- With the right side facing you, bind off knitwise to the end of the row.
- Cut yarns.
Left Front
- With the right side facing you, working only the 15 Left Front stitches and joining yarns as needed:
- With CC, knit 2 rows.
- With MC, knit 6 rows.
- Repeat from the beginning of the CC stripe sequence 2 more times. This will create 3 MC stripes and 3 CC stripes from the Division Row.
- With the right side facing you and still using MC, bind off knitwise to the end of the row, leaving the last stitch on the needle.
- Cut CC, but do not cut MC.
Left Button Band
- With the right side still facing you, rotate the piece 90 degrees clockwise so the Left Front selvage edge is at the top.
- Continuing with MC, pick up and knit 50 stitches between garter ridges along the Left Front edge to the bottom corner. This results in 51 total stitches.
- Starting with a wrong-side row, knit 2 rows.
- Buttonhole Row (wrong side): Knit 11, then [yarn over (yo), knit 2 together (k2tog), knit 10] 3 times, then yo, k2tog, knit 2. This creates 4 buttonholes.
- Starting with a right-side row, knit 2 rows.
- With the right side facing you, bind off to the end of the row.
- Cut yarn.
Right Button Band
With the right side still facing you, rotate the piece 180 degrees so the Right Front selvage edge is at the top.
- With MC and beginning at the bottom corner of the Right Front, pick up and knit 51 stitches between garter ridges along the Right Front edge to the top corner. Ensure to pick up the first stitch between the Right Front cast on and the first garter ridge.
- Starting with a wrong-side row, knit 2 rows.
- Buttonhole Row (wrong side): Knit 3, then [yo, k2tog, knit 10] 4 times. This creates 4 buttonholes.
- Starting with a right-side row, knit 2 rows.
- With the right side facing you, bind off to the end of the row.
- Cut yarn.
Right Sleeve
- Orient the piece with the right side of the Back facing you and the right selvage of the Back at the top.
- With MC and leaving a foot-long tail, start at the bottom right corner of the Back and pick up and knit 24 stitches between garter ridges to the top corner of the Back.
- Turn work so the wrong side is facing you and use a Cable Cast On to cast on 12 stitches.
- Turn work so the right side is facing you, and making sure the cast-on stitches are not twisted, pick up and knit 12 stitches down the Right Front selvage. This results in 48 total stitches.
- Starting with a wrong-side row and MC, knit 5 rows.
- Then, follow this stripe sequence:
- With CC, knit 2 rows.
- With MC, knit 6 rows.
- Repeat from the beginning of the CC stripe sequence 3 more times. This will create 5 MC stripes and 4 CC stripes.
- With the right side facing you, bind off to the end of the row.
- Cut yarns, leaving an 18-inch tail of MC.
Left Sleeve
Orient the piece with the right side facing you and the selvage of the Left Front at the top.
- With MC and leaving a foot-long tail, start at the bottom corner of the Left Front and pick up and knit 12 stitches between garter ridges to the top corner of the Left Front.
- Turn work so the wrong side is facing you and use a Cable Cast On to cast on 12 stitches.
- Turn work so the right side is facing you, and making sure the cast-on stitches are not twisted, pick up and knit 24 stitches down the left selvage of the Back. This results in 48 total stitches.
- Repeat the instructions from step 5 of the Right Sleeve pattern.
Seam Sleeves
For help seaming, refer to the Seaming Garter Stitch Tutorial.
- Fold the piece so the sweater is properly assembled and the Back is facing you.
- Thread the Left Sleeve’s bind-off tail onto a tapestry needle, and starting at the bind-off edge, sew the Sleeve edges together through four garter stitch ridges (one MC stripe and one CC stripe).
- Fold the Body’s Underarm in half and insert the tapestry needle just under the Underarm’s bind-off edge at its halfway point. Then, seam together the back Sleeve and back Underarm, sewing back and forth between Sleeve edge stitches as before and below the Underarm bind-off edge.
- With the Front facing you, thread the Left Sleeve’s pick-up tail onto a tapestry needle and seam together the front Sleeve and front Underarm, as you did for the Back.
- With the Front still facing you, repeat steps 3-5 for the Right Sleeve, sewing the front Underarm to the front of the Sleeve first, then flipping the sweater over to sew the back Sleeve to the back Underarm.
Finishing
- Sew buttons on top of either set of buttonholes. Traditionally, buttons for girls go on the Left Front and for boys on the Right Front.
- Weave in all ends and gently block your Little Sweater.
Download Free PDF: