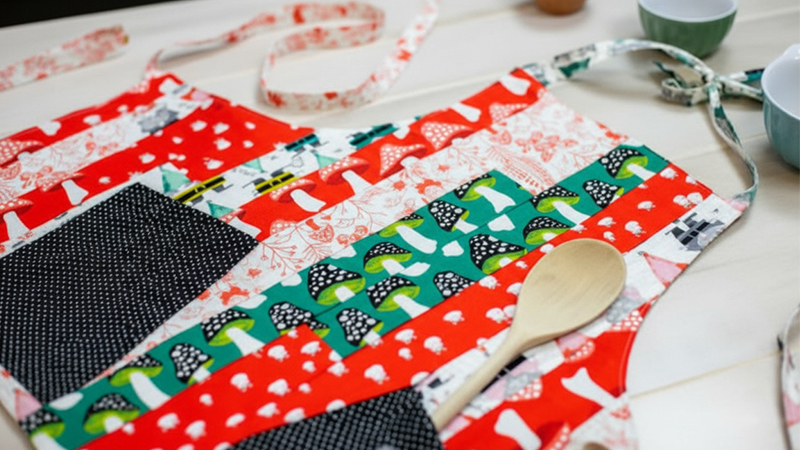
Pattern Description:
This free Mile-a-Minute Jelly Roll Apron pattern is an easy and fun project using 2 1/2″ wide jelly roll strips. It is fast to sew and makes a great gift.
The apron is sewn from strips to create a full coverage item suitable for women or men, measuring approximately 33’’ tall and 30’’ wide upon completion (excluding the ties). The pattern includes functional pockets, which are optional.
Materials Needed & Measurements:
The materials needed for the Mile-a-Minute Jelly Roll Apron include:
- 16 strips of fabric that are 2 1/2’’ wide and at least 42’’ long. One apron requires 16 strips of fabric that are 2 1/2’’ wide by 42’’ long. If using leftover 2 1/2’’ strips of any length, you will need to sew more together. If the strips are not at least 42’’ long without the selvages, one more strip is needed.
- 1 yard of coordinating fabric for the backing and pockets.
- Free Full Coverage Apron Template.
Measurements for pieces cut from the remaining 3 fabric strips and pockets:
- 2 neck ties: 2 1/2’’ x 18’’.
- 2 waist ties: 2 1/2’’ x 32’’.
- 2 pocket rectangles: 8 1/2’’ x 7’’. (These can be cut from new fabric, the backing fabric, or rounded scraps from the apron corners).
- Finished apron size is approximately 33’’ tall and 30’’ wide (not including the neck or waist ties).
Instructions for Making the Mile a Minute Jelly Roll Apron Pattern:
Cutting
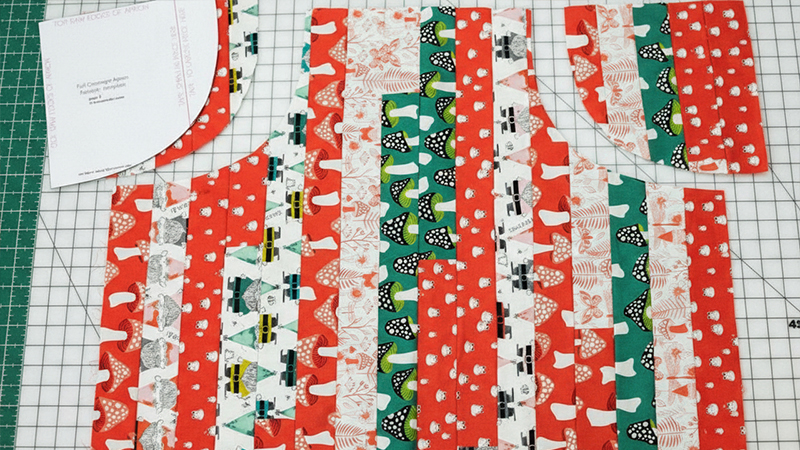
Begin the process by preparing your fabric strips. Start by cutting the selvages off the ends of the sixteen 2 1/2’’ wide strips. Measure to ensure that your strips are at least 42’’ long without the selvages; if they are not, you will need one more strip.
Once the apron top is prepared, lay it face down against your 1 yard of coordinating backing fabric. Cut around the edges to create an apron back that matches the size of the apron front.
From the remaining 3 fabric strips, cut the following pieces:
- 2 neck ties measuring 2 1/2’’ x 18’’.
- 2 waist ties measuring 2 1/2’’ x 32’’.
For the optional pockets, cut 2 rectangles measuring 8 1/2’’ x 7’’. These pocket pieces may be cut from new fabric, the backing fabric, or the rounded scraps cut from the apron corners.
Sewing the Apron Front
Using a 1/4’’ seam allowance, sew 13 of the fabric strips together end to end to create one very long strip. If your original strips were less than 42’’ long, you will need to sew 14 together. Alternate: If preferred, the strips can be sewn together at right angles for a different appearance.
Next, cut 16 pieces from the long strip, ensuring each piece is 34’’ long. Sew these sixteen 34’’ strips together along the long edges using a 1/4’’ seam allowance. This will create a large fabric piece approximately 32 1/2’’ wide and 34’’ tall. If the strips are not sewing together evenly, you can try switching the direction of the seams for every other one. If necessary, trim the top and bottom edges of the fabric piece to make them even.
Finally, use the free Full Coverage Apron Template to cut away the top corners of your fabric piece.
Sewing the Pockets (Optional)
- Press the top edge of each pocket rectangle over by 1/2’’ two times to create a 1/2’’ hem. Stitch the hem close to the fold.
- Fold the bottom and side edges of the pockets to the back by 1/2’’ (only once) and press well.
- Lay the apron top right side up. Use the vertical seams as guides to position the pockets.
- Place the lower inside corners of the pockets on the first seam over (2’’) from the center seam, and 19 1/2’’ down from the top edge.
- Tilt the pockets toward the outer edges, placing the top inner corners 2 seams over (4’’) from the center seam and 13’’ down from the top edge.
- Pin around the side and bottom edges to secure the pockets to the apron top.
- Use coordinating thread to sew the pockets to the apron top around the sides and bottom edges.
Sewing the Neck and Waist Ties
- Fold each of the neck and waist ties in half lengthwise with right sides together, and pin.
- Sew across one long edge and one short end using a 1/4’’ seam allowance.
- Trim away the extra fabric at the bottom corners. Use a chopstick or turning tool to turn the ties right side out, then press them flat.
- Topstitch around each tie piece, 1/8’’ from the edges. Repeat this process for all four ties.
- Pin the raw ends of the ties to the top and side edges of the apron:
- The raw ends of the shorter neck ties should be 1/2’’ from the top corners of the apron.
- The raw ends of the longer waist ties should be 1/2’’ below the side corners of the apron.
- Stitch across the ends to secure them approximately 1/4’’ away from the edge.
Finishing the Jelly Roll Apron
- Place the apron back piece and the apron top right sides together and pin all the way around the edges. Make sure all the ties are pushed toward the center of the apron (or tucked into the pockets) so they do not get caught in the seams.
- Sew all the way around the apron with a 1/2’’ seam allowance. Leave a 6’’ opening along the bottom edge for turning the apron right side out.
- Trim away the extra fabric at the corners. Along the curved edges, cut 1/2’’ clips toward the stitching line, being careful not to cut the actual stitches.
- Turn the apron right side out through the opening. Press it flat.
- Topstitch all the way around the apron 1/8’’ from the edge. This final stitching step simultaneously closes the opening.
Download Free PDF: