Pattern Description:
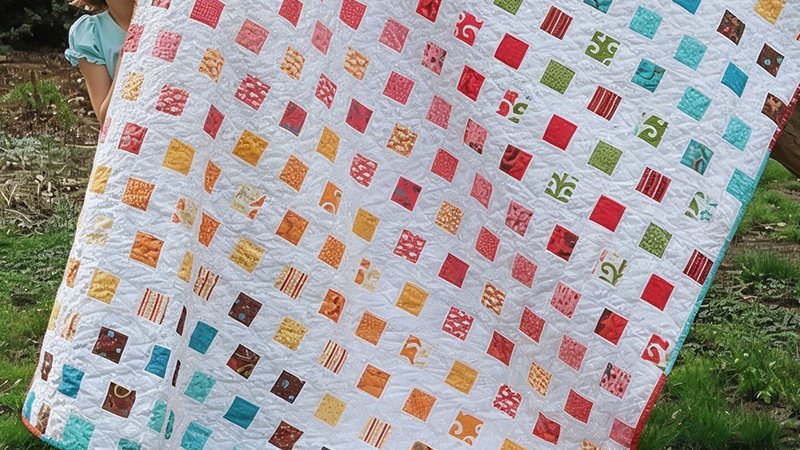
The Modern Workshop Quilt is a vivid, geometric design featuring seven shades each of yellow and pink, four shades each of blue and brown, and two green accents.
Constructed from 2½” squares, the 54″ x 72″ quilt emphasizes tonal contrast, visual depth, and modern aesthetics.
Carefully balanced colors create dynamic movement and harmonious interplay across the quilt surface.
Materials Needed & Measurements:
- Fabrics:
- Yellow: Y1-Y7
- Pink: P1-P7
- Blue: B1-B4
- Brown: BR1-BR4
- Green: G1-G2
- Other Supplies:
- Rotary cutter and cutting mat
- Quilting ruler (2½” increments)
- Sewing machine
- Thread (neutral or coordinating colors)
- Pins or clips
- Iron and ironing board
- Batting (54″ x 72″)
- Backing fabric (approx. 60″ x 78″)
Step 1: Cutting the Fabric
All quilt units are 2½” squares, but you may cut strips to speed up assembly.
- Yellow & Pink (dominant colors): Cut multiple 2½” squares from each shade. For a 54″ x 72″ quilt, estimate about 250–300 squares per color family.
- Blue & Brown (secondary colors): Cut 50-70 squares per shade. These will be used for accents, borders, or block framing.
- Green (accent colors): Cut 20-30 squares for small highlight areas.
Tip: Cut slightly more than calculated to account for errors or seam allowances.
Step 2: Planning the Layout
The Modern Workshop Quilt is geometric and modern, allowing flexibility:
- Divide the quilt top into a grid of 2½” squares:
- Width: 54″ ÷ 2½” = 21.6 → 22 squares wide
- Height: 72″ ÷ 2½” = 28.8 → 29 squares high
- Total: approximately 638 squares.
- Color distribution strategy:
- Alternate yellow and pink shades in a gradient pattern for visual flow.
- Interspace blue and brown squares to provide contrast and grounding.
- Add green accents sparingly to create subtle focal points.
Tip: Lay out the squares on a design wall or floor before sewing to visualize color balance.
Step 3: Assembling Blocks
- Piecing method:
- Sew 2½” squares into rows of 6-8 squares, pressing seams open or to one side.
- Join rows to form blocks of 6-8 rows, roughly 12″-20″ each, depending on your preferred size.
- Use contrasting or complementary colors for block borders to define shapes.
- Creative variation:
- Consider half-square triangles or rectangles within blocks to add geometric interest.
- Incorporate random blue, brown, and green squares to break monotony.
Step 4: Assembling the Quilt Top
- Arrange blocks on your workspace according to your layout plan.
- Join blocks row by row using ¼” seam allowance.
- Ensure seams line up neatly; pin carefully before sewing.
- Press all seams flat for a smooth quilt top.
Step 5: Adding Sashing & Borders
- Optional sashing (1½”-2″ strips) can frame blocks: Use a neutral or brown shade to separate blocks and enhance definition.
- Borders can add finishing touches:
- Inner border: 2½”-3″ brown or blue strips
- Outer border: 4″-6″ yellow, pink, or neutral fabric to frame the quilt
Step 6: Quilting
- Layering:
- Sandwich quilt top, batting, and backing fabric.
- Smooth out wrinkles and pin or baste layers.
- Quilting options:
- Straight-line quilting along grid lines to enhance geometric design
- Free-motion quilting for more modern, organic texture
- Consider quilting in alternating colors to complement dominant shades
Step 7: Binding
- Cut 2½” strips for binding (or 2¼” for standard bias binding).
- Join strips end to end, fold in half lengthwise, and press.
- Sew binding to quilt edges, mitering corners neatly.
- Hand-stitch or machine-stitch binding to finish.
Step 8: Finishing
- Trim excess batting and backing.
- Give the quilt a final press.
- Add a quilt label or personal signature if desired.
This completes the Modern Workshop Quilt, preserving its modern aesthetic with carefully balanced color gradients, geometric structure, and subtle accents.
Download Free PDF: