Pattern Description:
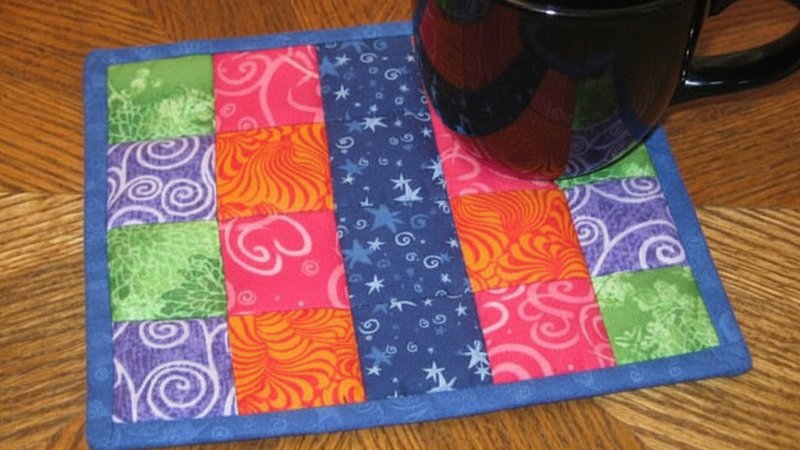
This simple and quick Patchwork Mug Rug tutorial is perfect for using up fabric scraps or charm squares. It makes a thoughtful handmade gift and can be completed in an afternoon.
The project involves sewing fabric pieces together for the front and back, quilting them with straight lines, and finishing with a bias tape binding. The finished mug rug measures 9 x 9 inches.
Materials Needed & Measurements:
| Material | Quantity / Measurement |
| Fabric Squares or Scraps | Ten 5 x 5 inch fabric squares from a charm pack or scrap fabrics |
| Batting or Felt | One 10 x 10 inch piece of cotton batting or felt |
| Bias Tape | One package of coordinating extra-wide double-fold bias tape |
| Thread | Coordinating thread |
| Tools | Sewing machine, rotary cutter and mat, straight pins, iron and ironing board |
Seam Allowance: 1/4 inch
Quilting Lines: Sew straight lines about 1/2 inch apart from the center line
Finished Size: 9 x 9 inches
Instructions for Making the Patchwork Mug Rug Pattern:
Constructing the Front Piece
- Create the Two-Square Section: Select two of the 5 x 5 inch squares for the right side of the mug rug front. Place them right sides together and sew along one edge using a 1/4 inch seam allowance. Press the seam open on the wrong side.
- Create the Five-Piece Strip: Cut four of the remaining 5 x 5 inch squares in half to make 2.5 x 5 inch rectangles. Choose five of these rectangles and sew them together along the 5-inch sides, right sides facing, using a 1/4 inch seam allowance each time. Continue until all five pieces form a single strip. Press all seams open on the wrong side.
- Join the Front Sections: Sew the two-square section to the five-piece strip, right sides facing, along the long edge. Press the seam open. This completes the front piece.
Constructing the Back Piece
Take the remaining four 5 x 5 inch squares and sew them together, right sides facing, using a 1/4 inch seam allowance.
Arrange them as you like and press the seams open. You should now have both the front and back pieces completed.
Layering, Quilting, and Finishing
- Layer the Pieces: Place the batting or felt on your work surface. Layer the back piece (right side up) on the bottom, then the batting, and finally the front piece (right side up) on top. Pin around the edges to secure all layers.
- Quilt the Mug Rug: Start quilting from the center by sewing a straight line from one side to the other.
Then sew additional straight lines spaced about 1/2 inch apart, working outward until the entire surface is quilted.
- Trim and Bind: Use a rotary cutter to square up the edges, trimming the mug rug to a 9 x 9 inch square. Sew the bias tape around the outer edges to bind the mug rug, making sure all raw edges are enclosed.
Your Patchwork Mug Rug is Complete!
This colorful, quilted mug rug is the perfect handmade gift or a cozy addition to your own table. Try experimenting with different fabric combinations to match any season or occasion.
Download Free PDF: