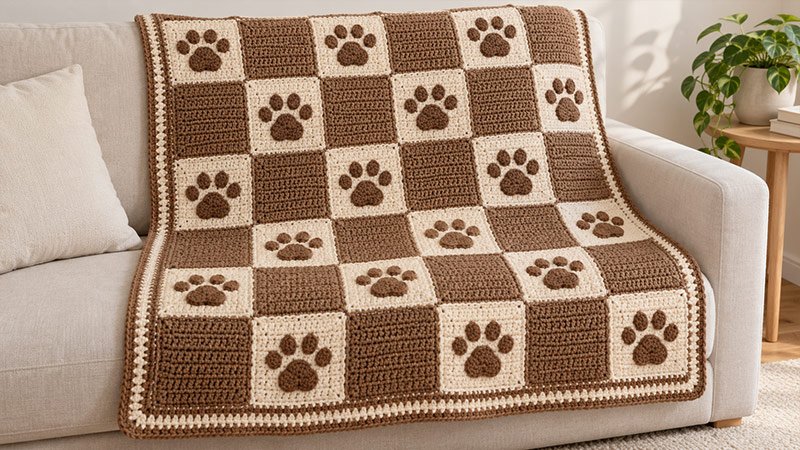
Wrap up in a soft blanket filled with sweet crochet paw prints. This design pairs simple squares with small paw shapes sewn onto the front.
Make it in cream and brown for a warm look, or choose shades that suit your home. The squares are easy to carry, so you can work on them during quiet breaks. Join them into a cozy throw, then add a neat border.
This project makes a thoughtful gift for anyone who loves cats, dogs, and handmade comfort at home.
Pattern Overview
This blanket uses thirty single crochet squares arranged in five columns and six rows. Fifteen squares have paw prints, while fifteen remain plain. Place them in a checkerboard layout so each paw has room to stand out.
Each paw consists of one central pad and four small toes. Work these pieces separately, then sew them onto a square.
Skill level: Confident beginner
Estimated finished size: Approximately 37 × 44 inches, including the border
Construction: Flat squares with sewn appliqués
Crochet terms: US terminology
Measurements depend on your gauge and joining method. This is an original written design; make a sample square and paw before starting the full blanket.
Materials
Gather the following supplies:
- Approximately 1,400–1,600 yards of medium-weight yarn for the squares, seams, and border.
- Approximately 150–200 yards of medium-weight yarn in a contrasting shade for the paws.
- A 5 mm crochet hook, or the size needed to meet gauge.
- A yarn needle.
- Scissors.
- Stitch markers.
- A measuring tape.
Choose smooth yarn so you can see the stitches clearly. Use yarns with similar thickness and care instructions.
Cream squares with brown paws create a gentle look. Gray squares with black paws also work well. Set aside some blanket yarn for joining and edging.
Gauge and Abbreviations
Gauge: 14 single crochet stitches and 20 rows measure approximately 4 inches.
Make a swatch larger than 4 inches, then measure the center. Wash and dry it as you plan to care for the finished blanket.
- ch: chain
- sc: single crochet
- sl st: slip stitch
- st: stitch
- sc2tog: single crochet two stitches together
- RS: right side
The turning chain does not count as a stitch. Work the first stitch of each row into the first actual stitch.
To make sc2tog, insert your hook into the next stitch and pull up a loop. Repeat in the following stitch. Yarn over and draw through all three loops.
Step 1: Crochet the Blanket Squares
Make 30 squares using the main blanket yarn.
Foundation: Ch 25.
Row 1: Sc in the second chain from the hook and in each chain across. Turn. 24 stitches.
Rows 2–35: Ch 1. Sc in each stitch across. Turn. 24 stitches per row.
Fasten off after Row 35. Weave in the ends.
At the stated gauge, each square measures approximately 7 inches across and 7 inches tall.
Check your first square before continuing. If it is much wider or narrower, adjust your hook size. Keep the same stitch and row counts throughout the blanket.
Lay completed squares flat. Gently block them to matching dimensions without stretching them hard.
Step 2: Crochet the Central Paw Pads
Make 15 pads with the contrasting yarn.
Foundation: Ch 7.
Row 1: Sc in the second chain from the hook and across. Turn. 6 stitches.
Row 2: Ch 1. Work 2 sc in the first stitch, sc in the next 4 stitches, and 2 sc in the last stitch. Turn. 8 stitches.
Row 3: Ch 1. Work 2 sc in the first stitch, sc in the next 6 stitches, and 2 sc in the last stitch. Turn. 10 stitches.
Row 4: Ch 1. Work 2 sc in the first stitch, sc in the next 8 stitches, and 2 sc in the last stitch. Turn. 12 stitches.
Rows 5–6: Ch 1. Sc across. Turn. 12 stitches.
Row 7: Ch 1. Sc2tog, sc in the next 8 stitches, sc2tog. Turn. 10 stitches.
Row 8: Ch 1. Sc2tog, sc in the next 6 stitches, sc2tog. Turn. 8 stitches.
Row 9: Ch 1. Sc2tog, sc in the next 4 stitches, sc2tog. 6 stitches.
Fasten off, leaving a long sewing tail. The broad middle and narrow ends form a softly shaped pad.
Step 3: Crochet the Paw Toes
Make 60 toes, allowing four for each paw.
Round 1: Work 6 sc into a magic ring. Pull the ring closed. 6 stitches.
Round 2: Work 2 sc in each stitch around. 12 stitches.
Sl st into the next stitch. Fasten off with a sewing tail.
If you prefer, ch 2 and work the first six stitches into the second chain from the hook.
Keep these circles flat. If they cup, loosen your tension slightly. Secure the center tail firmly so the ring cannot open.
Step 4: Sew the Paws onto the Squares
Decorate 15 squares.
Place one central pad slightly below the square’s midpoint. Arrange four toes above it in a shallow arch. Position the two middle toes a little higher than the outer pair.
Leave a small gap between each piece. Keep the whole paw centered, with clear space around the square’s edges.
Pin the pieces in place or hold them with removable stitch markers.
Using the yarn tails, sew around every piece with small stitches. Catch the square beneath each stitch without pulling tightly. Secure the edges fully so the toes cannot lift or snag.
Weave all remaining tails through several stitches on the back.
Step 5: Arrange and Join the Squares
Lay out five squares across and six down.
Start the first row with a paw square, then alternate paw and plain squares. Start the second row with a plain square. Repeat these two layouts through all six rows.
Check that every paw faces the same direction.
With matching yarn, whipstitch neighboring squares together through corresponding edge loops. Keep the seam relaxed.
Along vertical edges, match row ends. Along horizontal edges, match the twenty-four stitches. Join the squares into rows, then sew the rows together.
Step 6: Add the Border
Join blanket yarn at an outer corner.
Round 1: Ch 1. Work sc around the blanket. Along horizontal edges, work approximately one sc per stitch. Along vertical edges, work approximately one sc per row end. Work 3 sc in each corner. Join with a sl st.
Adjust spacing if the edge waves or draws inward.
Rounds 2–3: Ch 1. Sc around, working 3 sc into the middle stitch of each corner group. Join.
Fasten off and weave in the ends.
Finishing and Care
Lay the blanket flat and check the seams and appliqué edges. Secure any loose areas.
Wash according to the yarn label. Shape the blanket gently while damp and dry as directed.
For a larger blanket, add complete rows or columns of squares and increase your yarn allowance.