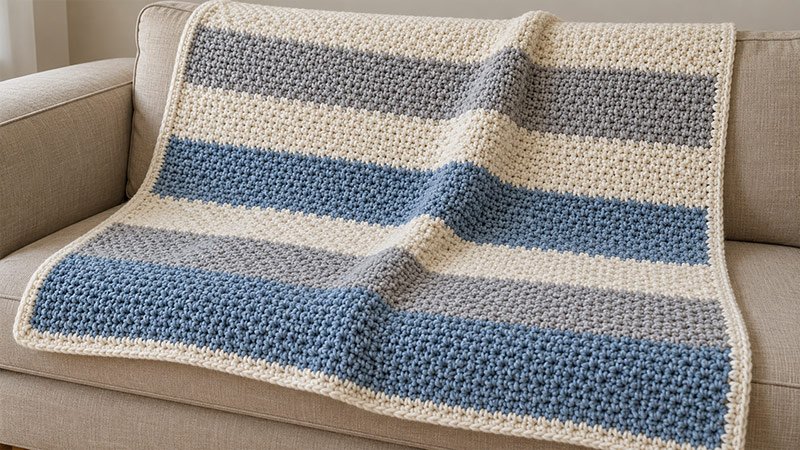
This moss stitch throw uses single crochet and chain gaps. These form a close, even cloth. Once you finish the first row, work each single crochet in a chain gap. Use the gaps in the row below. Repeat this row to make the throw.
The steps use US crochet terms. This is a good choice if you are new to crochet. You need to know how to chain and work single crochet. Use one color for a plain throw. Or use the stripe plan below.
Materials
- Yarn: Approximately 1,800–2,100 yards of worsted-weight yarn, category 4.
- Hook: 5.5 mm crochet hook, or the size needed to meet gauge.
- Yarn needle.
- Scissors.
- Measuring tape.
- Two stitch markers to mark the ends of each row.
For the optional stripe plan, use:
- Color A: Cream, approximately 900–1,050 yards.
- Color B: Soft gray, approximately 450–525 yards.
- Color C: Muted blue, approximately 450–525 yards.
Yarn amounts are estimates and include the border. Your tension and choice of yarn may change how much you need.
Size
Finished size: Approximately 42 × 52 inches, including a border about 1 inch wide on each edge.
Blanket body: Approximately 40 × 50 inches.
Gauge: 8 moss stitch repeats and 18 rows = 4 inches.
For gauge, one repeat means 1 sc plus 1 ch-1 sp. Measure across the middle of a swatch after washing and drying it as you plan to care for the blanket.
Adjust the Size
Start with an even number of chains.
At the stated gauge:
- Add 8 foundation chains to increase the body width by about 2 inches.
- Remove 8 foundation chains to reduce the body width by about 2 inches.
- Add or remove 9 rows to change the body length by about 2 inches.
The border adds approximately 2 inches to the total width and length.
Stitches
Abbreviations
- ch: Chain.
- sc: Single crochet.
- sl st: Slip stitch.
- st / sts: Stitch / stitches.
- sp / sps: Space / spaces.
- rep: Repeat.
- RS: Right side.
Single Crochet — sc
Insert the hook into the indicated stitch or space. Yarn over and pull up a loop. Yarn over and pull through both loops on the hook.
Moss Stitch
For this pattern, moss stitch uses sc, ch 1 repeats. After the foundation row, work each sc into a ch-1 sp from the previous row. The ch-1 passes over the sc below.
Pattern Notes
- The starting ch-2 on each repeat row counts as an edge chain space.
- Do not work into the tops of the sc stitches when making the blanket body.
- Work the last sc of each repeat row into the turning-chain space at the far edge.
- Each body row has 80 sc and 80 chain spaces, including the starting edge space.
- Keep your chains loose enough for the fabric to lie flat.
- Turn after every body row.
- Mark the starting edge space if it is hard to find.
Pattern Instructions
Step 1: Make a Gauge Swatch
Ch 26.
Follow Rows 1 and 2 below, using this shorter foundation chain. Each swatch row will have 12 sc and 12 chain spaces, including the edge space.
Work at least 24 rows. Wash and dry the swatch, then measure the middle.
If there are more than 8 repeats across 4 inches, try a larger hook. If there are fewer, try a smaller hook.
Step 2: Make the Foundation Chain
With Color A, ch 162.
Keep the chain relaxed and check that it has not twisted.
Step 3: Work Row 1
Row 1: Sc in the 4th ch from the hook. The 3 skipped chains form the starting edge space.
*Ch 1, skip the next ch, sc in the next ch; rep from * to the end. Turn.
Count: 80 sc and 80 chain spaces, including the starting edge space.
The last sc goes into the last foundation chain.
Step 4: Work Row 2
Row 2: Ch 2. Skip the first sc and sc in the first ch-1 sp.
*Ch 1, skip the next sc, sc in the next ch-1 sp; rep from * across. Work the final sc into the starting ch-3 sp from Row 1. Turn.
Count: 80 sc and 80 chain spaces, including the starting ch-2 sp.
Step 5: Repeat the Moss Stitch Row
Row 3: Ch 2. Skip the first sc and sc in the first ch-1 sp.
*Ch 1, skip the next sc, sc in the next ch-1 sp; rep from * across. Work the final sc into the starting ch-2 sp from the previous row. Turn.
Rows 4–224: Rep Row 3.
The body should measure approximately 50 inches long at the stated gauge. If your row gauge differs, repeat Row 3 until the body reaches that length.
Check the stitch count now and then. A missed edge space can cause the blanket to become narrower.
Step 6: Follow the Optional Stripe Plan
For a striped throw, use this sequence:
| Rows | Color |
|---|---|
| 1–16 | A |
| 17–32 | B |
| 33–48 | A |
| 49–64 | C |
Repeat the same 64-row sequence for Rows 65–128 and Rows 129–192.
Finish with:
| Rows | Color |
|---|---|
| 193–208 | A |
| 209–224 | B |
To change colors, work the last sc of the row until 2 loops remain on the hook. Yarn over with the new color and pull through both loops. Turn and begin the next row with the new color.
Cut the old yarn, leaving a tail of about 6 inches to weave in.
Step 7: Work the Border
Use Color A or your chosen border color. Keep the same side facing you throughout the border.
After the final body row, turn once and begin the border along the top edge. If needed, join the border yarn at that corner.
Border Round 1
Ch 1; this does not count as a st.
Work 3 sc in the first corner st. Sc in each remaining sc and ch-1 sp across the top, stopping before the opposite corner space. Work 3 sc in that corner space.
Along the side, begin with approximately 1 sc in each row end.
At the lower corner, work 3 sc in the corner. Sc across the underside of the foundation chain, placing approximately 1 sc opposite each sc and each chain space from Row 1.
Work 3 sc in the next corner. Sc evenly up the remaining side. Sl st in the first sc to join.
Place a marker in the middle sc of each 3-sc corner group.
Check the edge: Lay the blanket flat. If a side pulls inward, add a few evenly spaced sc along it. If it waves, reduce the number of sc along that side. Row-end spacing may need adjustment to suit your gauge.
Border Round 2
Ch 1. Sc in each st around, working 3 sc in each marked corner st.
Move each marker to the middle sc of the new corner group. Sl st in the first sc to join.
Border Rounds 3–4
Rep Border Round 2.
Check that the blanket lies flat after each round. Four rounds should make a border close to 1 inch wide, though the exact width depends on your tension.
Fasten off.
Step 8: Finish the Blanket
- Weave in all yarn ends with a yarn needle.
- Follow the yarn label’s washing instructions.
- Lay the blanket flat and gently shape the edges.
- Allow it to dry fully before measuring or folding.