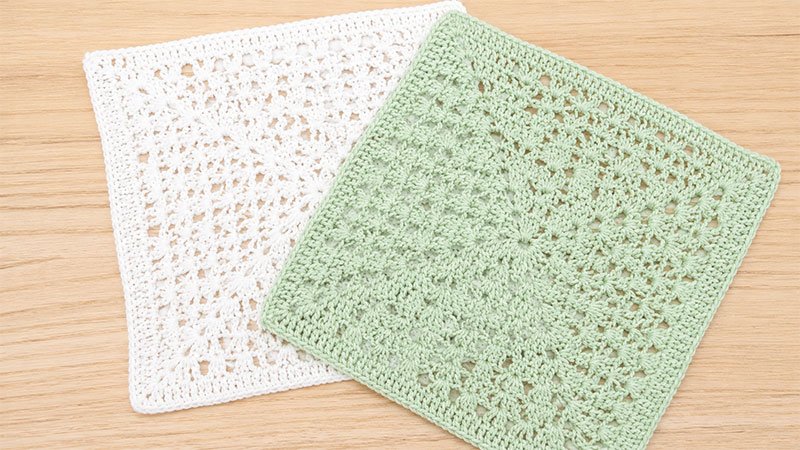
This pattern features a beautiful, vintage-inspired lace design that looks intricate but relies on an easy-to-memorize stitch pattern.
By combining classic double crochets, delicate V-stitches, and textured puff stitches, you will create an elegant 12-inch (30.5 cm) block perfect for blankets, bags, or pillows.
Preparation & Materials
Tools & Yarn
-
Hook: Size 5.0-mm (US H/8, UK 6)
-
Yarn: Aran weight / Medium (Category 4) yarn. You will need roughly 95 yards (87 meters) per square.
-
Notions: Tapestry needle for weaving in yarn tails, scissors, and optional blocking boards.
Gauge Check
To ensure your finished block measures exactly 12 inches, check your tension:
-
Crochet a standard traditional granny square. After completing 2 rounds, your work should measure 2.5 inches (6.4 cm) across.
Stitch Guide & Abbreviations (US Terms)
-
Ch: Chain
-
Dc: Double Crochet
-
MC: Magic Circle (Adjustable Ring)
-
Sl St: Slip Stitch
-
Sp / Sts: Space / Stitches
-
Yo: Yarn Over
Special Stitch Instructions
V-Stitch (V-St): Work 1 double crochet, chain 1, and work 1 more double crochet all into the exact same stitch or space.
V-Puff Stitch (V-Puff):
-
First Puff: (Yo, insert your hook into the designated space, draw up a tall loop) 3 times. You will have 7 loops on your hook. Yo, pull through 6 loops. Yo, pull through the remaining 2 loops.
-
Center: Chain 1.
-
Second Puff: In the exact same space, repeat the puff process: (Yo, insert hook, pull up a loop) 3 times. Yo, pull through 6 loops. Yo, pull through the last 2 loops.
Master Pattern Notes
-
Reading “dc 2”: This means you will place 1 double crochet into the next stitch, and 1 double crochet into the stitch after that (do not put them in the same stitch).
-
Brackets
[...]: Work all the stitches listed inside these brackets into the very same stitch or space. -
Parentheses
(...)and Stars*: Repeat the sequence of steps inside the parentheses or following the star the exact number of times requested. -
Starting Corners: Every round begins by building a partial corner space using a “chain 4” sequence. The first 3 chains mimic a double crochet, while the 4th chain creates the corner gap.
Step-by-Step Blanket Square Pattern
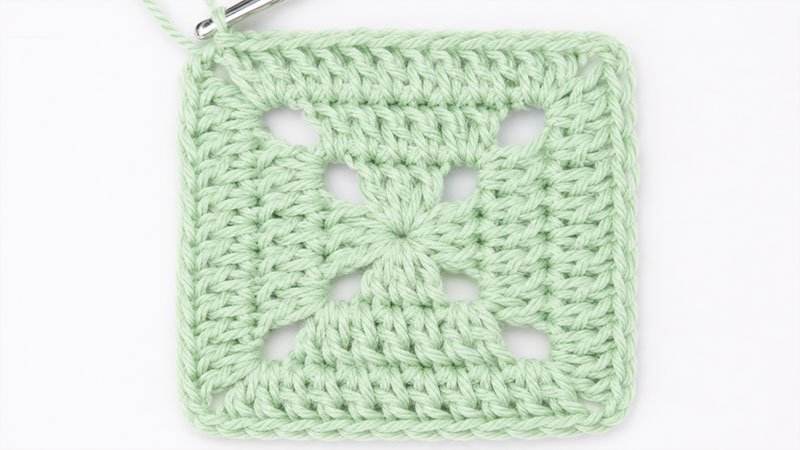
Round 1: Foundations
Begin by forming a Magic Circle.
-
Step 1: Ch 4 (this serves as your first double crochet and your first corner gap).
-
Step 2: Inside the circle, work 3 double crochets, then ch 2. Repeat this sequence 2 more times.
-
Step 3: Work 2 double crochets inside the circle.
-
Step 4: Close the loop. Join the round by working a slip stitch into the 3rd chain of your starting chain-4.
-
Stitch Count: 3 double crochets on each of the 4 sides, with a chain-2 gap at every corner.
Round 2: Setting up the V-Stitches
-
Step 1: Sl st into the first corner gap, then ch 4. In that same gap, work 2 double crochets.
-
Step 2: Skip the next double crochet. In the middle stitch of the side, work a V-St. Skip the last double crochet of the side. In the corner chain-2 space, work
[2 dc, ch 2, 2 dc]. -
Step 3: Repeat the sequence from * 3 times around until you reach the final side.
-
Step 4: Skip 1 stitch, work a V-St in the next, skip the last stitch. To finish your starting corner, work 1 double crochet directly into the initial corner gap. Sl st into the 3rd chain of your opening chain-4 to close.
-
Stitch Count: 4 double crochets and 1 V-Stitch per side, with chain-2 spaces at the corners.
Round 3: Expanding the Shells
-
Step 1: Sl st into the corner gap, ch 4, and work 2 double crochets in the same space.
-
Step 2: Ch 1, skip 3 stitches. Find the center chain-1 space of the previous round’s V-Stitch and work
[2 dc, ch 1, 2 dc]into it. Ch 1, skip 3 stitches. Work[2 dc, ch 2, 2 dc]into the corner. -
Step 3: Repeat from * 3 times around.
-
Step 4: On the final side, ch 1, skip 3 stitches, work
[2 dc, ch 1, 2 dc]in the V-St space, ch 1, skip 3 stitches. Work 1 double crochet into your starting corner gap, and sl st to the 3rd chain of the opening chain-4. -
Stitch Count: 4 double crochets and 3 separate chain-1 spaces per side, with chain-2 corners.
Round 4: Introducing the V-Puff Stitches
-
Step 1: Sl st into the corner gap, ch 4, and work 2 double crochets in the same space.
-
Step 2: Work 1 double crochet into each of the next 2 stitches, and 1 double crochet directly into the next chain-1 space. Ch 1, skip 2 stitches, then work a textured V-Puff stitch directly into the middle chain-1 space of the previous shell. Ch 1, skip 2 stitches, work 1 double crochet into the next chain-1 space, and 1 double crochet into each of the following 2 stitches. Work
[2 dc, ch 2, 2 dc]in the corner. -
Step 3: Repeat from * 3 times around.
-
Step 4: Complete the final side using the same sequence, finishing with 1 double crochet in the initial corner space. Sl st to the 3rd chain of the opening chain-4 to close.
-
Stitch Count: 10 double crochets, 1 V-Puff stitch, and 2 chain-1 spaces per side, with chain-2 corners.
Round 5: Building the Open Framework
-
Step 1: Sl st into the corner gap, ch 4, and work 2 double crochets in the same space.
-
Step 2: Ch 1, skip 2 stitches, work 1 V-St in the next stitch. Ch 2, skip the next 2 stitches and the chain-1 space. Work a V-St directly into the center of the V-Puff stitch. Ch 2, skip the next chain-1 space and 2 stitches, then work 1 V-St in the next stitch. Ch 1, skip the last 2 stitches of the side, and work
[2 dc, ch 2, 2 dc]in the corner. -
Step 3: Repeat from * 3 times around.
-
Step 4: Follow the sequence for the last side, ending with 1 double crochet in the starting corner space. Sl st to the 3rd chain of the opening chain-4 to close.
-
Stitch Count: 4 double crochets, 3 V-Stitches, 2 chain-1 spaces, and 2 chain-2 spaces per side.
Round 6: Secondary Shell Layer
-
Step 1: Sl st into the corner gap, ch 4, and work 2 double crochets in the same space.
-
Step 2: Work 1 double crochet into each of the next 2 stitches. Skip the chain-1 space. In each of the next 3 V-Stitch centers, work
[2 dc, ch 1, 2 dc]. Skip the final chain-1 space of the side, work 1 double crochet into each of the next 2 stitches, and work[2 dc, ch 2, 2 dc]in the corner. -
Step 3: Repeat from * 3 times around.
-
Step 4: Finish the final side, place 1 double crochet in the first corner space, and sl st to the 3rd chain of the opening chain-4.
-
Stitch Count: 20 double crochets and 3 chain-1 spaces per side.
Round 7: Triple Puff Row
-
Step 1: Sl st into the corner gap, ch 4, and work 2 double crochets in the same space.
-
Step 2: Work 1 double crochet into each of the next 4 stitches. Ch 1, skip 2 stitches. (Work a V-Puff in the next chain-1 space, ch 2, skip 4 stitches) twice. Work a V-Puff in the last chain-1 space of the side, ch 1, skip 2 stitches, work 1 double crochet in each of the next 4 stitches, and work
[2 dc, ch 2, 2 dc]in the corner. -
Step 3: Repeat from * 3 times around.
-
Step 4: Finish the last side, place 1 double crochet in the first corner space, and sl st to the 3rd chain of the opening chain-4.
-
Stitch Count: 12 double crochets, 3 V-Puff stitches, 2 chain-1 spaces, and 2 chain-2 spaces per side.
Round 8: Complex Framework Setup
-
Step 1: Sl st into the corner gap, ch 4, and work 2 double crochets in the same space.
-
Step 2: Work 1 double crochet, ch 1, skip 2 stitches, and work a V-St in the next stitch. (Ch 2, skip 2 stitches, then work a V-St inside the center of the next V-Puff) 3 times. Ch 2, skip the next chain space and 2 stitches, work a V-St in the next stitch, ch 1, skip 2 stitches, work 1 double crochet, then work
[2 dc, ch 2, 2 dc]in the corner. -
Step 3: Repeat from * 3 times around.
-
Step 4: Finish the last side, place 1 double crochet in the first corner space, and sl st to the 3rd chain of the opening chain-4.
-
Stitch Count: 6 double crochets, 5 V-Stitches, 2 chain-1 spaces, and 4 chain-2 spaces per side.
Round 9: Quintuple Shell Row
-
Step 1: Sl st into the corner gap, ch 4, and work 2 double crochets in the same space.
-
Step 2: Work 1 double crochet into each of the next 3 stitches. Skip the next chain-1 space. Into the center of each of the next 5 V-Stitches, work
[2 dc, ch 1, 2 dc]. Skip the last chain-1 space of the side, work 1 double crochet into each of the next 3 stitches, then work[2 dc, ch 2, 2 dc]in the corner. -
Step 3: Repeat from * 3 times around.
-
Step 4: Finish the final side, place 1 double crochet in the starting corner space, and sl st to the 3rd chain of the opening chain-4.
-
Stitch Count: 30 double crochets and 5 chain-1 spaces per side.
Round 10: Final Textured Lace Row
-
Step 1: Sl st into the corner gap, ch 4, and work 2 double crochets in the same space.
-
Step 2: Work 1 double crochet into each of the next 5 stitches. Ch 1, skip 2 stitches. (Work a V-Puff in the next chain-1 space, ch 2) 4 times. Work a final V-Puff in the last chain-1 space of the side, ch 1, skip 2 stitches, work 1 double crochet into each of the next 5 stitches, then work
[2 dc, ch 2, 2 dc]in the corner. -
Step 3: Repeat from * 3 times around.
-
Step 4: Complete the last side, place 1 double crochet in the starting corner space, and sl st to the 3rd chain of the opening chain-4.
-
Stitch Count: 14 double crochets, 5 V-Puff stitches, 2 chain-1 spaces, and 4 chain-2 spaces per side.
Round 11: Solid Border Frame
-
Step 1: Sl st into the corner gap, ch 4, and work 2 double crochets in the same space.
-
Step 2: Work 39 double crochets evenly across the side. To achieve this exact count, place 1 double crochet into every single double crochet stitch, puff stitch, and chain-1 space from the previous round, and place exactly 2 double crochets into every chain-2 space. At the corner, work
[2 dc, ch 2, 2 dc]. -
Step 3: Repeat from * 3 times around.
-
Step 4: Work 39 double crochets along the last side, place 1 final double crochet into your starting corner space, and sl st to the 3rd chain of your opening chain-4 to lock the round.
-
Stitch Count: 43 double crochets per side, with chain-2 spaces at the 4 corners.
Finishing
Cut your yarn, pull it through the final loop to secure it, and weave in all loose yarn ends neatly on the wrong side using a tapestry needle.
Tip: To make the lace pattern really open up and lay perfectly flat, wet-block your finished square to exactly 12″ × 12″.