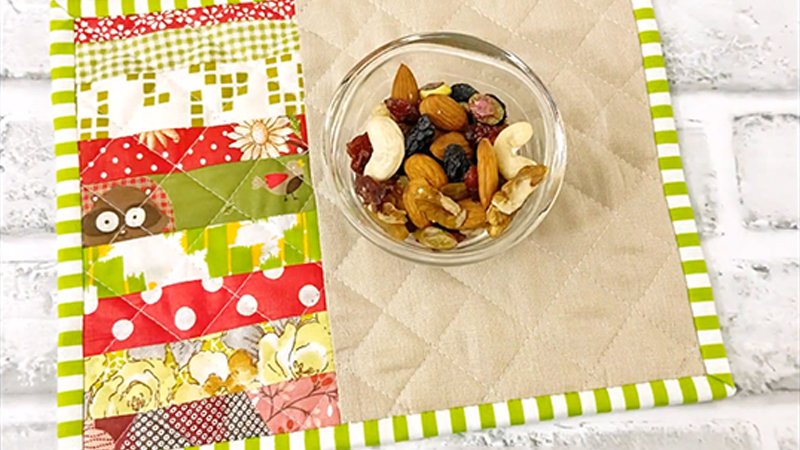
Pattern Description:
This is an intermediate-level quilting tutorial for a Scrappy Stack Mug Rug, finished size approximately 10″x7″.
It is designed to help bust your fabric scrap stash, especially long skinny scraps. The project involves piecing ten print strips together to form a rectangle, adding two sets of sashing strips, quilting, and binding the edges.
Materials Needed & Measurements:
- 10 print strips, each measuring 4.5″x1.25″
- 2 sashing strips, each measuring 8″x1.75″
- 2 sashing strips, each measuring 6.5″x1.75″
- 1 binding strip, measuring 2.5″x44″
- Backing fabric, measuring 12″x9″
- Batting, measuring 12″x9″
- Coordinating thread
- Fnished size of approximately 10″x7″:
Instructions for Making the Scrappy Stack Mug Rug Pattern:

Step 1: Constructing the Patchwork Center
The first construction step focuses on creating the colorful center piece using the fabric scraps.
The 10 print strips are taken and sewn together lengthwise to form a single, rectangular patchwork unit.
After all strips have been joined, the quilter should press the seams based on their preferred method.
Step 2: Adding the Sashing Strips
Once the central rectangle is pieced, the sashing strips are added to frame the scrap work.
- Take the two 8-inch sashing strips and attach them along the long sides of the pieced rectangle.
- After sewing, press the seams open.
- Next, take the two remaining sashing strips (measuring 6.5 inches each) and attach them to the short ends of the rectangle.
- Press these seams open as well.
Step 3: Preparing the Quilt Sandwich (Basting)
Prior to quilting, the three layers of the mug rug must be assembled to form a quilt sandwich. This assembly involves layering the backing fabric, the batting, and the newly pieced top. Once the layers are stacked and aligned, the unit should be secured by basting.
Step 4: Quilting the Mug Rug
The next crucial step is quilting, which can be done as desired using coordinating thread.
A highly praised technique is needed: quilting with wavy lines. This wavy effect is achieved by using a walking foot and deliberately wiggling the quilt as the stitches are made.
This method is for great texture and for making the pieced center appear to “float on a wonderfully crinkly background”.
The original creator used two different, harmonious thread colors to enhance the texture and quilting feature.
Green thread was stitched first, placed approximately every 1/2 inch. Following this, turquoise thread was stitched in the spaces between the initial lines.
Step 5: Finishing and Binding
The final steps involve cleaning up the edges and binding the perimeter.
- The backing fabric and batting layers must be trimmed, and the entire mug rug needs to be squared up.
- A double fold bias tape should be created.
- Use the binding strip to bind the edges of the mug rug. The creator’s method involved machine stitching the binding to the front side of the mug rug and then hand stitching the binding to the back side.
Upon completion, the maker is encouraged to put the new Scrappy Stack Mug Rug to use with some tea and a cookie.
Download Free PDF: