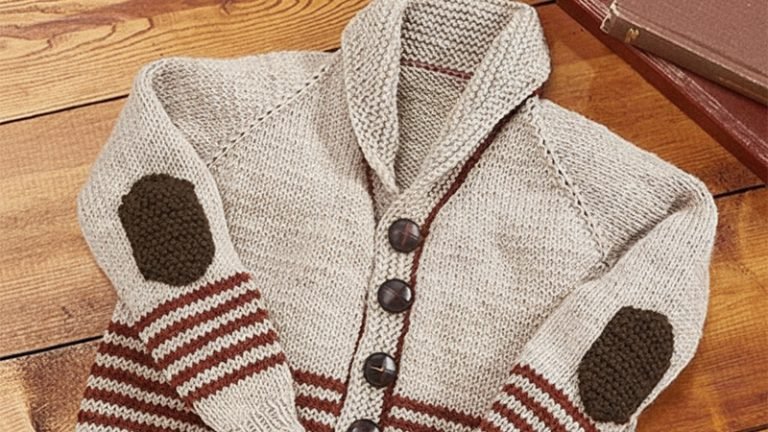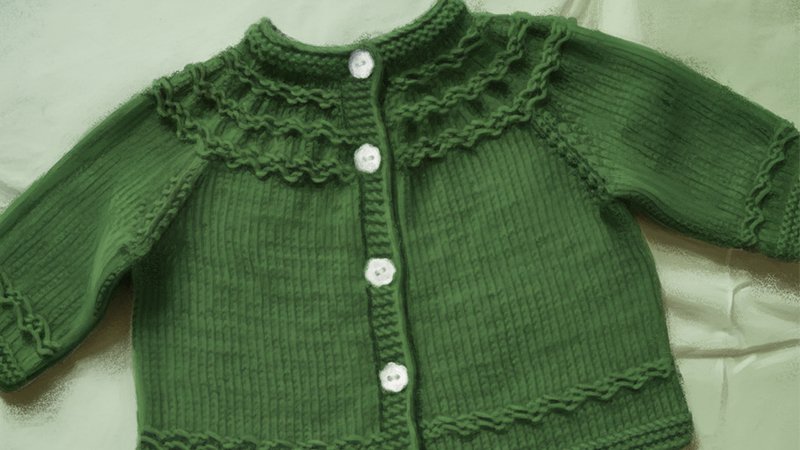
Pattern Description:
This pattern provides instructions for a Seamless Yoked Baby Sweater designed for newborn to 6-month size, with options for a larger size indicated by bold numbers.
It includes directions for decorative slipped stitch rows suitable for a girl, or a plainer garter stitch cuff and bottom for a boy. The design features buttonholes and garter stitch borders to match the neck.
Materials Needed & Measurements:
- Yarn: Sport Weight (Bernat Softee Baby) Yarn is recommended. Finer-weight yarns, such as Jamie, can also be used, yielding a newborn to 6-month size when using the larger set of numbers.
- Yarn Weight: Sport Weight.
- Hook: A crochet hook is needed.
- Notions:
- U.S. #4 straight needles
- Set of 4 double-pointed needles (dpn’s)
- 2 stitch holders
- Five ½-inch buttons
- Measurements:
- The pattern makes a newborn to 6-month size.
- Larger size numbers are indicated in bold face within the pattern instructions.
- Sleeves are worked to 1½” short of desired length before decreases.
- Sleeves will have 36 stitches after the first decrease round, and 32 stitches after a subsequent decrease round.
Stitches & Abbreviations Used:
- K: Knit
- P: Purl
- y/o: Yarn Over
- K 2 tog: Knit 2 Together
- C/O: Cast On
- inc in next st: Increase in next stitch
- Increase Type: All increases in this pattern use the “bar” type, which is done by Knitting into the front and back of the same stitch.
- slip 2 as if to P, with yarn held in back of work: A slipped stitch technique used in decorative rows.
- dpn’s: Double Pointed Needles
- r.s.: Right Side
- w.s.: Wrong Side
- sts: Stitches
- Stockinette stitch: Used for the sweater body and sleeves (all K in the round for sleeves).
- Garter stitch: Used for button bands, cuffs, and neck borders (K for rows 1-2, P 1 row, K 1 row).
Instructions for Making the Seamless Yoked Sweater Pattern:
Sweater Body (Yoke Construction)
- Casting On and Initial Rows:
- C/O 60 sts.
- Rows 1-2: K across.
- Row 3 (r.s.): Buttonhole Row.
- For boy: K 2, y/o, K 2 tog, then work to end.
- For girl: K across to last 4 sts, then K 1, y/o, K 2 tog, K 1.
- Rows 4-5: K across.
- Row 6 (w.s.): K 4, P across to within 4 sts of end, K 4.
- Row 7: K across.
- Row 8: K 4, P across to within 4 sts of end, K 4.
- Increasing and Decorative
- Rows: 8.
- Row 9: K 4, inc in next st, K 2, repeat between stars across, end K 4 (78 sts). 9.
- Row 10 (w.s.): K 6, sl 2 as if to P (yarn in back), K 2, sl 2 repeating across, ending with K 6. 10.
- Row 11: K across. 11.
- Row 12 (w.s.): Work as Row 10. 12.
- Row 13: K 4, inc in next st, K 3, repeat across, end K 5 (96 sts). 13.
- Row 14: K 4, P across to within 4 sts of end, K 4. 14.
- Row 15: K across. 15. Row 16: K 4, P across to within 4 sts of end, K 4. 16.
- Row 17: K 5, inc in next st, K 4, repeat across, end K 5 (114 sts). 17.
- Row 18 (w.s.): K 6, sl 2 as if to P (yarn in back), K 2, sl 2 repeating across, ending with K 6. 18.
- Row 19: K across. 19.
- Row 20 (w.s.): Work as Row 18. 20.
- Row 21: K 6, inc in next st, K 5, across, end K 5 (132 sts). 21.
- Row 22: K 4, P across to within 4 sts of end, K 4. 22.
- Row 23: Work row in K and make the second buttonhole on the same end as in Row 3. For the standard size, buttonholes should be placed every 10th ridge. For the larger size, the second buttonhole is in Row 27, and subsequent buttonholes are placed every 12th ridge. 23.
- Row 24: K 4, P across to within 4 sts of end, K 4. 24.
- Row 25: K 6, inc in next st across, K 6 (150 sts). 25.
- Row 26: K 6, sl 2 as if to P (yarn in back), K 2, sl 2 repeating across, ending with K 6. 26.
- Row 27: K across (for the larger size, the second buttonhole is worked in this row). 27.
- Row 28 (w.s.): Work as Row 26. 28.
- Row 29: K across. For the larger sweater, do another increase row here: K 7, inc in next st across, end K 6. 29. Work even in stockinette stitch with garter stitch button bands for 2 (6) rows.
Placing Markers and Separating Sleeves:
- Place Markers (w.s.): Work 26 (30) sts, place marker; work 26 (27) sts, place marker; work 46 (54) sts, place marker; work 26 (27) sts, place marker; work last 26 (30) sts. This will result in (150) (168) sts total.
- Increase Row: K to within 2 sts of marker, inc in next st, K 1, pass marker, inc in next st; repeat between stars 3 times. This adds 8 sts.
- Next Row: K 4, P across to within 4 sts of end, K 4.
- Repeat these two rows 4 (5) more times, resulting in (190) (216) sts. On the last (w.s.) row, place the sleeve sts onto holders.
- The 3rd buttonhole will be coming up soon.
- **Next Row (r.s.): Work to within 2 sts of marker, inc in next st, K 1, remove marker, C/O 4 sts under arm, remove marker, inc in next st; work across the back and repeat between stars once more. This will leave (130) (150) sts for the body.
Finishing the Body:
- Work even, ensuring to maintain the button bands and placing buttonholes where needed.
- For a girl’s sweater, work two additional decorative slipped stitch rows (following the pattern of Rows 10 and 11).
- If the sweater is for a little boy, leave the bottom plain.
- Continue working even, incorporating the last buttonhole into a garter stitch border to match the neck.
Sleeves:
- Pick up the sts of one sleeve plus 4 sts from the C/O underarms, using 3 dpn’s.
- Tie on yarn at the underarm and work stockinette stitch in the round (all K) until the sleeve is 1½” short of the desired length.
- Decrease evenly in the last round of K, leaving 36 sts on the sleeve.
- For a girl’s design: P 2, sl 2 with yarn in front, for 1 round, K 1 round. Repeat these last 2 rounds, then K 2 rounds.
- For a plainer boy’s design: Just work 4 K rounds.
- Decrease 4 sts in the next round, leaving 32 sts.
- Switch to garter stitch (P 1 row, K 1 row) and work to match the neck.
- C/O in P loosely.
- Repeat all sleeve steps for the second sleeve.
Final Touches:
- Attach the five ½-inch buttons.
- Weave in all loose ends.
Download PDF: