Pattern Description:
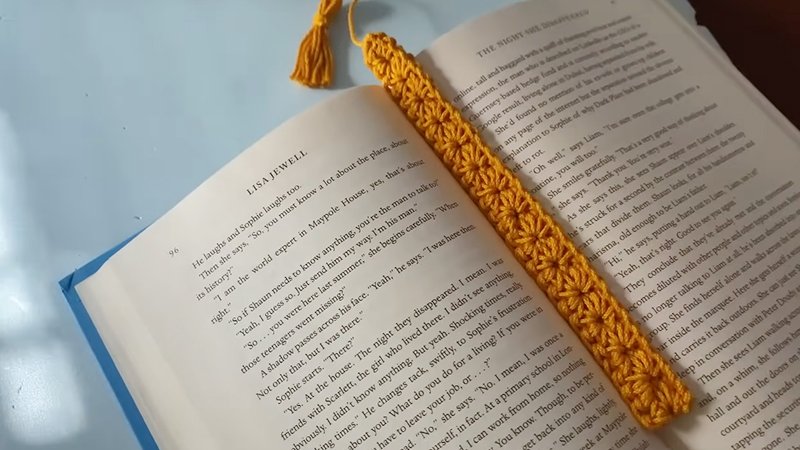
This is a quick and easy textured bookmark, called the Simply Daisy Bookmark, that utilizes the two-row star stitch.
It is perfect for beginner crocheters or book lovers and can be completed in under 20 minutes.
Requiring only 20 yards of yarn, it is an excellent project for using up scrap yarn. The pattern includes instructions for adding a tassel and blocking.
Materials Needed & Measurements:
| Item Category | Material/Measurement Detail | Source(s) |
| Hook | 4.0mm crochet hook | |
| Yarn | 20 Yards of ANY Worsted (4) or DK (3) Weight Yarn (Dishie 100% Cotton Yarn was used by the author) | |
| Tools | Scissors | |
| Yarn Needle | ||
| Steamer or Spray Bottle | ||
| Straight Pins | ||
| Tassel & Blocking Aids | Container, Book, or Cardboard that measures approx. 2″ – 3″ (used for shaping/blocking surface) | |
| Cardboard, approximately 2.5″ long (for wrapping the tassel yarn) | ||
| Blocking surface (blocking mat, piece of Styrofoam, cardboard, or carpet) | ||
| Finished Dimensions | The finished bookmark measures approximately 7.5″ long by 1″ wide | |
| Tassel Yarn Pieces | 5″ piece of yarn (used for making a double knot around the wrapped yarn) | |
| 5″ piece of yarn (used to shape the top of the tassel) |
Abbreviations
The following abbreviations are used in this pattern:
- Ch – chain
- St – stitch
- Sl st – slip stitch
- Sc – single crochet
- YO – yarn over
- Rs – right side
- Ws – wrong side
Instructions for Making the Simply Daisy Bookmark Pattern:
The Simply Daisy Bookmark is a quick and easy project that utilizes the two-row star stitch.
Row 1 (Rs)
Row 1 establishes the first half of the star stitch pattern.
First Stitch
- YO and insert the hook into the second ch from the hook.
- YO and draw up a loop – there should be 3 loops on the hook.
- [ Insert hook into next ch, YO and draw up a loop ] 3 times – there should be 6 loops on the hook.
- YO and pull through all 6 loops.
- Ch 1 to complete the st.
Next Stitch
To create the subsequent star stitches, the hook will be placed in 3 key areas: the eye, the leg, and the chain of the last stitch.
- Insert hook into the ch-1 sp of the last st (referred to as the “eye” of the st). YO and draw up a loop – there should be 2 loops on the hook.
- Insert hook into the leg of the last st, YO, and draw up a loop – there should be 3 loops on the hook.
- Insert hook into the ch of the last st, YO and draw up a loop – there should be 4 loops on the hook.
- [ Insert hook into next ch, YO and draw up a loop ] 2 times – there should be 6 loops on the hook.
- YO, and pull through all 6 loops. Ch 1 to complete the st.
Repeat the instructions for the “Next Stitch” across the entire row. When Row 1 is complete, there should be a total of 15 sts.
Row 2 (Ws)
Turn your work. Do not ch 1 to start the row. Instead, go directly into the “eye” (or ch-1 sp) of the st.
- Make 2 sc into the eye of each st across.
- There should be a total of 30 sc at the end of Row 2.
- To end the row and finish the bookmark, sl st into the side of the first st of Row 1.
- Fasten off and weave in the ends.
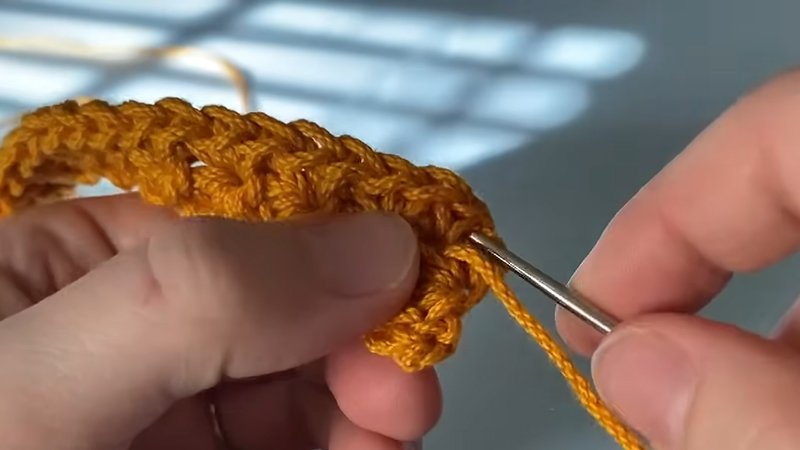
Adding a Tassel
- Wrap yarn around a piece of cardboard that is approximately 2.5″ long, wrapping it around about 7 times.
- Slip a 5″ piece of yarn between the cardboard and the wrapped yarn.
- Make a double knot around the wrapped yarn to hold it in place.
- Cut the yarn at the bottom of the cardboard using scissors.
- Wrap a second 5″ piece of yarn around the top section of the tassel to shape it. Make 2 knots to secure the top shaping yarn.
- Using a yarn needle, insert the yarn tail into the top of the finished bookmark.
- Once the desired length for the tail/tassel is achieved, secure it in place with a knot.
- Weave the remaining yarn tail through the back side of the bookmark, and trim the tail.
- Trim the bottom of the tassel so that all the ends are the same length.
Blocking your Crochet Bookmark
Blocking is recommended as it helps the stitches lay flat, improves the drape, and straightens the edges, which is useful if the bookmark tends to curl.
- Place the bookmark on a blocking surface where straight pins can be secured (such as a blocking mat, cardboard, carpet, or Styrofoam).
- Stick straight pins into the top and bottom of the bookmark to hold it firmly in place.
- Using a steamer or a spray bottle, gently steam or spray the bookmark and the tassel.
- If using a steamer, ensure it is held at least 2 inches away from the yarn to avoid burning it.
- Gently pat the steam or water into the bookmark and tassel with your hand.
- Before unpinning the project, allow the bookmark to dry completely.
Your Simply Daisy Crochet Bookmark is now complete.