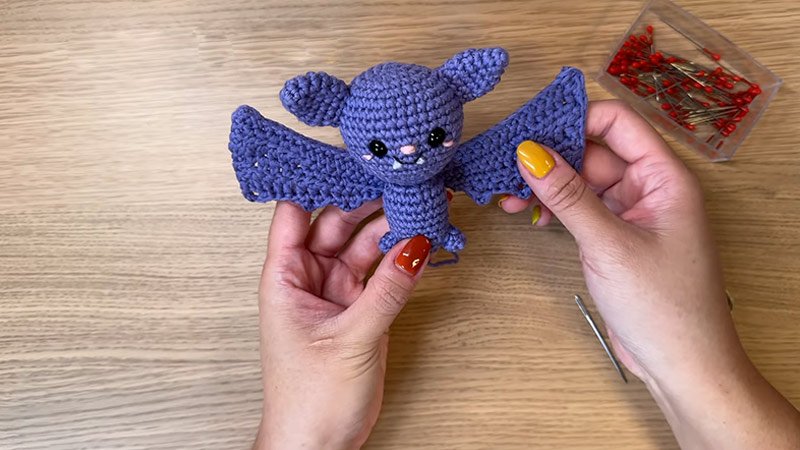
Pattern Description:
Meet Sir Batwington– a tiny, noble bat with big dreams of being fearsome, yet he uses his powers to protect, not frighten.
While he may look like a classic Halloween creature of the night, he’s actually gallant at heart. This small, amigurumi bat is perfect as a cute gift, Halloween decoration, or whimsical desk companion!
Materials Needed & Measurements:
- Yarn: Worsted weight (4) yarn
- Light Grey (main color)
- Dark Grey (contrast color)
- Hook: 2.75 mm crochet hook
- Notions:
- 10mm plastic safety eyes (1 pair)
- Fiberfill stuffing
- Yarn needle
- Scissors
- Finished Size: Approximately 5 inches (13 cm) tall
- Skill Level: Beginner – Familiarity with basic amigurumi stitches and part assembly required.
Stitches & Abbreviations (US Terms)
- MR – Magic Ring
- Ch – Chain
- Sl st – Slip Stitch
- Sc Single Crochet
- Inc – Increase (2 sc in same stitch)
- Dec – Decrease (single crochet 2 stitches together)
- Hdc – Half Double Crochet
- Fhdc – Foundation Half Double Crochet (Video tutorial available)
Stitching Instructions for Making the Sir Batwington the Bat Pattern:
Head (Light Grey)
- R1: 6 sc in MR (6 sts)
- R2: Inc around (12 sts)
- R3: (Sc, inc) × 6 (18 sts)
- R4: (Sc 2, inc) × 6 (24 sts)
- R5: (Sc 3, inc) × 6 (30 sts)
- R6: (Sc 4, inc) × 6 (36 sts)
- R7: (Sc 5, inc) × 6 (42 sts)
- R8–R14: Sc around (42 sts)
- R15: (Sc 5, dec) × 6 (36 sts)
- R16: (Sc 4, dec) × 6 (30 sts)
- R17: (Sc 3, dec) × 6 (24 sts)
- R18: (Sc 2, dec) × 6 (18 sts)
- Assembly Note:
- Insert the safety eyes between R11 and R12, spaced 8 stitches apart.
- Firmly stuff the head.
- Fasten off and set aside.
Ears (Make 2 – Dark Grey):
- R1: 6 sc in MR (6 sts)
- R2: (Sc, inc) × 3 (9 sts)
- R3: (Sc 2, inc) × 3 (12 sts)
- R4: (Sc 3, inc) × 3 (15 sts)
- Fasten off, leaving a long tail for sewing.
Wings (Make 2 – Light Grey with Dark Grey Edging):
- R1: Ch 2, Fhdc 8 (8 sts)
- R2: Ch 2, turn, hdc 7 (7 sts)
- R3: Turn. Sl st in next 2 sts, ch 2, hdc in same st, hdc 5 (6 sts)
- Switch to Dark Grey:
- Sc around the side and top edges of the wing.
- Fasten off and weave in ends.
- Using dark grey yarn, embroider lines to each of the three wing tips to create a structured look.
- Note: Wings are not stuffed.
Legs & Body (Crocheted in One Piece – Light Grey)
- Legs (Make 2)
- R1: 6 sc in MR (6 sts)
- R2: (Sc 2, inc) × 2 (8 sts)
- R3: (Sc 3, inc) × 2 (10 sts)
- R4: Sc around (10 sts)
- Fasten off only the first leg.
- Do not fasten off the second leg- continue to the joining round.
- Body
- Joining Row: Ch 5, join with sc to first leg.
- Sc 9 more around first leg (10 total)
- Sc 5 across one side of chain
- Sc 10 around second leg
- Sc 5 across other side of chain (30 sts)
- R2: (Sc 4, inc) × 6 (36 sts)
- R3-R8: Sc around (36 sts)
- R9: (Sc 4, dec) × 6 (30 sts)
- R10: Sc around (30 sts)
- R11: (Sc 3, dec) × 6 (24 sts)
- R12: (Sc 2, dec) × 6 (18 sts)
- Stuff legs and body firmly as you go.
- Fasten off, leaving a long tail for sewing the body to the head.
Assembly Instructions:
- Attach Ears: Sew both ears to the top sides of the head using yarn tails.
- Sew Head to Body: Align and attach the stuffed head to the top of the stuffed body.
- Attach Wings: Sew each wing to the back side of the body using dark grey yarn. Be sure to center them symmetrically.
Final Touch:
Congratulations! Sir Batwington is completely brave, gallant, and ready to stand guard against evil spirits. Display him proudly or gift him to someone who could use a little hero by their side.
Download PDF