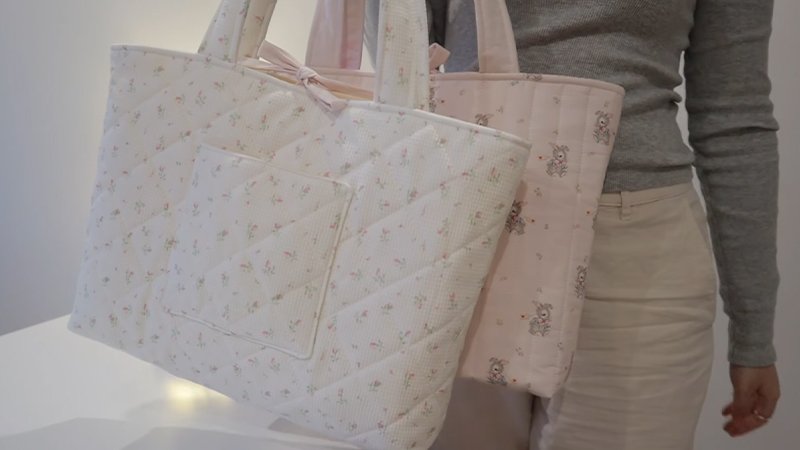
Pattern Description:
The Sweet Quilted Tote is a charming, beginner-friendly sewing project that uses fusible fleece or quilt batting for structure and soft texture.
Featuring simple quilting lines and sturdy handles, this tote finishes at about 10″ tall, 8½” wide, and 4″ deep.
Perfect for daily use, it’s an ideal project to practice quilting and bag-making skills with beautiful, customizable fabric choices.
Materials Needed & Measurements:
The following pieces need to be cut from fabric and stabilizer, using the provided dimensions:
| Component | Material | Measurements |
| Exterior | Fabric | 1 rectangle 13 \frac{1}{2}” \times 25″ |
| Lining | Fabric | 1 rectangle 13 \frac{1}{2}” \times 25″ |
| Handles | Fabric | 2 strips 2 \frac{3}{4}” \times 15 \frac{1}{2}” |
| Stabilizer | Fusible fleece or cotton quilt batting | 1 rectangle 13 \frac{1}{2}” \times 25″ for the exterior |
| Stabilizer | Fusible fleece or cotton quilt batting | 2 strips 2 \frac{3}{4}” \times 15 \frac{1}{2}” for the handles |
Instructions for Making the Sweet Quilted Bag Pattern:

Cutting
Begin by cutting the following pieces from your chosen fabric:
- One rectangle measuring 13 \frac{1}{2}” \times 25″ for the exterior.
- One rectangle measuring 13 \frac{1}{2}” \times 25″ for the lining.
- Two strips measuring 2 \frac{3}{4}” \times 15 \frac{1}{2}” for the handles.
Next, fold the exterior and lining pieces in half, bringing the 13 \frac{1}{2}” edges together. At the fold of the fabric, you need to measure and mark rectangles at the corners. These corner rectangles should be 2″ wide and 1 \frac{1}{2}” tall.
Stabilizer and Quilting Preparation
Cut the stabilizer pieces from fusible fleece or cotton quilt batting:
- One rectangle measuring 13 \frac{1}{2}” \times 25″ for the exterior.
- Two strips measuring 2 \frac{3}{4}” \times 15 \frac{1}{2}” for the handles.
Use the fabric pieces as a guide to cut out the corresponding corner rectangles from the stabilizer.
If you are using cotton quilt batting, which is not fusible, quilt basting spray must be used to adhere the stabilizer to the wrong side of both the exterior tote piece and the handle pieces.
Quilting
With the exterior fabric piece attached to the fusible fleece or other stabilizer, you can now quilt it in any design of your preference.
For example, quilting lines marked 1″ apart can be used. After the quilting is complete, trim around all the edges of the fabric, ensuring the cut-out corner rectangles are neat.
Make the Handles
The two handle strips must be prepared next:
- Fold each handle piece lengthwise.
- Sew along the long straight edge of the folded handle.
- Use a safety pin or turning tool to turn the handles right side out.
- Press the handles flat.
- Topstitch along both sides of the handles, 1/8″ from the edge.
Note: If you intend to add an interior pocket to the bag (such as a welt zipper pocket), it should be sewn to the lining piece at this stage before further assembly.
Assemble the Tote Bag
This stage involves attaching the handles and joining the exterior and lining sections:
- Pin one handle to each of the shorter edges of the tote bag exterior. The handles should be placed 3″ from each corner.
- Place the lining piece over the exterior piece and handles, with the lining facing right side down.
- Pin and stitch along the shorter edges only.
- Press the seam allowances open.
- Adjust the tote so that the lining piece is folded together and the exterior piece is folded together. The shorter seams should now run horizontally along the middle of the project.
- Pin the long side edges together. Note that you must leave an opening approximately 3″ long in the lining section’s seam allowance for turning the bag later.
- Sew the long side seams, ensuring the 3″ opening is left in the lining.
- Press the seam allowances open.
Sew the Gussets
The cut-out corners are now stitched to form the gussets, which create the box shape of the bag:
- Flatten each corner of the bag. This action creates a straight edge where the corner had been cut out.
- Pin and stitch across this newly formed straight edge.
- Repeat this process for all four corners: the two corners in the exterior fabric and the two corners in the lining fabric.
Finishing
The final steps involve turning the bag and securing the openings:
- Turn the entire bag right side out by pulling it through the 3″ opening left in the lining.
- Close the opening in the lining by hand or machine sewing.
- Push the lining down into the bag’s exterior.
- Gently press the top edge of the bag.
- Topstitch around the top edge of the bag, 1/8″ from the top.