Pattern Description:
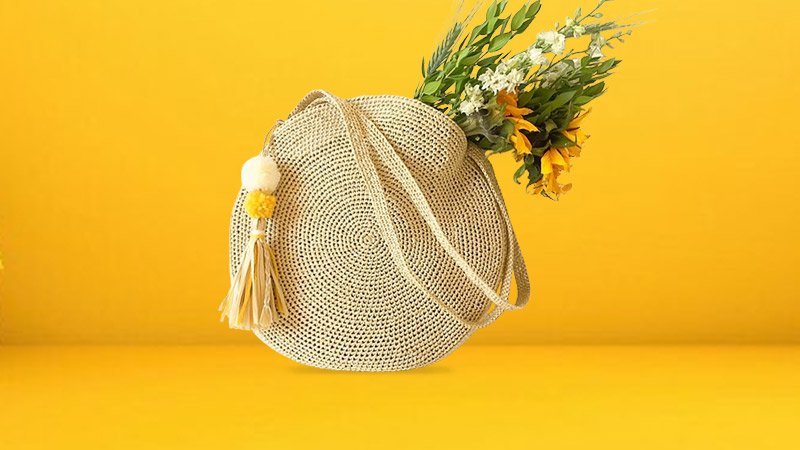
The Sun City Bag is a delightful and easy crochet project designed for sunny days. It creates a stylish, roomy bag perfect for carrying essentials, with an optional intricate tassel that can be customized with different yarn colors to match your outfit, mood, or the weather.
This bag is made using raffia yarn, which gives it a unique textured look ideal for summer and spring.
Materials Needed:
- Yarn:
- Recommended: King Cole Raffia (100% cellulose rayon, 50g/1.75oz, 124 yards/114m per ball).
- Quantity: Approximately 7oz/200g or 4 balls.
- Color: Suggested color is 1456/natural.
- Substitutes: Other raffia yarns like Ra-Ra Raffia from Wool and the Gang work well.
- Note: On Round 34, you’ll add a second strand of raffia, working with two threads held together.
- Hook:
- Size: 3 mm (US C/2 or D/3).
- Adjust hook size as needed to meet gauge.
- Notions:
- Stitch marker
- Tapestry needle
- Optional: Millinery wire (~10 meters / 11 yards) or invisible hanging cord (transparent plastic wire from hardware stores). This helps the bag keep a structured shape but can be omitted for a softer finish.
- Optional: Yarn in desired colors for tassels.
- Pompom makers (1.5”/3.5cm and 1”/2.4cm) for making decorative pompoms.
Finished Measurements
- Bag Diameter: Approximately 13” (33 cm)
- Strap Length: 29” (74 cm), adjustable
- Gauge: 20 stitches and 21 rows = 4” (10 cm), steam-blocked
Abbreviations and Stitches Used
- ch = chain
- sc = single crochet
- st(s) = stitch(es)
- R / rnd(s) = round(s)
- PM = place marker
Pattern Notes
The bag consists of two identical round panels crocheted in the round, then connected together. Millinery wire is crocheted into specific rounds to help the bag keep its shape. If you prefer a softer, more flexible bag, you can skip adding wire.
Round Panel Instructions
Starting the circle:
- Make a magic circle (or magic loop).
- Round 1 (R1): Crochet 6 single crochet (sc) into the circle. Tighten the loop and place a stitch marker to mark the start of the round. (6 sts)
- R2: Increase by crocheting 2 sc in each stitch around. (12 sts)
- R3: (sc in next st, 2 sc in next st) repeat 6 times. (18 sts)
- R4: (2 sc in next st, 2 sc in next st) repeat 6 times. (24 sts)
- R5: (3 sc, 2 sc in next st) repeat 6 times. (30 sts)
- R6: Crochet 2 sc, then repeat (2 sc in next st, 4 sc) 5 times, finish with 2 sc in next st, then 2 sc. (36 sts)
- R7: (5 sc, 2 sc in next st) repeat 6 times. (42 sts)
- R8: Crochet 3 sc, then repeat (2 sc in next st, 6 sc) 5 times, finish with 2 sc in next st, then 3 sc. (48 sts)
- R9: (7 sc, 2 sc in next st) repeat 6 times. (54 sts)
- R10: Add a round of millinery wire here. Crochet 4 sc, then repeat (2 sc in next st, 8 sc) 5 times, finish with 2 sc in next st, then 4 sc. (60 sts)
- R11–R21: Continue increasing stitch counts as per pattern, increasing from 66 sts to 126 sts. Follow the increase pattern carefully.
- R22: Add another round of millinery wire. Crochet 10 sc, then repeat (2 sc in next st, 20 sc) 5 times, finish with 2 sc in next st, then 10 sc. (132 sts)
- R23–R33: Continue crocheting and increasing stitch counts from 138 sts up to 198 sts.
- R34: Attach a second strand of raffia. Hold two strands together and crochet 1 sc in each stitch around. Add two rounds of millinery wire this round. Keep the stitch marker in place. Do NOT cut yarn after this round on the first panel.
After finishing, steam-block the round panel to shape it flat. Use a cotton cloth and steam carefully to avoid damaging raffia fibers.
Handle and Bottom Construction
On the first finished round panel:
- Remove the marker. Crochet 2 sc, then place the marker again.
- Chain 145 stitches for the strap.
- Count 55 stitches to the left along the edge of the round panel and make 1 sc into the next stitch to attach the handle.
- Crochet 142 sc around to complete the round.
- Fold this round so that the stitches stand at a right angle to the wrong side of the round panel – this forms the bottom of the bag.
- Cut one thread, continue crocheting with just one strand.
- R2-R4: Crochet 1 sc in each stitch around (including the chain stitches), maintaining the right angle fold.
Repeat all these steps to create a second identical half.
Finishing the Bag
- Steam-block both halves again, shaping the angle between the round panel and the bottom with your hands and a folded towel for support.
- Place the two halves wrong side to wrong side.
- Using single crochet, join the bottoms together by crocheting corresponding stitches. A video tutorial is available for this step to guide you through joining.
- Do NOT join the handles unless you want a single handle instead of two separate ones.
- Weave in all yarn ends neatly.
- Turn the bag right side out. Steam-block again if necessary to smooth the bottom.
Making and Attaching Tassels & Pompoms (Optional)
- Using your preferred yarn colors, create two pompoms – one with a 1.5” (3.5cm) pompom maker and one with a 1” (2.4cm) maker.
- Make a tassel with raffia and two or three strands of the yarn used for the pompoms. Tie the tassel tightly, leaving the ends about 20” (50cm) long. Braid these ends simply.
- Attach the pompoms to the top of the tassel by threading the braid through them. Fold the braid in half and tie it tightly close to the pompom, hiding the knot in the yarn.
- Finally, attach the tassel to the bag for a playful, personalized finishing touch.
Tips
- Adding millinery wire rounds gives the bag structure and stiffness, but it’s completely optional depending on your style preference.
- Raffia yarn is delicate, handle with care during blocking and washing.
- Adjust strap length by adding or subtracting chain stitches to suit your comfort.
- Experiment with tassel and pompom colors to coordinate with your wardrobe.
Enjoy your sunny days with the chic and practical Sun City Bag – a perfect project to brighten up your accessories.
Download PDF