
Pattern Description:
Skill Level: Beginner to Easy
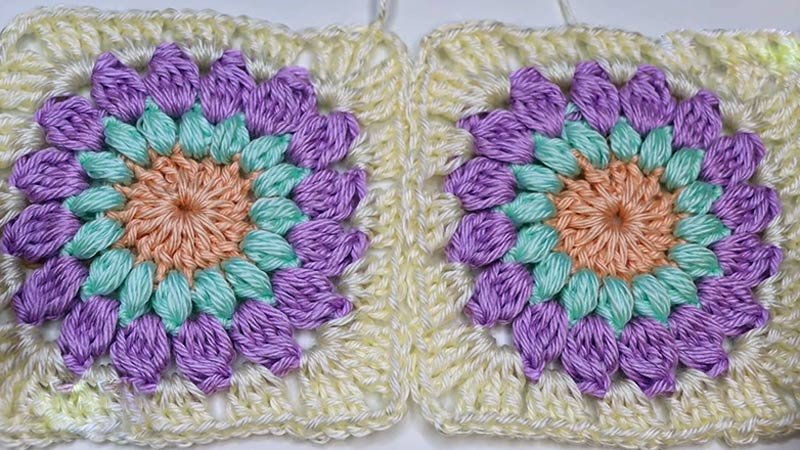
The sunburst granny square is a classic and easy-to-crochet pattern that has existed for many years.
This free crochet pattern is worked in rounds, with each round typically using a new color to create a distinct sunburst design that resembles a sunflower. It is a great project for beginners and is also ideal for using up scrap yarn.
Materials Needed & Measurements:
- Yarn: Worsted weight yarn (Category 4), preferably in 4 colors. Example color combos:
- Sunflower look: Brown, gold, yellow, and cream.
- Recommended yarns:
- Lion Brand Heartland – Sequoia, Bryce Canyon, Canyonlands, Acadia
- Lion Brand Wool-Ease Worsted – Umber, Arrowwood, Fisherman
- WeCrochet Swish Worsted – Copper, Allspice, Honey, Nutmeg
- You can mix and match brands or use scrap yarns of similar weight.
- Hook: H-8 (5 mm). (Note: You may see J-10 recommended on yarn labels, but downsizing helps maintain a tighter square.)
- Notions: Yarn needle, scissors, optional stitch markers, and a ruler or tape measure.
- Finished Size: Approximately 5 inches x 5 inches
Abbreviations (US Terms):
- ch – chain
- sl st – slip stitch
- st/sts – stitch/stitches
- hdc – half double crochet
- dc – double crochet
- tr – treble crochet
- Puff – Puff Stitch: Yarn over, insert hook into stitch, yarn over and pull up a loop ×3 (7 loops total). Yarn over, pull through all loops, ch 1 to secure.
- Cluster – Cluster Stitch: Yarn over, insert hook and pull up a loop, yarn over, pull through 2 loops ×4 (5 loops on hook). Yarn over and pull through all loops.
Instructions for Making the Crochet Sunburst Granny Square Pattern:
Round 1: (Brown Yarn)
- Start with a magic ring (or ch 5 and join with sl st to form a ring).
- Ch 3 (counts as 1 dc), then work 15 dc into the ring.
- Join with a sl st to the top of the beginning ch-3.
- Total: 16 dc
- Cut yarn, fasten off.
Note: If ch-3 leaves too large a center hole, you can substitute ch-2 at the beginning.
Round 2: (Gold Yarn)
- Join yarn in any dc with a sl st.
- Ch 2.
- Work 1 Puff Stitch in the same stitch and in each dc around. (Remember: Yarn over, insert hook, pull up loop ×3. Pull through all loops. Ch 1 to close.)
- Join with sl st to the first puff stitch.
- Total: 16 Puff Stitches
- Cut yarn, fasten off.
Round 3: (Yellow Yarn)
- Join yarn in any ch-1 space between puff stitches.
- Ch 2 (counts as partial start of a cluster stitch).
- Make 1 modified cluster stitch in the same space:
- Yarn over, insert hook, pull up loop, yarn over, pull through 2 loops – repeat 2 more times (4 loops on hook).
- Yarn over, pull through all 4 loops.
- Ch 2.
- In next ch-1 space, and in each around:
- Work a Cluster stitch, ch 2.
- Join with a sl st to the first cluster stitch.
- Total: 16 Clusters with ch-2 between each
- Cut yarn, fasten off.
Round 4: (Cream Yarn)
- Join yarn with a sl st into any ch-2 space.
- Ch 4 (counts as 1 tr), then 2 tr into the same space.
Make the first side of the square:
- In next ch-2 space: 3 dc
- Next ch-2 space: 3 hdc
- Next ch-2 space: 3 dc
Corner:
- In next ch-2 space: 3 tr, ch 3, 3 tr
Repeat for the remaining sides:
- Side 2: 3 dc, 3 hdc, 3 dc (each in next ch-2 spaces)
- Corner 2: 3 tr, ch 3, 3 tr
- Side 3: 3 dc, 3 hdc, 3 dc
- Corner 3: 3 tr, ch 3, 3 tr
- Side 4: 3 dc, 3 hdc, 3 dc
Final Corner:
- In same space as starting ch-4: 3 tr, ch 3, then sl st to top of beginning ch-4.
Finishing:
- Cut yarn and fasten off.
- Weave in all yarn ends using a yarn needle.
- For projects joining multiple squares, blocking is recommended to align the edges evenly.
Tips:
- Play around with color combinations for seasonal or themed projects.
- Use the finished squares for blankets, cushion covers, bags, or wall art.
- You can increase the size of the square by adding more rounds with granny-style borders.
Download PDF


