Pattern Description:
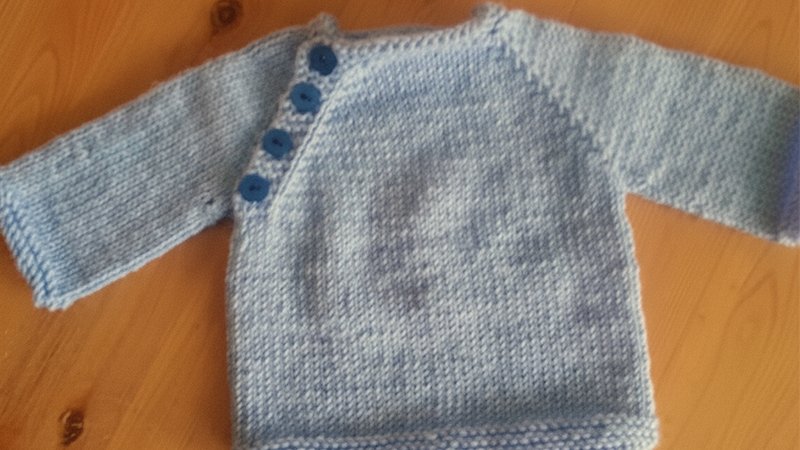
The Wee Lima is a classic, top-down knit cardigan designed for babies, suitable for either boys or girls.
It features buttons down the side and offers the choice of long or short sleeves, making it an ideal last-minute gift.
Materials Needed & Measurements:
- Yarn: Cascade 220 Superwash
- Needle: 7 US (4.50 mm) (or size needed to obtain gauge) and 6 US (4.00 mm).
- Notions: Buttons (¾” or 1” size) and 5 stitch markers.
- Measurements:
- Gauge: 20.0 stitches = 4 inches
- Yardage: 200(275, 350, 450)
- Sizes: 0-3 months (3-6 months, 6-12 months, 12-18 months)
- Chest measurements: 16”(18”, 19”, 21”)
Stitches & Abbreviations Used:
- WS – Wrong side
- YO – Yarn over
- Sm – Slip marker
- Pm – Place marker
- SSK – Slip, slip, knit together
- RS – Right side
- K2tog – Knit two stitches together
- Rm – Remove marker
- Kfb – Knit into the front and back of the stitch
Instructions for Making the Wee Lima Pattern:
Initial Setup & Yoke Shaping
To begin the Wee Lima Baby Cardigan, you will first set up the yoke and initial body shaping.
- Cast On: Using a long tail cast on method and the smaller needle (6 US / 4.00 mm), cast on 49(53,57,59) stitches.
- Row 1 (WS): Knit to the end of the row.
- Row 2 (RS): Knit to the end of the row.
- Row 3 (WS): Knit to the end of the row.
- Row 4 (RS – Buttonhole Row): Knit 2 stitches, then YO (yarn over), K2tog (knit two stitches together), and knit to the end of the row.
- Row 5 (WS): Knit 4 stitches. Then, Pm (place marker), knit 6(6,6,6) stitches (these are for the first sleeve). Pm again, knit 16(18,20,21) stitches (for the back). Pm once more, knit 6(6,6,6) stitches (for the second sleeve). Pm a final time, knit 13(15,17,18) stitches (for the front), and then knit the last 4 stitches.
- Needle Change: After completing Row 5, change to the larger needle (7 US / 4.50 mm) for the remainder of the body and sleeves.
Raglan Increases & Continuing Yoke Shaping
This section involves repetitive rows that create the raglan shaping and additional buttonholes.
- Row 6 (RS): Knit 4 stitches. Then, Sm (slip marker), Kfb (knit into the front and back of the stitch), and knit until you are 1 stitch before the next marker. Repeat the following sequence three times: (Kfb, Sm, Kfb, knit until you have 1 stitch before the next marker). Conclude the row with Kfb, Sm, and knit the final 4 stitches. This row will increase your stitch count by 8 stitches.
- Row 7 (WS): Knit 4 stitches, then purl all stitches until you reach the last 4 stitches, and knit these final 4 stitches.
- Repeat Sequence 1: Work rows 6 and 7 a total of 3 times.
- Row 8 (RS – Buttonhole Row): Knit 2 stitches, YO, K2tog, then Sm, Kfb, and knit until you are 1 stitch before the next marker. Repeat the following sequence three times: (Kfb, Sm, Kfb, knit until you have 1 stitch before the next marker). Conclude with Kfb, Sm, and knit the final 4 stitches. This row also increases 8 stitches.
- Row 9 (WS): Knit 4 stitches, purl all stitches until the last 4 stitches, and knit these final 4 stitches.
- Repeat Sequence 2: Following the initial “Repeat Sequence 1,” now work rows 6 and 7 a total of 3 times. After this, work rows 8 and 9 (Buttonhole Row) a total of 1 time. Then, work rows 6 and 7 a total of 3 times. Finally, work rows 8 and 9 (Buttonhole Row) a total of 1 time.
Size-Specific Yoke Adjustments
After the general repetitions, these instructions apply based on the size you are making:
- For size 0-3 months: Work rows 6 and 7 one more time.
- For size 3-6 months: Work rows 6 and 7 two more times.
- For size 6-12 months: Work rows 6 and 7 three more times.
- For size 12-18 months: Work rows 6 and 7 three more times, and then rows 8 and 9 (Buttonhole Row) one last time.
Upon completing these steps, you will have a total of 13(14,15,16) raglan increases, resulting in 153(165,177,187) stitches on your needle.
Dividing for Sleeves & Joining in the Round
Now, you will separate the sleeves and join the body to knit in the round.
- Preparation: Ensure the right side (RS) of your work is facing you. Place your beginning of the round marker.
- Cable Needle Transfer: Slip the last 4 stitches, which are currently at the end of your main needle, onto a cable needle.
- Joining: Carefully join your work in the round, taking care not to twist the stitches. Hold the 4 stitches that are on the cable needle directly behind the first 4 stitches on your main needle.
- Secure Join: Knit the first stitch on the main needle together with the first stitch on the cable needle. Repeat this for the 2nd, 3rd, and 4th stitches, knitting each main needle stitch together with its corresponding cable needle stitch. You have now joined in the round and have worked only 4 stitches. Proceed immediately to Round 1.
Body of the Sweater
After joining, you will work the main body of the cardigan in the round.
- Round 1: Knit to the marker, Rm (remove marker), then slip the next 32(34,36,38) stitches (these are the sleeve stitches) onto a piece of scrap yarn. Rm, knit across the back stitches, Rm, slip the next 32(34,36,38) sleeve stitches onto a second piece of scrap yarn, Rm, and knit to the end. You should now have 85(93,101,107) stitches remaining for the body.
- Round 2: Knit to the end of the round.
- Body Length: Repeat Round 2 until the body of the sweater measures 5”(7”,9”,10”) inches from the underarm.
- Edging Rounds: Work Round 3 (purl to the end of the round) and Round 4 (knit to the end of the round) a total of 3 times.
- Binding Off: On Round 5, bind off all stitches purlwise.
Sleeves
Each sleeve is worked separately in the round.
- Preparation: Reattach yarn to the stitches you placed on scrap yarn for one sleeve. Place a start of round marker. Leave a 6” tail of yarn, which you will use later to sew close any small hole under each arm. Use the larger needle (7 US / 4.50 mm) for the sleeves.
- Round 1: Knit to the end of the round.
- Sleeve Length: Repeat Round 1 until the sleeve measures 4 ¼”(6”,7 ½”,8 ½”) inches from the underarm, or until it reaches your desired length.
- Needle Change: Change to the smaller needle (6 US / 4.00 mm) for the cuff.
- Cuff Rounds: Work Round 2 (purl to the end) and Round 3 (knit to the end) a total of 2 times.
- Binding Off: Bind off all stitches purlwise.
- Second Sleeve: Repeat all the sleeve instructions for the second sleeve.
Finishing
- Weave in all loose ends to tidy up your work.
- Sew the ¾” or 1” buttons onto the cardigan.
- Block the cardigan to achieve its final shape and drape.
- Your Wee Lima Baby Cardigan is now complete – enjoy!
Download PDF: