
Pattern Description:
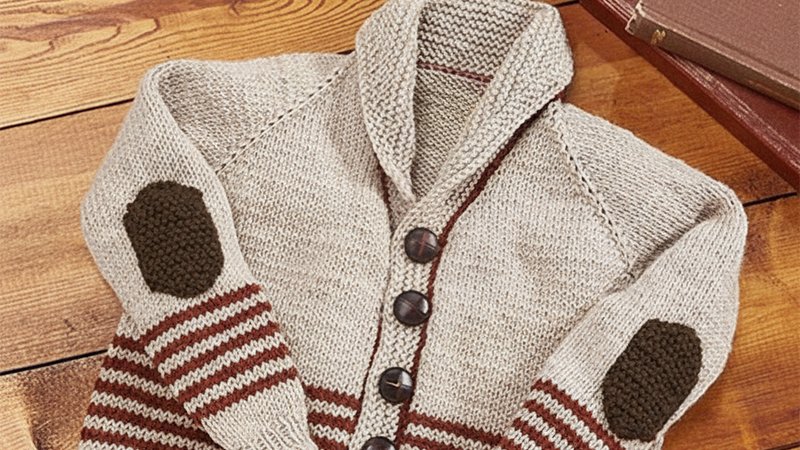
A classic, cozy baby/toddler cardigan with a shawl collar, garter-stitch hems, and optional elbow patches.
Designed for ages 1-10 years, it features stockinette body, easy-to-follow construction, and a comfortable fit, perfect for layering or gifting.
Materials Needed & Measurements:
- Yarn: DK / Light weight
- Needles: US 3 (3.25 mm) for hems/bands, US 5 (3.75 mm) for body
- Notions: 5 buttons, stitch markers, waste yarn, darning needle
- Measurements (finished chest): 24 (26, 28, 30, 32)” for ages 1 (4, 6, 8, 10)
Stitches & Abbreviations Used: k (knit), p (purl), k2tog (knit 2 together), ssk (slip-slip-knit), CO (cast on), BO (bind off), RS (right side), WS (wrong side), M1 (make one), st(s) (stitch(es)), pm (place marker)
Instructions for Making the Professor Sweater Pattern:
Back
- Cast On & Hem: Using smaller needles, CO 60 (65, 70, 75, 80) sts. Work garter hem for 6 rows (approx. 1”).
- Body: Switch to larger needles and work in Stockinette (RS: k, WS: p) until the piece measures 7¼ (8, 8¼, 8½, 9)” from CO, ending on WS.
- Armhole Shaping: BO 4 (4, 5, 5) sts at the beginning of the next two rows for armhole shaping. Continue in Stockinette until armhole measures 4¾ (5, 5¼, 5½, 5¾)”.
- Shoulders & Neck: Place remaining shoulder sts on waste yarn or BO for seaming. This will match the front shoulder height.
Left Front
- Cast On & Hem: CO 34 (36, 38, 40, 42) sts with smaller needles. Work garter hem for 6 rows.
- Body: Switch to larger needles and work Stockinette until the front reaches the same length as the back to the armhole, ending on WS.
- Armhole Shaping: BO 4 (4, 5, 5) sts at the armhole edge. Continue straight until armhole depth matches back.
- Neck Shaping: At the neck edge, BO 6 (6, 7, 7, 8) sts once or decrease 1 st every RS row until desired neckline width. Leave shoulder sts on waste yarn.
Right Front
Work as a mirror of the left front. The neck shaping is on the opposite edge. If you plan to add a buttonband later, leave the front edge plain to accommodate buttonholes.
Sleeves (Make 2)
- Cast On & Hem: CO 34 (36, 38, 40, 42) sts with smaller needles. Work garter hem for 6 rows.
- Body & Increases: Switch to larger needles. Increase 1 st at each end every 6 (6, 6, 8, 8) rows until sleeve measures 8½ (9, 9½, 10, 10½)” from CO. Total sts after increases: approx. 44 (48, 52, 56, 60).
- Sleeve Cap Shaping: BO 4 (4, 5, 5) sts at the beginning of next two rows. Then decrease 1 st each side every RS row 2 (3, 3, 4, 4) times. BO remaining sts.
Collar (Shawl)
- After seaming shoulders, pick up 1 st per ¾-1” evenly around the neckline using larger needles. Expected total: 60-80 sts depending on size.
- Work garter stitch (k every row) for 1¾-2” to form a folded shawl collar.
- Optionally taper the collar by decreasing 1 st at each end every 6th row, 2-3 times. BO loosely in knit.
Buttonbands
Option 1 – Pick-up & Knit:
- Using smaller needles, pick up 3-4 sts per inch along each front edge.
- Work garter stitch for 6–8 rows.
- On the RS of the right front band, create 5 buttonholes evenly spaced starting ~1” below the neckline using k2, yo, k2tog or BO/CO technique.
- On the left front band, align button placement when sewing buttons.
Option 2 – Sew-on Band: Use a pre-knitted or ribbed band and sew neatly along front edges, adding buttonholes as desired.
Elbow Patches (Optional)
- CO 12 (12, 14, 14, 16) sts. Knit garter hem 2 rows.
- Work Stockinette for 14 (16, 18, 20, 22) rows. BO.
- Make 2-4 patches depending on thickness. Block and sew centered ~2-2½” below sleeve cap for small sizes; adjust for larger sizes.
Finishing
- Block all pieces lightly to measurements.
- Seam shoulders using mattress stitch or 3-needle BO.
- Set sleeves into armholes and seam side and sleeve seams.
- Attach collar and buttonbands as described. Sew on buttons to match buttonholes.
- Weave in ends and lightly press.
Tips:
- Adjust stitch counts by ±2-4 for a looser or tighter fit.
- Optional: add contrast colors for collar, cuffs, or elbow patches.
- For seamless top-down construction, increase sleeves and yoke accordingly.
Download Free PDF:


