Pattern Description:
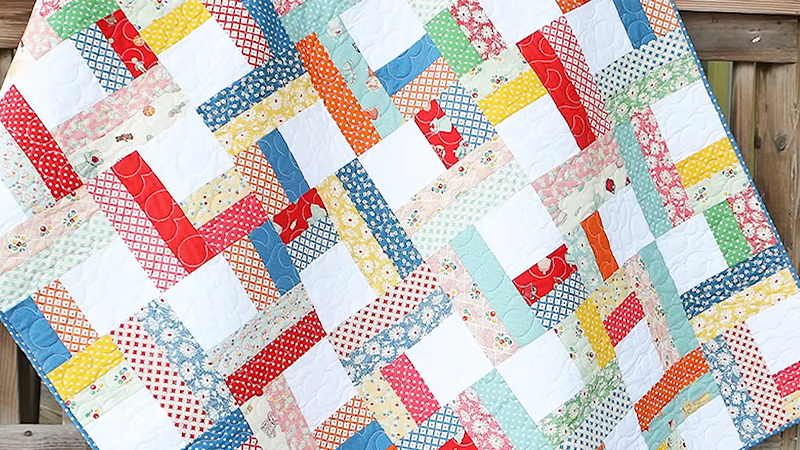
The Jelly Roll Twist Shortcut Quilt is a fun and beginner-friendly pattern that finishes at 51 ¼” x 60″.
It features bold “Twist Blocks” made by combining Jelly Roll strips with 5” charm squares, creating a striking, modern look. These blocks are joined into “Twist Rows” and then pieced together for a dynamic quilt center.
With simple strip sewing, easy cutting, and straightforward assembly, this pattern is perfect for showcasing colorful fabrics while producing a fresh, eye-catching quilt design.
Materials Needed & Measurements:
- Fabric A (Jelly Roll):
- One “Hop, Skip and A Jump! Jelly Roll” OR thirty-four 2 ½” x width of fabric strips.
- Used to create seventeen Strip Sets, each measuring 4 ½” x 42”.
- These Strip Sets are then subcut into:
- Forty-four Long Piece Units, each measuring 4 ½” x 9”.
- Forty-two Short Piece Units, each measuring 4 ½” x 5”.
- Fabric B (Charm Pack): One “Bella Solids Charm Pack (9900PP-98)” OR forty-two 5” squares.
- Binding (Fabric C):
- ½ yard binding (21098-115).
- Cut into 7 – 2 ½” x width of fabric strips.
- Backing: 3 ¾ yards backing (21701-17).
Key Unit Measurements:
- Strip Set: 4 ½” x 42”.
- Long Piece Unit: 4 ½” x 9” (forty-four made).
- Short Piece Unit: 4 ½” x 5” (forty-two made).
- Twist Block: 9” x 9” (forty-two made).
- Twist Row: 9” x 51 ¼” (seven made).
- Quilt Center: 51 ¼” x 60”.
- Finished Size: 51 ¼” x 60”.
Abbreviations Used:
- F A / F B / F C → Fabric A, Fabric B, Fabric C
- JR → Jelly Roll
- CP → Charm Pack
- WOF → Width of Fabric
- SS → Strip Set
- LPU → Long Piece Unit
- SPU → Short Piece Unit
- TB → Twist Block
- TR → Twist Row
- QC → Quilt Center
Instructions for Making the Jelly Roll Twist Shortcut Quilt Pattern:
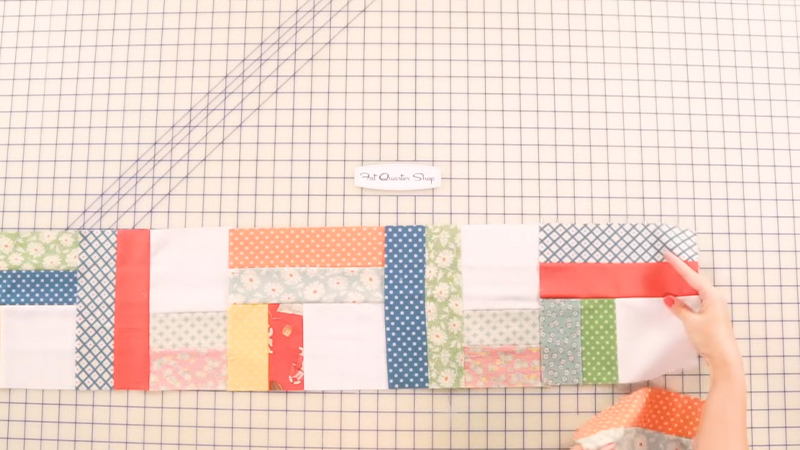
Cutting Instructions
Careful cutting ensures your blocks come together accurately. Remember to use ¼” seams and press as arrows indicate throughout the process.
- F A (Jelly Roll or Strips):
- From your F A JR or thirty-four 2 ½” x WOF strips, you will create seventeen “Strip Sets” (SS). These SS will be your base for the next cuts.
- Long Piece Units (LPU): From eleven of your SS, subcut each SS into four rectangles measuring 4 ½” x 9”. Each LPU should measure 4 ½” x 9”. You will make a total of forty-four LPU, though you will not use two of them in the final quilt.
- Short Piece Units (SPU): From the remaining six SS, subcut each SS into seven rectangles measuring 4 ½” x 5”. Each SPU should measure 4 ½” x 5”. You will make a total of forty-two SPU.
- F B (Charm Pack or Squares): If using a CP, your F B squares are already cut to 5”. If using yardage, cut forty-two 5” squares.
- F C (Binding): Cut your ½ yard of F C binding fabric into seven 2 ½” x WOF strips.
Assembly Instructions
Follow these steps precisely to assemble your quilt, pressing seams as indicated by arrows for best results.
- Create Strip Sets (SS):
- Take two different F A strips and assemble them together.
- Each resulting SS should measure 4 ½” x 42”.
- You will need to make seventeen SS in total.
- Subcut LPU & SPU from SS:
- Refer to the “Cutting Instructions” above for precise details on subcutting your SS into forty-four LPU (4 ½” x 9”) and forty-two SPU (4 ½” x 5”).
- Assemble Twist Blocks (TB):
- To create each TB, you will assemble one SPU, one F B square, and one LPU.
- The finished TB should measure 9” x 9”.
- You will need to make forty-two TBs.
- Assemble Twist Rows (TR):
- Lay out and assemble six TBs side-by-side to form a TR.
- Each TR should measure 9” x 51 ¼”.
- You will make seven TRs in total.
- Assemble Quilt Center (QC):
- Once you have all seven TRs, assemble them together to form the Quilt Center.
- The assembled QC should measure 51 ¼” x 60”.
Finishing
Complete your quilt with binding and desired quilting.
- Prepare Binding: Piece the seven F C strips end to end to create your continuous binding strip.
- Quilt and Bind: Quilt your project as desired, and then attach the binding to finish the edges.
Important Notes
- All seams should be ¼”.
- Press seams as indicated by arrows throughout the pattern.
- This pattern is intended for personal use only. Duplication or reproduction of any kind, or commercial use, is prohibited without express written permission from the Fat Quarter Shop.
Download Free PDF: