Pattern Description:
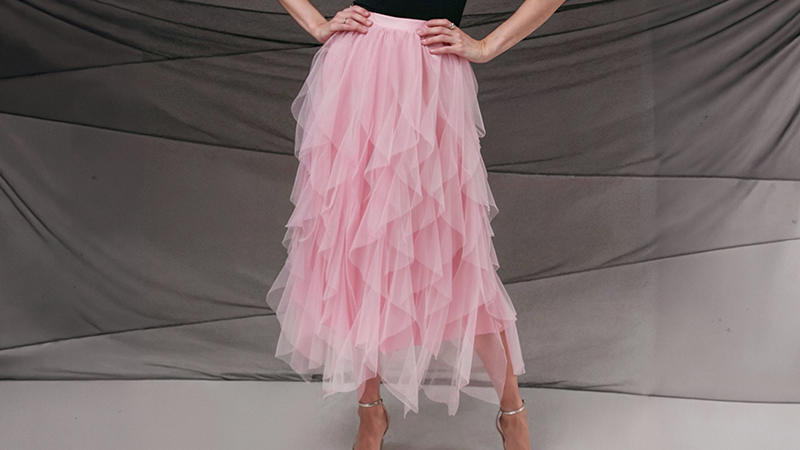
The Roslyn Ruffled Midi Skirt Free Sewing Pattern offers a feminine and graceful design that blends elegance with playful charm.
Crafted with layers of soft nylon tulle and a chiffon lining, this skirt creates a flowing silhouette enhanced by delicate ruffles.
Versatile and timeless, it transitions effortlessly across styles and seasons, making it a perfect wardrobe staple.
Materials Needed & Measurements:
The essential materials and quantities listed below are recommended for sewing a size small ruffled midi skirt:
| Item | Quantity (Size Small) | Specific Detail/Measurement |
| Soft Nylon Tulle | 6 yards | Chintz Pink – Leonardo Collection |
| Polyester High-Multi Chiffon (Lining) | 2 yards | Candy Pink – Netta Collection |
| Italian White Elastic Trimming | 1 yard | 1.75″ |
| Rit All-Purpose Liquid Fabric Dye | 1 each (8oz Bottle) | Rosequartz (Used optionally to dye the elastic waistband) |
| Gutermann Sew All Thread | 1 each (250m) | 305 Petal Pink |
| Roslyn Ruffled Midi Skirt Sewing Pattern | 1 each | MDF452 (Free download) |
Instructions for Making the Roslyn Ruffled Midi Skirt Pattern:
Step 1: Attach Ruffles to Skirt
The ruffles (B) are attached to the tulle skirt piece (A). Sew the inner circle of each ruffle piece onto the skirt, following the designated ruffle placement lines, moving from top to bottom.
Repeat this process for all 7 front ruffles, 7 back ruffles, and 2 side ruffles. As you attach them, ensure that the ruffles overlap each other to the left.
Once all ruffles are secured following the pattern lines, machine baste the top of the ruffles around the top of the skirt waist.
Step 2: Attach Skirt Pieces (Tulle Shell)
Take the tulle skirt pieces (A) and pin them together with the right sides facing each other, so the ruffles are facing inward.
Sew together down the skirt side seams. As you sew, be careful to keep the ruffles away from your seam.
Step 3: Assemble Skirt Lining (Chiffon)
Pin the front and back pieces of the lining (A) together, right side to right side. Because chiffon is a delicate fabric, hand basting the side seams is recommended before proceeding to machine sewing.
Next, machine sew using a straight stitch and a 1/2″ seam allowance. Then, serge the side seams, trimming 1/4″ of the seam allowance as you sew.
Remove the basting stitches. Finally, press the seam allowance to the back and flip the lining to the outside.
Step 4: Hem Skirt Lining
To finish the hem and obtain a clean rolled hem finish, begin by rolling 1/4″ of the lining hem. Press this roll and then sew it. Repeat this process by rolling another 1/4″, pressing it, and sewing again.
Step 5: Attach Skirt Lining to Skirt Shell
Insert the skirt lining, which should have its right side facing out, into the tulle skirt shell, which should have its wrong side facing out.
This positioning ensures that the right sides of the skirt lining and skirt shell are together. Pin both pieces together around the skirt waist.
As you pin, ensure that the side seams of the lining match the side seams of the tulle skirt shell. Finally, machine baste around the skirt waist, making the seam 3/8″ away from the edge.
Step 6: Prepare Elastic Waistband
Measure and Join the Elastic: To determine the necessary elastic waistband length, first measure your waistline. Subtract 5% from this measurement, and then add 1/2″ for seam allowance.
Fold the measured elastic in half so that the short ends meet and the right sides are facing together. Serge these short ends to join them, creating a loop.
Step 7: Mark/Notch Waistband
Mark or snip an 1/8″ notch into the looped waistband to locate the front and both sides. To find the center front, fold and flatten the looped waistband in half with the serged seam on one side; mark the fold.
To find both sides, fold and flatten the looped waistband again so that the serged end and the center front mark meet; mark the new folds on each side.
Step 8: Attach Waistband to Skirt
Place and pin the serged seam of the waistband to the center back of the skirt. Sew and serge the elastic waistband onto the skirt, ensuring the right side of the waistband faces the right side of the skirt.
As you sew, stretch the waistband up to 5%, matching the notches on the waistband with the side seams and center front of the skirt as you go. Finally, serge the waistband seam closed.
Download Free PDF:


