
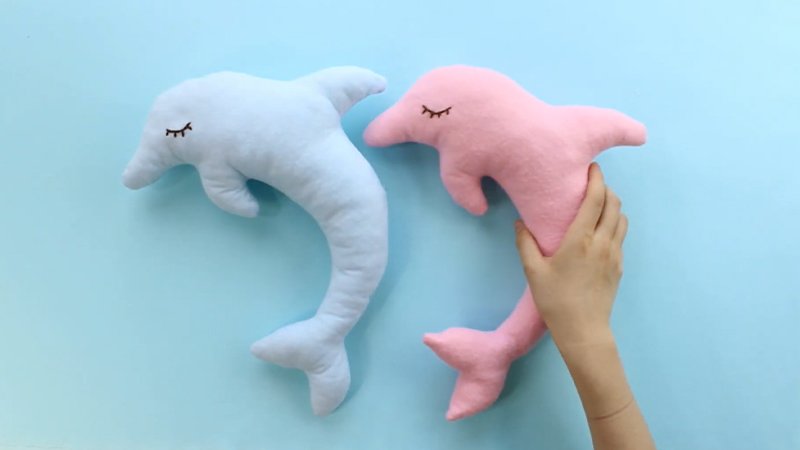
Pattern Description:
This pattern creates a chubby and pudgy baby dolphin plushie with a tiny bottle nose, round body, and bitty dorsal, side, and tail fins.
Measuring just hand-held size, this plush is perfect as a tiny gift for an ocean lover. The project uses skills such as curved sewing, fusible web appliqué, ladder stitch, and basting.
Materials Needed & Measurements:
The finished plush measures about 5” wide, 5” long, and 4” tall.
| Item | Measurement / Description | |
| Main Fabric (Body & Fins) | ¼ yd. of main color fabric | |
| Belly Fabric | ¼ yd. of white fabric | |
| Black Applique Fabric (Eyes) | 3” x 3” piece (e.g., felt, cotton) | |
| White Applique Fabric (Eye Shines) | 2” x 2” piece (e.g., felt, cotton) | |
| Fusible Web | 3” x 3” piece of light or heavy duty fusible web | |
| Thread | Sewing thread to match main fabric, applique fabrics, and accent fabric | |
| Stuffing | Poly-fil stuffing | |
| Tools | Basic sewing tools (sewing machine, scissors, iron, needles, pins, fabric marker, seam ripper) |
Suggested Fabrics:
Plush, stretchy fabrics such as fleece or minky are suggested. Variations like faux fur, cuddle fleece, and micro fleece would work well.
Stretch fabrics create a more squat, round shape when stuffed, whereas non-stretchy fabrics (like felt or cotton) result in an elongated plush.
Instructions for Making the Dolphin Plushie Pattern:
Appliqué and Fin Construction
Preparing and Sewing the Eye Appliqué
To create the eyes, take the fusible web and trace the eye pieces onto the smooth (paper) side. You should trace two of the eye pieces and two of the eye shine pieces.
Fuse the bumpy (adhesive) side of the web onto the wrong side of the appliqué fabrics: use black for the eyes and white for the eye shines. Cut out all eye pieces.
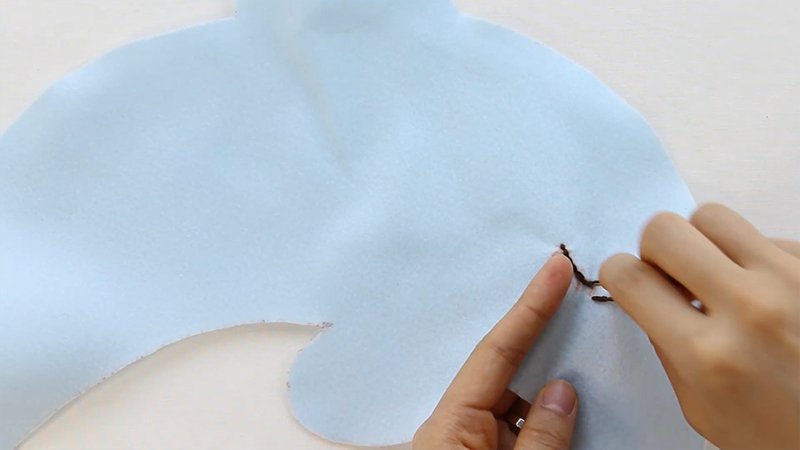
Arrange the cut eye pieces on the Side (A) piece of your main fabric (right sides up). Align the pieces where the placement markings are located.
Since the Side (A) piece is not symmetrical, align the second eye piece by tracing the eye marking onto the back side of the paper pattern to ensure a mirror image.
Fuse the eye pieces in place using an iron; if using polyester or fur fabrics like minky, use a press cloth. Fuse the eye shines after the main eye pieces.
You can secure the appliqué using a zigzag stitch or a straight stitch about 1/8” from the edge. Alternatively, you can use a hand whipstitch, bringing the thread up 1/8” in from the edge and down just outside the shape.
Sewing the Dorsal and Side Fins
The Dorsal Fin (D) is sewn first. Align the two Dorsal Fin pieces with right sides facing. Sew them together along the long curved edge, leaving the short curved edge free for turning. Trim the excess seam allowance at the corner, and turn the fin right side out.
To make the Side Fins (C), align two pieces with right sides facing. Sew them along the long curved edge, leaving the short curved edge open for turning.
Trim the excess seam allowance, turn the fin right side out, and repeat this process with the remaining two pieces to complete two side fins.
Body Assembly
Attaching the Dorsal Fin and Sewing the Sides
If the placement lines have not been transferred, do so now onto one of the Side (A) pieces. Align the open edge of the dorsal fin within these lines.
Baste the fin in place within the seam allowance, ensuring the fin’s tip is pointed towards the back fin.
Layer the other Side (A) piece on top of the first (right sides facing). Pin the top half of the piece, and sew them together along the edge shown in the photo, forming the top of the dolphin, going over the fin during the process.
Attaching the Side Fins and Sewing the Bottom
Transfer the side fin placement lines onto the Bottom (D) piece. Align the open edge of a side fin within these lines and baste it in place within the seam allowance; repeat on the other side for the second fin.
Next, attach the bottom to the sides. If you haven’t already, transfer the circle markings from the Bottom (D) paper pattern to the fabric.
The back seam should line up with the closed circle, and the nose seam should line up with the open circle.
Pin the top of the dolphin to the bottom (right sides facing) all the way around. Sew around these edges, but leave the marked opening for turning (located between the side and back fins).
Stuffing and Finishing

Turning and Stuffing the Dolphin
Trim the excess seam allowance at the outer tail corners and clip into the inner tail corners. Turn the plush right side out through the opening for turning, using a chopstick to define the corners.
To stuff the dolphin, start by stuffing each side of the tail fin using a small ball of Poly-fil stuffing. Then, stuff the nose.
Stuff the rest of the dolphin gradually, pushing the stuffing to the sides and bottom until they are packed tight. Once the sides and bottom are full, stuff the center and work toward the top.
Closing the Opening
Once the plush is stuffed, tuck the seam allowances inside the opening. Use a hand-sewing needle threaded with a knot.
Insert the needle from the inside of the opening and out near one edge to hide the knot. Close the opening using a ladder stitch.
A ladder stitch (sometimes called a slip stitch, hidden stitch, or invisible stitch) involves taking a 1/8” stitch into the fold of one side, then crossing to the other side and taking another stitch, repeating this until the opening is closed.
Finishing the Plush
Finish the seam by stitching a knot. Insert the needle near the finished knot and out of the plush about 1-2” away.
Pull the thread taut while snipping it; the excess thread will sink inside the plush, hiding the tail.
Download Free PDF:


