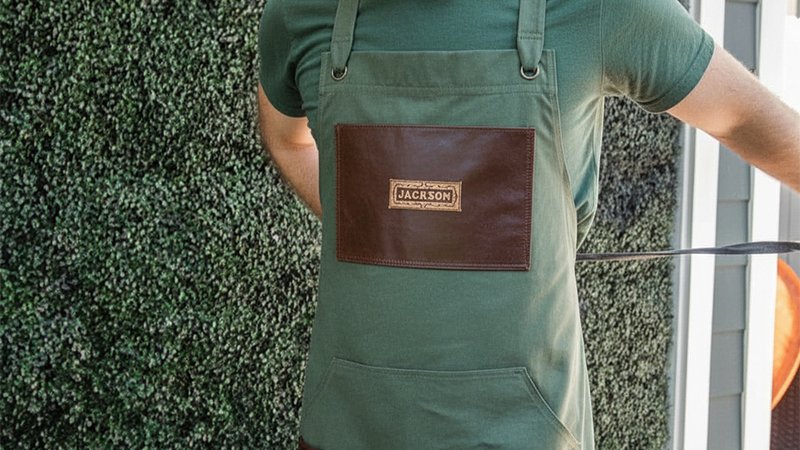
Pattern Description:
This is an easy-to-sew, full, unisex apron pattern designed to keep the wearer clean while cooking or doing BBQ.
It features two layers of fabric for excellent protection against sauce or splatters. A handy hanging loop is included to keep tongs accessible.
The finished apron measures approximately 32 inches long by 30 inches wide, excluding the neck and waist ties.
Materials Needed & Measurements:
- Finished Apron Measurements: Approximately 32” long and 30” wide, not including the neck and waist ties.
Required Materials:
- 1/2 yard each of three coordinating fabrics.
- A 31” x 33” piece of fabric for the back (unbleached muslin was used as an example).
- Thread.
- Free apron cutting template (downloadable).
Cutting Dimensions (All seam allowances are 1/2’’. Dimensions for skinny ties are listed in parentheses):
| Piece | Fabric Source | Dimensions | Notes |
| Apron Backing | Separate Fabric Piece | 31” x 33” | Cut out apron and backing at the same time using the template. |
| Center Apron Strip | Main Fabric | 1 strip 33” x 7” | |
| Waist Tie Strips | Main Fabric | 2 strips 33” x 5” | (33” x 3” for skinny ties) |
| Tong Loop Strip | Main Fabric | 1 strip 10” x 4” | |
| Apron Strips (Inner) | Coordinating Fabric #1 | 2 strips 33” x 7” | Sew next to the main fabric strip. |
| Neck Tie Strips | Coordinating Fabric #1 | 2 strips 18” x 5” | (18” x 3” for skinny ties) |
| Apron Strips (Outer) | Coordinating Fabric #2 | 2 strips 33” x 7” | Outermost apron strips. |
Instructions for Making the Classic BBQ Apron Pattern:
Step 1: Prepare the Waist, Neck Ties, and Tong Strap
- Preparing the Ties: Take each neck and waist tie strip and fold it in half lengthwise, ensuring the right sides are facing.
Stitch across one of the short ends and continue stitching down the entire length of the long edge. Make sure to leave the remaining short end open for turning. After stitching, cut the corners diagonally.
Repeat this process for all tie strips. Once complete, turn the ties right side out, press them flat, and then topstitch along the three finished edges.
- Preparing the Tong Strap: Take the 4” x 10” tong strap strip. Fold it in half lengthwise and press. Open the strip, then press both long raw edges toward the center line.
Next, re-fold the strip lengthwise to form a finished 1” strip, and press again. Topstitch the strap close to both long edges.
Step 2: Sew the Apron Strips Together
This step combines the five 7” x 33” apron strips along with the tong strap.
- Sew the two apron strips cut from Coordinating Fabric #1 to either side of the main apron strip (the center strip).
- Along one side of the three strips that are now sewn together, measure 16” down from the top.
- Fold the tong strap in half and pin it at the 16” mark, making sure the raw edges of the strap are aligned with the raw edge of the apron strips. Baste the tong strap in place.
- Sew the remaining two apron strips (Coordinating Fabric #2, the outermost strips) to the sides of the apron assembly. The tong strap will be secured, sandwiched in between two strips.
- After the strips are sewn, the resulting apron piece should measure 31” wide by 33” tall.
Step 3: Cut Out the Apron Shape
Before proceeding, verify that your 31” x 33” backing piece is cut.
- Fold the 31” x 33” backing piece in half lengthwise (it will measure 33” long x 15.5” tall when folded).
- Fold the main apron strip piece (created in Step 2) in half lengthwise as well.
- Place the main apron piece on top of the backing piece, ensuring the folds are aligned and all raw edges are together.
- Place the free apron cutting template on top of the fabric layers.
- Cut along the curved edge of the template.
Step 4: Assemble and Finish the Apron
- Baste the prepared neck ties to the top edge of the apron. Align the top raw edges of the ties with the top raw edge of the apron, positioning the ties 1/2” away from the side curved edges.
- Baste the prepared waist ties to the sides of the apron, aligning the raw edges. The waist ties should be positioned 1/2” below the curved edges.
- Once the ties are basted, push their ends towards the center of the apron to keep them out of the way during the next stitching step.
- Lay the apron backing over the main apron piece, with right sides facing. Pin all the way around the perimeter.
- Stitch the layers together using the 1/2” seam allowance, but leave an opening of about 6” at the bottom for turning.
- Clip the corners diagonally and clip the curves close to the stitching line.
- Turn the apron right side out through the opening at the bottom. Use a turning tool or chopstick to properly poke out the corners. Press the entire apron.
- To finish, topstitch all the way around the entire apron. This topstitching step closes the turning opening simultaneously.
The Classic BBQ Apron is now complete.
Download Free PDF: