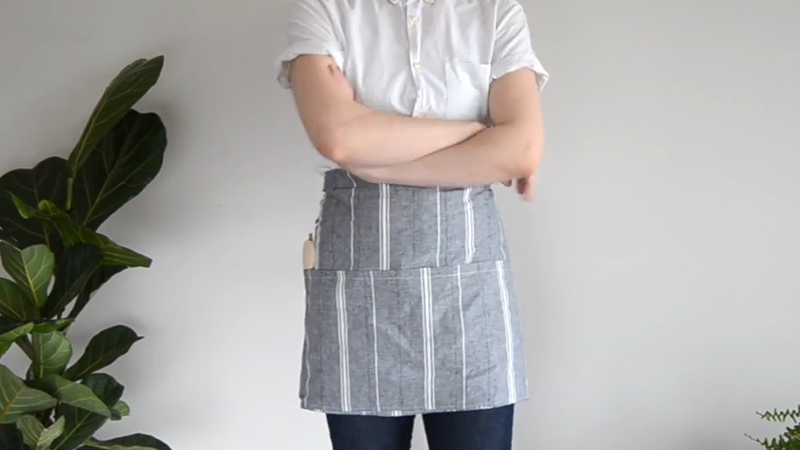
Pattern Description:
This tutorial guides you through making a simple, functional half apron with pockets and a waistband.
It is an excellent beginner sewing project because the directions are straightforward, and it avoids super tricky stitches or features.
You are encouraged to use creativity when choosing colors and patterns for the fabrics. The resulting apron is designed to hold up well to being machine washed, ensuring it can be used repeatedly in the kitchen.
Materials Needed & Measurements:
The necessary supplies and fabric measurements for this half apron pattern are below:
| Material/Equipment | Quantity/Size/Description | |
| Fabric Supplies | ||
| Skirt Fabric | One 16″x36″ piece of cotton fabric | |
| Pocket Fabric | Two 12″x12″ pieces of contrasting fabric | |
| Waistband Fabric | One 54″x5″ piece of contrasting fabric (or longer) | |
| Equipment | ||
| Sewing machine | 1 | |
| Iron + ironing board | 1 set | |
| Self-healing cutting mat | 1 | |
| Fabric scissors | 1 pair | |
| Pinking shears | 1 pair | |
| Straight pins | As needed |
Instructions for Making the Cute Half Apron Pattern:
Preparing and Hemming the Skirt Fabric
The first steps involve cutting and preparing the large skirt piece.
- Cut the Skirt Piece: Cut out the main 16″x36″ piece of cotton fabric designated for the skirt. Use regular scissors for all edges except for the top edge. Use pinking shears for the top edge.
- Press the Side Edges: Set your iron to the cotton setting. Start with the two side edges (the 16″ sections). Fold the side edge over 3/4″ and press. Once this edge is fully ironed, fold the edge a second time and press again. After this double fold, you should see no raw edge. Repeat this double folding and pressing process on the second side.
- Stitch the Sides: Pin your folded side edges in place. Take the fabric to your sewing machine. To begin stitching, make a stitch and then reverse it with a backstitch to secure the thread on the fabric. Slowly stitch along the edge, removing pins as you go. Guide the fabric with your hand, making sure not to push it into the feed dogs. Continue stitching until the end, and be sure to do one or two backstitches to secure the stitch before lifting the needle and presser foot. Repeat this straight stitch along the second side.
- Stitch the Bottom Edge: Repeat the side-stitching process along the bottom edge. Use the iron to press a 3/4″ fold, and then fold and press again for a 3/4″ hem. Take the piece to the sewing machine and perform a straight stitch exactly as you did on the sides. Once complete, the skirt piece should have two hemmed sides and one hemmed bottom.
Creating and Attaching the Pockets
The next section focuses on preparing and securing the pockets.
- Prepare Pocket Hems: Cut the two 12″x12″ pieces of contrasting fabric. Using your iron, press a 3/4″ fold and then press again. This double-folded hem ensures nice, smooth edges when hands are placed in the pockets, preventing fraying. (Alternatively, a single fold can be used if pinking shears are applied to the edges). Use straight pins to hold the pressed hem in place.
- Stitch Pocket Tops: Take both pocket squares to the sewing machine. You will only be stitching along the top edge of each square.
- Attach Pockets: Position the pocket squares onto the skirt piece and pin them in place. Remember that the top edge, which was just stitched, will not be attached to the skirt, as this is the pocket opening. Stitch slowly along the left side, the bottom, and the right side of the first pocket. Repeat this process for the second pocket.
Gathering the Skirt and Assembling the Waistband
The final steps involve cinching the skirt top and attaching the waistband.
- Run a Basting Stitch: Run a basting stitch along the very top edge of the main skirt piece. Do not pull the strings yet.
- Cinch the Skirt: Pull the basting stitch to cinch the fabric. It is crucial to go slowly during this process to avoid breaking the thread. Work the pleats toward the middle until the gathers are satisfactory. Tie off each end of the thread and adjust the pleats so they are evenly distributed.
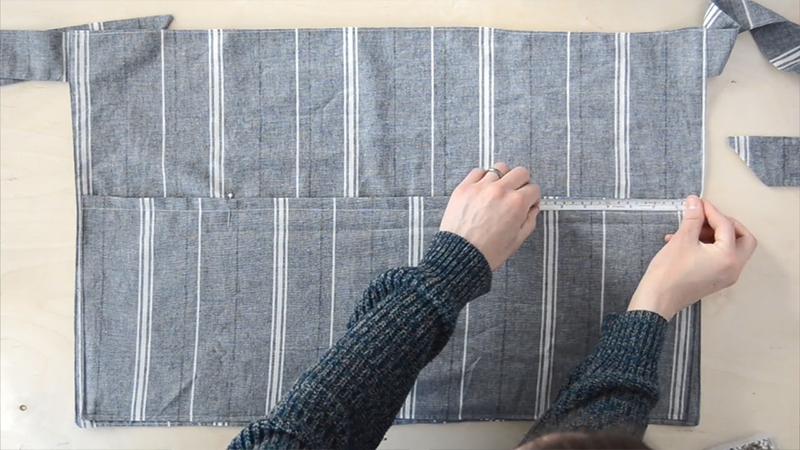
- Prepare the Waistband: Cut the 54″x 5″ (or longer) piece of contrasting fabric for the waistband. Fold this piece in half lengthwise and press it with your iron to create a crisp crease down the center. Open the fabric up. Press a 3/4″ crease into each of the long (54″) edges (do not double-fold these edges). On the short side edges, press a 3/4″ crease and pin these in place.
- Attach the Waistband: Open up the waistband. Find the center of the waistband and place the top, gathered edge of the skirt inside, treating the waistband like Pac-Man and the skirt like a ghost. Fold the band over the skirt edge and pin it in place.
- Final Stitching: Begin stitching at one short side (end) of the waistband. Continue along the edge and around the bottom of the waistband, sewing the skirt portion into the band along the way. Continue until the second short edge is reached, stitch that edge, and secure with a backstitch.
You now have a pretty, new, and functional half apron. The length of the waist tie can be customized if you are making it as a gift or a matching set.
Download Free PDF: